
In my previous article, I introduced Infrastructure as Code (IaC) and discussed its key benefits, including automation, consistency, version control, scalability, and cost savings. That article focused on Terraform, an open-source IaC tool that enables defining, managing, and provisioning cloud infrastructure using the HashiCorp Configuration Language (HCL). I provided a step-by-step guide to creating an EC2 instance with Terraform, which you can find here.
In this article, we'll shift our focus to AWS CloudFormation, a widely-used IaC tool in the AWS ecosystem. AWS CloudFormation allows you to model, provision, and manage your AWS infrastructure using JSON or YAML templates. It offers a consistent, automated approach to managing infrastructure, enabling you to create and update resources in a controlled and predictable manner.
Throughout this article, we'll cover the basics of AWS CloudFormation, demonstrating how to create and manage AWS resources using this powerful tool. By the end of this article, you'll better understand AWS CloudFormation and be equipped to decide if it's the right IaC solution for your needs.
Why AWS CloudFormation?
Imagine building a web app on AWS, using EC2 for compute, S3 for storage, RDS for managed databases, and Lambda for API requests. Managing these resources separately and configuring them to work together can be complex and time-consuming.
As your application gains traction globally, availability becomes crucial. To improve it, you can replicate the application in multiple AWS regions. This ensures users can access your app even if one region experiences an outage. However, replication involves duplicating resources and configurations across regions, which can be challenging.
This is where AWS CloudFormation comes in:
Solving app replication: CloudFormation templates define resources and configurations, allowing you to provision identical resources in different regions consistently and repeatedly. This ensures consistency and reduces configuration drift.
Solving resource management: CloudFormation automates resource provisioning and configuration, making it easier to create, update, and delete resources. Deleting a stack removes all associated resources, ensuring efficient cleanup.
By using CloudFormation, managing a collection of resources as a single unit becomes simpler, streamlining the process of maintaining consistency across your infrastructure.
CloudFormation Concepts
In AWS CloudFormation, stacks and templates are essential components to define and manage your infrastructure. Let's use an analogy to help illustrate these concepts:
Templates
Imagine that you're constructing a building. A template can be thought of as the blueprint for your building. The blueprint contains detailed information about the structure, such as the number of floors, rooms, doors, and windows. Similarly, a CloudFormation template is a JSON or YAML formatted text file that describes the AWS resources and their properties required for your application or infrastructure.
Here's a CloudFormation example template in YAML format that defines an Amazon S3 bucket:
YAML:
Resources:
  S3Bucket:
    Type: AWS::S3::Bucket
    Properties:
      BucketName: my-sample-bucket
or JSON:
{
  "Resources": {
    "S3Bucket": {
      "Type": "AWS::S3::Bucket",
      "Properties": {
        "BucketName": "my-sample-bucket"
      }
    }
  }
}
Stacks
Continuing with the building analogy, a stack can be thought of as the actual constructed building based on the blueprint. It is a collection of AWS resources that are created and managed as a single unit when you provide the template. In the context of CloudFormation, a stack is the live instantiation of a template, where each resource defined in the template is created and associated with the stack.
For instance, when you create a stack using the example template above, CloudFormation will create an S3 bucket with the specified name my-example-bucket. The stack will be responsible for managing the lifecycle of this bucket, such as updating its properties or deleting it when the stack is deleted.
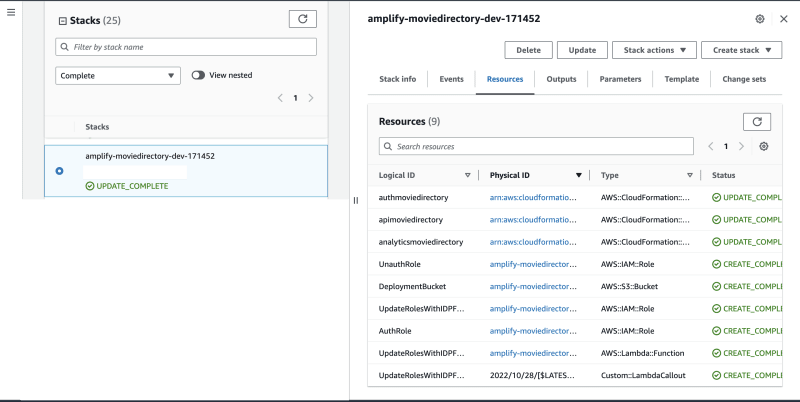
To provide more clarity, when you build web or mobile applications using Amplify and select resources like Cognito for authentication, Analytics for notifications, Datastore for GraphQL APIs, or any other resources for your app, Amplify automatically creates CloudFormation templates based on your choices. These templates are then deployed to an S3 bucket, and CloudFormation is used to create, update, or delete the corresponding stack.
In other words, Amplify simplifies the process of managing AWS resources for your application by generating and managing CloudFormation templates on your behalf. This makes it easier to deploy and manage your application's infrastructure.
When you look at your CloudFormation dashboard, you will see the stacks that have been created or managed by Amplify, along with any other stacks you've created manually or through other means.
You can find the Template on the public gist.
Change Sets
Imagine you have a blueprint (your CloudFormation template) of a house (your stack). The blueprint contains all the details about the house, such as the number of rooms, the layout, and the materials used for construction.
Now, you decide to make some changes to the house, like adding a room or changing the layout of the living room. Instead of immediately making the changes to the house itself, you first update the blueprint to reflect the desired changes. Change sets in AWS CloudFormation are like comparing the updated blueprint with the original one. They allow you to see the differences between the two versions, such as the new room or the altered living room layout.
With the change sets, you can review the changes and understand how they will impact the house before actually making the updates. This way, you can be sure that you're making the right modifications without causing any unintended damage or altering the house in an undesired manner. After reviewing the change set (the differences between the two blueprints), you can decide whether to apply the changes to the house or cancel them. If you're satisfied with the changes, you can update the house according to the new blueprint. If you decide against the modifications, you can discard the change set and leave your house unchanged.
Creating your first AWS CloudFormation Template
You should have these prerequisites to follow through with the rest of this article.
- AWS Account: Sign up for an AWS account if you don't have one already.
- AWS CLI: Install and configure the AWS CLI on your local machine. For instructions, follow this guide: https://docs.aws.amazon.com/cli/latest/userguide/install-cliv2.html
- Code editor (preferably VS Code)
- Enable AmazonS3FullAccess and AWSCloudFormationFullAccess Permission for your IAM user.
Let’s cover the basic components of a CloudFormation template and walk through an example of creating an S3 bucket. If you went through this GitHub Gist that contains a sample template, you’ll notice these components:
- Resources: The core component of a CloudFormation template is the resources section, where you define the AWS resources you want to create and manage. Each resource has a unique logical ID and a resource type that identifies the AWS service it belongs to.
- Parameters: CloudFormation parameters allow you to pass values into your template, making it customizable and reusable. They enable you to specify dynamic values, such as the name of the S3 bucket or the instance type for an EC2 instance.
- Outputs: CloudFormation outputs are used to export values from the created resources, making them accessible outside of the stack. They can be used to display specific information, like the URL of a created S3 bucket or the public IP address of an EC2 instance.
Create an s3_bucket_template.yaml file and add these lines of code:
AWSTemplateFormatVersion: '2010-09-09'
Description: 'A simple AWS CloudFormation template to create an S3 bucket'

Parameters:
  BucketName:
    Description: 'The name of the S3 bucket'
    Type: String

Resources:
  MyS3Bucket:
    Type: 'AWS::S3::Bucket'
    Properties:
      BucketName: !Ref BucketName

Outputs:
  BucketURL:
    Description: 'The URL of the created S3 bucket'
    Value: !GetAtt MyS3Bucket.WebsiteURL
In this template:
- We define a parameter
BucketNameof type String to allow users to specify the desired name for the S3 bucket. - Under the
Resourcessection, we define a resource of typeAWS::S3::Bucketwith a logical IDMyS3Bucket. We use the!Reffunction to reference the value of theBucketNameparameter. - In the
Outputssection, we define an outputBucketURLthat displays the URL of the created S3 bucket using the!GetAttfunction to retrieve theWebsiteURLattribute from theMyS3Bucketresource.
To deploy the CloudFormation template you just created, follow these steps:
-
Create a CloudFormation stack using the AWS CLI and your template file. Replace
<STACK_NAME>with a unique name for your stack and<BUCKET_NAME>with the desired name for your S3 bucket:
aws cloudformation create-stack --stack-name <STACK_NAME> --template-body file://s3_bucket_template.yaml --parameters ParameterKey=BucketName,ParameterValue=<BUCKET_NAME>
Ensure the s3 bucket name is very unique. Something like this my-unique-bucket-8f3gh1t2-202434537 to avoid the stack creation from failing.
💡 To generate a unique name, you should use a combination of a prefix, a random string, and a timestamp.
- The AWS CLI command will return a
StackIdin the response, indicating that the stack creation has started. You can monitor the progress of the stack creation in the AWS CloudFormation console. If the stack creation fails, navigate to the Events tab and check the log. -
Once the stack creation is complete, you can retrieve the output value for the
BucketURLby running the following command, replacing<STACK_NAME>with the name of your stack:
aws cloudformation describe-stacks --stack-name <STACK_NAME> --query "Stacks[0].Outputs[?OutputKey=='BucketURL'].OutputValue" --output text
You should see the output like this on your terminal

Or on your Amazon S3 console:
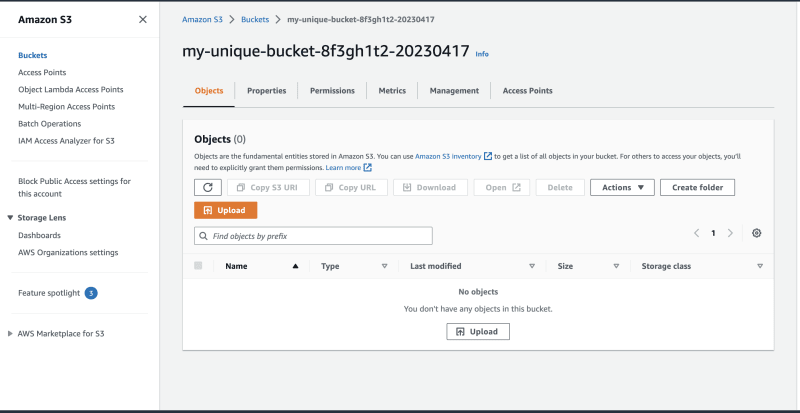
For the purpose of the article, i won’t be creating any objects (🙂).
Updating the CloudFormation Template
In the S3 bucket example, let's say you want to update the stack to enable versioning for the created S3 bucket. Versioning is a feature in Amazon S3 that allows you to preserve, retrieve, and restore every version of every object in your bucket.
You will have to modify the CloudFormation template to include the versioning configuration and then update the stack using the AWS CLI.
Add the VersioningConfiguration property to the MyS3Bucket resource in your s3_bucket_template.yaml file:
    AWSTemplateFormatVersion: '2010-09-09'
    Description: 'A simple AWS CloudFormation template to create an S3 bucket'

    Parameters:
      BucketName:
        Description: 'The name of the S3 bucket'
        Type: String
        Default: MyS3Bucket

    Resources:
      MyS3Bucket:
        Type: 'AWS::S3::Bucket'
        Properties:
          BucketName: !Ref BucketName
          VersioningConfiguration:
            Status: Enabled

    Outputs:
      BucketURL:
        Description: 'The URL of the created S3 bucket'
        Value: !GetAtt MyS3Bucket.WebsiteURL
Run the following command to update the stack:
aws cloudformation update-stack --stack-name my-new-s3-stack --template-body file://s3_bucket_template.yaml --parameters ParameterKey=BucketName,ParameterValue=your-unique-bucket-name
Ensure you monitor the progress of the stack update using the AWS Management Console. The stack update is complete when the stack status changes to UPDATE_COMPLETE.
After the stack update is complete, the S3 bucket will have versioning enabled.
Deleting the Stack
Deleting a CloudFormation stack means removing all the resources associated with the stack and the stack itself.
💡 This is important because keeping unused resources running can increase your AWS costs. Deleting a stack helps you optimize costs by removing no longer required resources.
Let’s go ahead and delete the S3Stack
Run this command:
aws cloudformation delete-stack --stack-name my-new-s3-stack
Replace my-new-s3-stack with the name of the stack you want to delete. This command will initiate the deletion process, and AWS CloudFormation will start removing the resources associated with the stack.
Please note that the deletion process may take a few minutes.
To check the progress of the stack deletion, you can use the AWS Management Console or the following AWS CLI command:
aws cloudformation describe-stacks --stack-name my-new-s3-stack
I want to keep practicing…
If you want to dive deeper, you must learn by creating more stacks and writing templates that actually do something. Here are some ideas:
- Get Started with CloudFormation from the docs:
Get started - AWS CloudFormation
- Use AWS CloudFormation Designer to create a basic LAMP server:
Walkthrough: Use AWS CloudFormation Designer to create a basic web server - AWS CloudFormation
- Static website: Create a simple static website hosted on Amazon S3 and distributed using Amazon CloudFront. Use CloudFormation to provision and configure the S3 bucket, CloudFront distribution, and Route53 records for custom domain setup.
- Serverless REST API: Build a serverless REST API using AWS Lambda, Amazon API Gateway, and Amazon DynamoDB. Use CloudFormation to create and configure the necessary resources, including Lambda functions, API Gateway, and DynamoDB tables.
- Scalable web application: Design a scalable web application using Amazon EC2 instances, Elastic Load Balancing, and Amazon RDS. Utilize CloudFormation to create and manage Auto Scaling groups, load balancers, and RDS instances.
Before you stop reading…
Here is the full list of best practices to consider while working with CloudFormation:
AWS CloudFormation best practices - AWS CloudFormation
Some of the practices that stood out for me based on my recent experience are:
- Use IAM to control access: You should use IAM with AWS CloudFormation to specify what AWS CloudFormation actions users can perform, such as viewing stack templates, creating stacks, or deleting stacks.
- Do not embed credentials in your templates: Rather than embedding sensitive information in your AWS CloudFormation templates, we recommend you use dynamic references in your stack template
- Manage all stack resources through AWS CloudFormation: After you launch a stack, use the CloudFormation console, API, or AWS CLI to update resources in your stack. Don't make changes to stack resources outside of CloudFormation.
- Validate templates before using them: Before you use a template to create or update a stack, you can use CloudFormation to validate it. For the AWS CLI or CloudFormation API, use the aws cloudformation validate-template command or ValidateTemplate operation.
So far, this is what I know about AWS CloudFormation…
AWS CloudFormation is a powerful and versatile Infrastructure as Code tool that allows you to model, provision, and manage your AWS infrastructure efficiently. In this article, we delved into the basics of CloudFormation, explored its key components, and walked through a practical example of creating, updating, and deleting an S3 bucket using templates, parameters, and outputs.
By leveraging AWS CloudFormation, you can enjoy the benefits of automation, consistency, version control, scalability, and cost savings when managing your cloud infrastructure. This article has provided a foundation for understanding AWS CloudFormation and inspired you to further explore and experiment with this tool.

Top comments (0)