Jmeter #CosmosDatabase #PeroformanceTesting #databasetesting #Luxoft #Poland
Working with Luxoft for over a year, I have gained invaluable experience in my 11+ years of overall professional journey. The culture of knowledge sharing at Luxoft not only fosters continuous learning but also plays a vital role in our collective success.
In today’s fast-paced software development industry, ensuring the optimal performance of your product is paramount. However, as the sole tester on your project or even within the entire company, selecting the right performance testing tool can feel overwhelming. With a vast array of options available, making an informed choice is crucial. This article aims to demystify the process by exploring Apache JMeter — an exceptionally powerful and user-friendly tool for performance testing. I will provide a step-by-step guide to help you become familiar with JMeter and successfully execute your first performance test.
I have had the opportunity to work extensively on performance projects using Jmeter.
Though jmeter is very popular among us but still we don't have lot of documentation for cosmos database so here I’m sharing my experience of Jmeter with cosmos which I have recently used in my project .
Azure Cosmos DB is a globally distributed, multi-model database service offered by Microsoft Azure. It is designed to provide high availability, scalability, and low-latency access to data for mission-critical applications.
Apache JMeter™ can also perform load testing against Azure Cosmos DB (SQL API).
Azure Cosmos DB (SQL API) is operated by the REST API.
So, it will be tested using the HTTP request sampler in Apache JMeter™.
For the request to be successful, it must be made with the appropriate method, header, and body.
Outline of steps
- Install jmeter
- Install the plugin for Microsoft Azure.
- Cosmos database set up configuration.
- Add a Thread Group.
- HTTP Header Manager .
- User Parameters.
- JSON Extractor.
- Extract the test data in CSV format.
- Save the Response.
- Run the test plan and check the result
- Detailed steps with real-time examples :
Step 1: Download and Install JMeter
Download the latest stable version of JMeter from (https://jmeter.apache.org/).
Step 2 : Install Azure CosmosDB Plugin
To enable the connectivity download “Azure backend listerner” plugin from JMeter Plugins website (https://jmeter-plugins.org/) or you can use the JMeter Plugins Manager to install it.
Place it in lib/ext directory of your JMeter installation. Next restart JMeter to load the plugin.

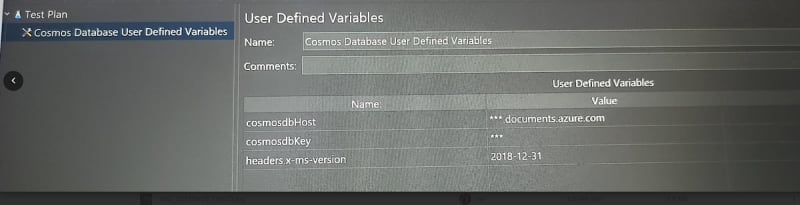
Step 3: Cosmos database set up configuration
You can get all the below details from the cosmos database, go to the database and check the cosmos database properties.
Add > Config Element > User Defined Variables
cosmosdbHost: Hostname of Cosmos DB (***.documents.azure.com)
cosmosdbKey: Key of Cosmos DB
You can use either the primary or secondary key.
headers.x-ms-version: Version of Cosmos database

Step 4: Add a Thread Group
Add>Threads(Users)> SetUp Thread Group
This will be set up once and can be used many times throughout the test plan. Eg data extracted/saved from this script can be used in various thread groups.
Protocol : https/http ,ServerName or IP : you can directly provide here e.g test.com or you can define a variable and use it here e.g ${cosmosdbHost},
Method : POST ( small correction in SS :( )and Path .
Note : all these varibles are defined in

Step 5: HTTP Header Manager
Configure the parmaters (x-ms-version, authorizaton and other parameters) as per below screenshot .


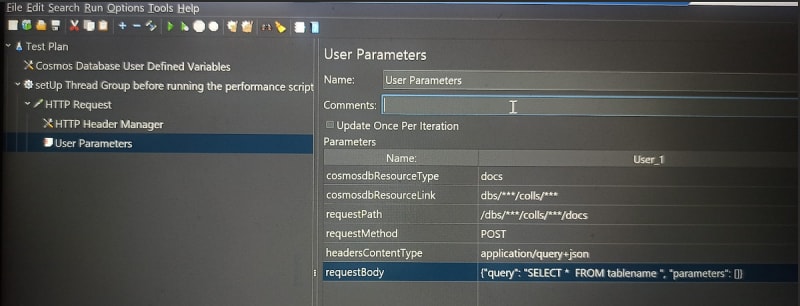
Step 6: User Parameters

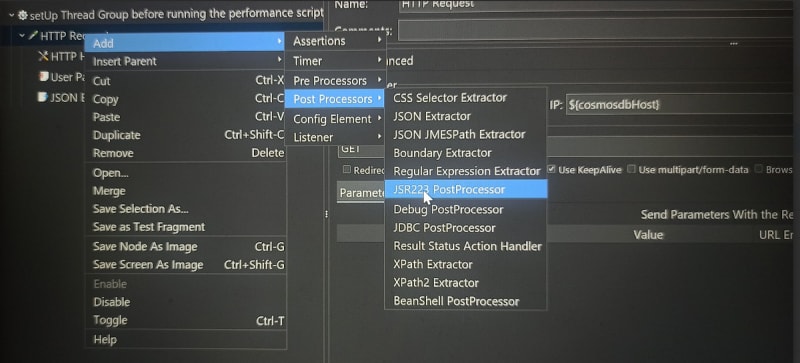
Step 7 : JSON Extractor
Here I have given two examples but you can extract as many as you want. Also you can change the JSON expression ( may be we can cover JSON expression in next article )


Step 8 : Extract the test data in csv format.


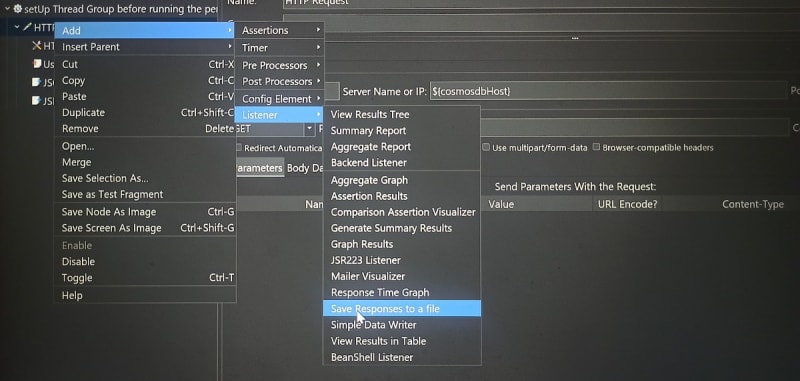
Step 9: Save the Response:
Save the response in txt or json format . You can also define a reference varible for response file name in the variable section and use a variable here eg ${responseFilePath}
Go to Http request >> Add>Listener> Save Response to a file and provide a file name and location else it will be saved in Jmeter bin folder ( default location )

Step 10 : Run the test plan and check the result
Testing Azure Cosmos DB with Apache JMeter provides valuable insights into the performance and reliability of your database deployments. By following the basic steps outlined in this article, you can establish a strong foundation for testing and ensuring optimal performance of your Cosmos DB applications. Harness the power of JMeter to validate the behavior of your Cosmos DB and deliver robust and scalable solutions.
Stay tuned for the next article where I will cover JSON extractor in detail :)

Top comments (0)