neo.mjs concepts
This Concepts / Introduction guide is intended for new users who have read the "buzz-word" table on the
Main Readme File and would like to learn more before following the
Getting Started Guide.
Content
- Worker Setup
- No Javascript Builds (Development Mode)
- No string based pseudo XML templates
- JSON based virtual DOM
- JSON based Component Trees
- Combining Component and VDOM Trees
- What to do next?
Worker Setup
The framework is using 4 threads by default:
- top (Main): Creating the workers, manipulating the real DOM, forwarding UI events to App
- App: Most parts of the framework & your apps live here
- Data: Responsible for the BE connections
- Vdom: Converting the virtual DOM into HTML, as well as calculating delta updates
The best way to get a feeling for workers is using the Google Chrome Dev Tools (Console).
In case you open the neo.mjs Docs App
(or any other neo.mjs app), you will get a dropdown menu where you can pick the console scope:

The default scope (top) will show the (console) logs inside all threads.
Most parts of the neo.mjs framework as well as the apps which you create will run within the App thread.
Hint: Type Neo and hit return inside the default view (top). You will see the parts of Neo which are used inside the main
thread. Neo.component won't exist here. Now use the dropdown and switch into the App thread. Type Neo and hit return again.
Now you will see a completely different version of the Neo namespace object. Neo.component will exist here and you can
use methods like Neo.getComponent('myId') directly.
What is the reason to use multiple threads?
As you know, (almost) all computers and mobile devices have several cores / CPUs.
By default, browsers will only use one of them.
This means that in case a lot is going on inside your App UI one CPU could go up to 100%, your animations get laggy or
your UI might even freeze, while the other CPUs are idle.
To ensure this does not happen you want to keep the Main thread as idle as possible.
To quote the neo.mjs Story:
In case you take a look at the web workers page on Wikipedia,
you will find the following quote:"The simplest use of workers is for performing a computationally expensive
task without interrupting the user interface."At this point, all other web-based UI frameworks are still struggling with performance,
especially in case you are building big apps. There are many hidden background tasks running
which can slow down your beautiful animations or even worse: single threaded applications can have memory
leaks resulting in browser-freezes after using them for a while (either the one and only core which is used
runs at 100% or the memory usage gets too extreme).Looking back at the Wikipedia quote, Rich Waters & I came to the conclusion that the most expensive tasks are
the framework & the apps itself.So we asked ourselves the question:
"What if a framework & all the apps you build would run inside a separate thread?"With this idea, the neo.mjs project was born.
Summary: Since the Main thread is as idle as possible, it is close to impossible that your UI will get laggy
or even freezes. In case a lot is going on on the Javascript side of things, the worst that could happen is that
the App thread runs at 100% which will not affect the Main thread.
No Javascript Builds (Development Mode)
This probably sounds really old school (pre ES6+ times) at first:
You edit a JS source file, refresh the page and you get your changes right away.
No build process(es), no hot module replacements or whatever.
Design Goal: No transpiled Javascript Code, at least for the Development Mode.
As an example, let's take a quick look at the Gallery inside the Real World App version 2 (early stage, in progress).
This is (the start of) the Gallery source code:
import {default as ClassSystemUtil} from '../util/ClassSystem.mjs';
import {default as Collection}      from '../collection/Base.mjs'
import {default as Component}       from './Base.mjs';
import GalleryModel                 from '../selection/GalleryModel.mjs';
import NeoArray                     from '../util/Array.mjs';
import Store                        from '../data/Store.mjs';

/**
 * @class Neo.component.Gallery
 * @extends Neo.component.Base
 */
class Gallery extends Component {
    static getConfig() {return {
        /**
         * @member {String} className='Neo.component.Gallery'
         * @private
         */
        className: 'Neo.component.Gallery',
        /**
         * @member {String} ntype='gallery'
         * @private
         */
        ntype: 'gallery',
        /**
         * The amount of visible rows inside the gallery
         * @member {Number} amountRows_=3
         */
        amountRows_: 3,
        /**
         * The background color of the gallery container
         * @member {String} backgroundColor_='#000000'
         */
        backgroundColor_: '#000000',
        /**
         * @member {String[]} cls=['neo-gallery', 'page', 'view']
         */
        cls: ['neo-gallery', 'page', 'view'],
        /**
         * True disables selection of  gallery items
         * @member {Boolean} disableSelection=false
         */
        disableSelection: false,
        /**
         * The image height of the gallery
         * @member {Number} imageHeight=160
         */
        imageHeight: 160,
        /**
         * The image width of the gallery
         * @member {Number} imageWidth=120
         */
        imageWidth: 120,
        /**
         * @member {Object} itemTpl_
         */
        itemTpl_: {
            cls     : ['neo-gallery-item', 'image-wrap', 'view', 'neo-transition-1000'],
            tabIndex: '-1',
            cn: [{
                tag  : 'img',
                cls  : [],
                style: {}
            }]
        },
        /**
         * The unique record field containing the id.
         * @member {String} keyProperty='id'
         */
        keyProperty: 'id',
        /**
         * Additional used keys for the selection model
         * @member {Object} keys
         */
        keys: {},
        /**
         * The max amount of store items to show
         * @member {Number} maxItems_=300
         */
        maxItems_: 300,
Full component.Gallery Source Code
Now let us take a look at the source code inside the browser:
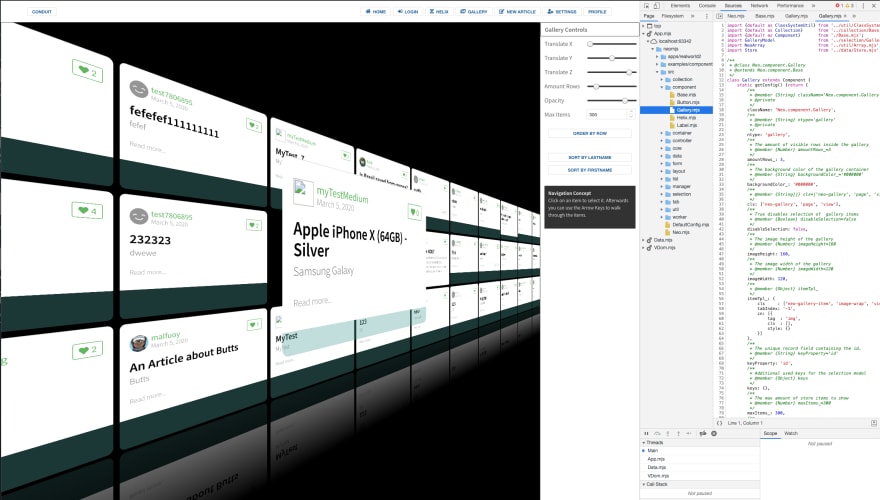
Expand the image and take a close look at the Chrome Dev Tools:
- The source code is 1:1 the same
- If you look at the left console tab (Page), you will see the 4 threads again. The Gallery code is inside the App thread.
Summary: The design goal to not transpile Javascript code (at least inside the development mode for now),
has several pros & cons. neo.mjs is the first UI framework to use JS modules inside workers,
which just got enabled in Google Chrome v80+.
Pros:
- You get an unmatched debugging experience, since you can debug the real code (no source-maps needed, no webpack interferences etc.)
- Browsers can cache JS modules and native packaging is in development
- Your code base is modular
Cons:
- neo.mjs is not using TypeScript (you could do it for your own app code, in case you want to use a build process)
- Firefox & Safari do not support JS modules inside workers yet, so the development mode only runs in Chrome v80+. Of course the dist (dev&prod) versions do run fine in FF & Safari as well.
- Several npm dependencies can not easily get used, since they do not use a correct ES6 import syntax (e.g. missing file names)
No string based pseudo XML templates
One example from the React Website:
  render() {
    return (
      <div>
        <h3>TODO</h3>
        <TodoList items={this.state.items} />
        <form onSubmit={this.handleSubmit}>
          <label htmlFor="new-todo">
            What needs to be done?
          </label>
          <input
            id="new-todo"
            onChange={this.handleChange}
            value={this.state.text}
          />
          <button>
            Add #{this.state.items.length + 1}
          </button>
        </form>
      </div>
    );
  }
Everyone has seen template based code like this and... it has to go away!
Sadly, all other frameworks I am aware of are still using string based templates.
The advantage is, that the code looks like real HTML and is compact.
I think of it like comparing XML with JSON based APIs.
By now JSON has almost replaced all XML based APIs and for good reason.
So, what is the problem with string based templates?
I could probably write a small book on this one, but to keep it short:
- You should not mix markup with variables or even JS methods
- You can get scoping issues with methods defined inside templates
- The whole concept of defining web components which then get used as string based markup which controls the instantiation of the matching JS instances is terrible (e.g. for re-using them)
- You need to parse these templates, e.g. when a variable changes or in case you want to compare 2 component states
to get the delta updates. This is slow!
- To be fair: for trivial components, this can be done at build time (e.g. Svelte). However, the more complex components get, the less sense it makes (too many variations, imagine the neo.mjs Helix as a template)
- You can not dynamically change template structures, except with using Factory / Composition patterns
So, what is the alternative?
JSON based virtual DOM
Let's take a look at component.Button:
_vdom: {
    tag: 'button',
    cn : [
        {tag: 'span', cls: ['neo-button-glyph']},
        {tag: 'span', cls: ['neo-button-text']}
    ]
}
Defining the HTML markup via JSON (nested JS objects & arrays to be precise) might look a little bit less compact,
but the advantages are obvious: manipulating JS objects with JS is as easy as possible.
You don't need something like:
<tpl for="listItems"><subitem></subitem></tpl>, but you can use a real JS for loop.
You don't need to insert variables using curly brackets.
You don't need to mix the markup code with JS methods.
To better get the idea, let us take a look at a more complex example:
component.DateSelector
When creating a new component, you will define a "vdom skeleton" first to cover the static parts.
_vdom: {
    tabIndex: -1,
    cn: [{
        cls: ['neo-dateselector-header'],
        cn : [{
            cls: ['neo-nav-button', 'neo-prev-button']
        }, {
            cls: ['neo-center-region'],
            cn : [
                {cls: ['neo-month-text']},
                {cls: ['neo-year-text']}
            ]
        }, {
            cls: ['neo-nav-button', 'neo-next-button']
        }]
    }, {
        cls: ['neo-dateselector-content'],
        cn : []
    }]
}
Afterwards, you can manipulate or enhance it as you like to:
changeYear(increment) {
    let me = this,
        vdom, y;

    if (!me.useAnimations) {
        me.recreateContent(0, increment);
    } else {
        if (!me.isUpdating) {
            me.isUpdating = true;

            Neo.main.DomAccess.getBoundingClientRect({
                id: me.getCenterContentEl().id
            }).then(data => {
                vdom = me.vdom;
                y    = increment < 0 ? 0 : -data.height;

                vdom.cn.push({
                    cls: ['neo-relative'],
                    cn : [{
                        cls: ['neo-animation-wrapper'],
                        cn : [{
                            cls: ['neo-dateselector-content'],
                            cn : []
                        }],
                        style: {
                            flexDirection: 'column',
                            height       : 2 * data.height + 'px',
                            transform    : `translateY(${y}px)`,
                            width        : data.width + 'px'
                        }
                    }]
                });

                me.updateHeaderYear(increment, true);

                me.createDayViewContent(true, vdom.cn[2].cn[0].cn[0]);
                vdom.cn[2].cn[0].cn[increment < 0 ? 'unshift' : 'push'](vdom.cn[1]);
                vdom.cn.splice(1, 1);

                me.promiseVdomUpdate(vdom).then(() => {
                    y = increment < 0 ? -data.height : 0;
                    vdom.cn[1].cn[0].style.transform = `translateY(${y}px)`;
                    me.vdom = vdom;

                    setTimeout(() => {
                        vdom.cn[1] = vdom.cn[1].cn[0].cn[increment < 0 ? 1 : 0];
                        me.triggerVdomUpdate();
                    }, 300);
                });
            });
        } else {
            me.cacheUpdate();
        }
    }
}
Take a look at the "Virtual DOM & Virtual Nodes" Tutorial inside the
neo.mjs Docs App for more infos.
JSON based Component Trees
Exactly like the virtual DOM, the component trees are JSON based as well.
For an example, let's take a look at the
Docs App MainContainer
items: [HeaderContainer, {
    ntype : 'container',
    flex  : 1,
    layout: {ntype: 'hbox', align: 'stretch'},

    items: [{
        ntype   : 'tab-container',
        cls     : ['neo-docs-navigation-tab-container', 'neo-tab-container'],
        minWidth: 290,
        width   : 290,

        items: [{
            module   : ApiTreeList,
            listeners: {leafItemClick: 'onApiListLeafClick'},
            reference: 'api-treelist',

            tabButtonConfig: {
                iconCls: 'fa fa-code',
                text   : 'API'
            }
        }, {
            module   : TutorialsTreeList,
            listeners: {leafItemClick: 'onTutorialListLeafClick'},
            reference: 'tutorials-treelist',

            tabButtonConfig: {
                iconCls: 'fa fa-hands-helping',
                text   : 'Tutorials'
            }
        }, {
            module   : ExamplesTreeList,
            listeners: {leafItemClick: 'onExamplesListLeafClick'},
            reference: 'examples-treelist',

            tabButtonConfig: {
                iconCls: 'fa fa-desktop',
                text   : 'Examples'
            }
        }]
    }, {
        module   : ContentTabContainer,
        flex     : 1,
        reference: 'content-tabcontainer'
    }]
}]
Dynamically generating or changing these component trees using JS is easy.
Containers also provide you with some convenience methods like add(), insert(), remove() etc.
Taking a look at the API section inside the
neo.mjs Docs App will help you.
Combining Component and VDOM Trees
Since both trees are defined as JSON, you can easily mix them.
Example: RealWorld2 App HomeContainer
items: [{
    ntype : 'component',
    cls   : ['banner'],
    height: 170,
    vdom  : {
        cn: [{
            cls: ['container'],
            cn : [{
                tag : 'h1',
                cls : ['logo-font'],
                html: 'conduit v2'
            }, {
                tag : 'p',
                html: 'A place to share your knowledge.'
            }]
        }]
    }
}, {
    module: Container,
    cls   : ['neo-container', 'center', 'container'],
    flex  : 1,
    layout: {ntype: 'hbox', align: 'stretch'},
    items: [{
        module     : TabContainer,
        activeIndex: 1,
        flex       : 3,

        items: [{
            ntype          : 'component',
            cls            : ['neo-examples-tab-component'],
            style          : {padding: '20px'},
            tabButtonConfig: {iconCls: 'fa fa-user-ninja', text: 'Your Feed'},
            vdom           : {innerHTML: 'todo'}
        }, {
            module         : PreviewList,
            tabButtonConfig: {iconCls: 'fa fa-globe-europe', text: 'Global Feed'}
        }]
    }, {
        module: TagListComponent,
        flex  : 1
    }]
}]
What to do next?
- In case you like the neo.mjs concepts and would like to see more in the future, adding a github star to this repository is highly appreciated.
- Take a look at the Online Examples (Desktop).
- Follow the Getting Started Guide to get the framework & examples running locally.
- Open Source projects rely on your help, take a look at the Contributing Guide
- neo.mjs is still in need of Sponsors to speed up the development: Sponsors Page
Best regards,
Tobias

Top comments (0)