By now, most people use a password as a way to login into an account. But we’ve all seen the problems with passwords. For example, they need to be memorable but not easy to guess.
Many people, including myself, have used passwords that are easy to remember. Unfortunately, this makes it very easy for other people to guess your password and hack your account.
Luckily, in recent years, there have been great strides made in security that allows users to generate very hard-to-guess passwords and store them securely. But passwords themselves have been around for a long time, and maybe there’s another way to have access to an account without having to remember a string of text.
What if you could use something unique to you that can not be hacked or stolen?
The team over at TypingDNA has thought about this problem in depth. Luckily for us, they came up with a great way to authenticate you as a user, using the way you type.
The following post will cover how the TypingDNA Authentication API works and how to integrate into an IOS application in four easy steps.
- Create a TypingDNA Account
- Integrate the TypingDNARecorderMobile framework
- Integrate the TypingDNA Authentication API
- Put it all Together
The source code for the IOS is available on GitHub. I’ve also created a demo of the application, which is available on YouTube.
TypingDNA overview
Here’s how TypingDNA’s technology works: Every person has a unique way of typing. This includes many factors, which are a key to verifying your identity.
The TypingDNA Authentication API has a way of recording your typing pattern. After a few attempts of training to the way you type, you can use that typing pattern to login into an application. Behind the scenes, TypingDNA uses a machine learning model to categorize how you type and saves this pattern as your biometric.
After three or so attempts of learning, the TypingDNA system can record that pattern for future use when you try to log in.
Create a TypingDNA account
Before we build out the iOS application, we’ll need to know how to interact and use the TypingDNA Authentication APIs.
To do that, you first need to create an account here. Once authenticated, navigate to the API dashboard here and copy the apiKey and apiSecret.
When we build out our application, we will need to add these keys into the app. For now, just save them for later.
iOS app
Learning about how TypingDNA works is great. But as a developer, I usually like to see things in action. So I’ve worked on an iOS demo application that shows how to use the TypingDNA API in a Signup/Login scenario.
If you want to go straight to the code, please have a look at this GitHub repo. You will need to have the latest version of Xcode installed and be on a Mac. (Sorry, Windows people.)
App overview
This demo app shows how to integrate the TypingDNA Authentication API into your application. For this app, I’ve created a SignupViewController that allows a user to enter an email address and a password.
The user will need to verify their pattern by entering in their username and a password at least three times. This allows the TypingDNA system to learn your typing pattern.
After the third time the username and password are entered, the user will be able to login with the same username and password and be directed to the Authenticated ViewController, which shows the status of the authentication as well as how many times the user tried to verify themselves.
Next, we’ll build out the interface in the main storyboard.
Our design looks like this:
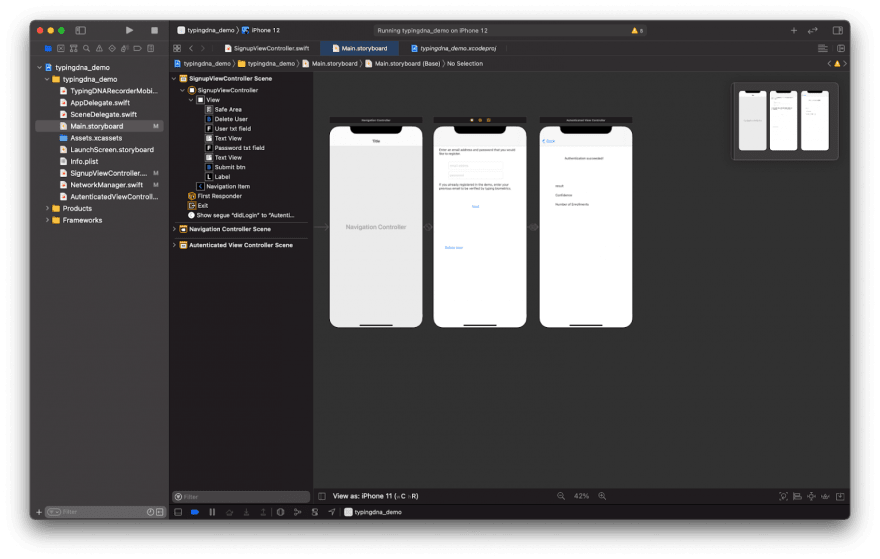
We first have a NavigationController, which loads our second ViewController, which I called SignupViewController.swift. This view contains two text fields that allow the user to enter a username and a password. Once the user is authenticated, they will be brought to the rightmost screen, which is the AuthenticateViewContoller.swift. This simulates when a user is logged in to an application.
Integrating TypingDNARecorderMobile framework
Before we start calling the TypingDNA Authentication API, we need a way to record the typing pattern of the user. First, you will need to install the Typing DNA recorder framework. Download this repo, and inside the TypingDNARecorderMobile folder, copy theTypingDNARecorderMobile.swift file into your Xcode project.
This framework will allow you to enter a set of text and will return a typing pattern. This pattern, as a string, will be used in the TypingDNA Authentication API to learn your typing pattern.
When using the typing pattern recorder on a mobile device, the way you physically hold the device is taken into account when generating a pattern. For example, if you try to signup with a username and password and hold the device in portrait, you would not be able to login when using the same username and password while holding the device in landscape mode.
For more information about this, please see the Mobile Positions FAQ and the Mobile integration process tutorial.
Before we can use this framework, we first need to add two text fields to our storyboard and create an outlet. In the SignupViewController, inside ViewDidLoad, we need to tell the recorder what to listen to. We do that by adding the following:
@IBOutlet weak var typing_pattern: UITextField!
 override func viewDidLoad() {
        super.viewDidLoad()
    TypingDNARecorderMobile.addTarget(user_txt_field)
    TypingDNARecorderMobile.addTarget(password_txt_field
    }
The addTarget function is a listener that is attached to both the username and password text fields. When we add a target to both fields, this tells the TypingDNARecorderMobile framework to capture both text patterns, which will increase the number of characters used for generating a typing pattern. The recommended number of characters is around 30. Using both text fields will help us get closer to that number rather than using the password textfield alone.
As the user begins to type, the TypingDNARecorderMobile framework will record the typing pattern for both inputs. Once the text is entered and the Next button is tapped, we grab the pattern using the following function:
TypingDNARecorderMobile.getTypingPattern()
For our application, we will set type to 1 and set all the other parameters to their defaults.
When we set type to 1, we will use the getTypingPattern function to expect short, identical texts, which are the username and password.
We then call this function inside our IBAction:
@IBAction func signupButtonTapped(_ sender: Any) {
    guard let userId = user_id.text, userId.count > 6 else {
        return
    }
    let typingPattern = TypingDNARecorderMobile.getTypingPattern(1, 0, "", 0, nil);

}
Once the user enters their username and password, the getTypingPattern will return the user's typing pattern. Now, we can start integrating the TypingDNA Authentication API.
Integration of TypingDNA Authentication API
Auto API
Now, in Xcode, we’ll create a new class called NetworkManager.swift. This class will make the requests to the API. Once we have our pattern, we need to start the authentication process. We will be using the /auto endpoint to send our pattern.
For this demo, we’ll be making the API calls within our iOS application. However, making these requests server-side would be the better approach if you are using this in a production setting.
In NetworkManager.swift, we first need to add the TypingDNA API key and secret, which should have been created previously. On lines 13 and 14 in NetworkManager.swift, update the api_key and api_secret to your keys.
Next, we’ll need a way to send the pattern to the API. Inside NetworkManager.swift,
we’ll have a function called save_pattern, which accepts the username and typing pattern.
We need to send the username and the typing pattern to the endpoint. To send it, the TypingDNA Authentication API requires us to use a unique identifier for the user. In our case, we will use MD5 to hash the username. Finally, we can make a request to the /auto endpoint.
class NetworkManager {
    private let base_url = "https://api.typingdna.com"
    var api_key = "xxx"
    var api_secret = "xxx"

    func save_pattern(user_id:String, typing_pattern:String, completionHandler:@escaping (_ result:[String: Any]) -> Void) {
            let hashed_user_id = MD5(string: user_id)
            let serviceUrl = URL(string: base_url+"/auto/"+hashed_user_id)
            let parameterDictionary = ["tp" : typing_pattern]
             var request = URLRequest(url: serviceUrl!)
             request.httpMethod = "POST"
             request.setValue("Application/json", forHTTPHeaderField: "Content-Type")
                let authString = encode_auth()
                request.setValue(authString, forHTTPHeaderField: "Authorization")
                guard let httpBody = try? JSONSerialization.data(withJSONObject: parameterDictionary, options: []) else {
                    return
                }
             request.httpBody = httpBody
             let session = URLSession.shared
             session.dataTask(with: request) { (data, response, error) in
                 if let data = data {
                     do {
                        let json = try JSONSerialization.jsonObject(with: data, options: [])
                        completionHandler(json as! [String : Any])
                     } catch {
                         print(error)
                     }
                 }
             }.resume()
        }

}
In the code above, we make a POST request to /auto endpoint, passing in the MD5 version of the username and send the typing_pattern(tp) in the body of the request. For authentication, we base64 our API key and secret and add that to the Authorization header of the request.
After we send the first request, we should receive a JSON payload:
{"message": Pattern(s) enrolled. Not enough patterns for verification., "action": enroll, "message_code": 10, "status": 200, "enrollment": 1}
In the action parameter, we receive the word enroll. This means that we have begun the authentication process.
Check API
The next step is to make a request to the /check endpoint. This will allow us to verify that the pattern was accepted and allow us to log in, as long as we have sent at least three typing patterns.
func check_user(user_id:String, completionHandler:@escaping (_ result:[String: Any]) -> Void) {

        let hashed_user_id = MD5(string: user_id)
        let serviceUrl = URL(string: base_url+"/user/"+hashed_user_id + "?type=1")

         var request = URLRequest(url: serviceUrl!)
         request.httpMethod = "GET"
         request.setValue("Application/json", forHTTPHeaderField: "Content-Type")

            let authString = encode_auth()
            request.setValue(authString, forHTTPHeaderField: "Authorization")

         let session = URLSession.shared
         session.dataTask(with: request) { (data, response, error) in

             if let data = data {
                 do {
                     let json = try JSONSerialization.jsonObject(with: data, options: []) as? [String: Any]
                    completionHandler(json!)
                 } catch {
                     print(error)
                 }
             }
         }.resume()
    }
This is very similar to the /auto endpoint call. We pass the MD5 version of the username and a type parameter, which is set to 1. This is to tell the /check endpoint that our typing pattern came from a set of repeated text, rather than being a random sentence. If we set the type to 0, it would mean that we allow the user to enter any text they want.
Putting it all together
After we finished writing our two API calls, we can now put it all together.
In the SignupViewController, after we enter a username and record a typing pattern, we can now request the /auto endpoint to send the typing pattern. Once we send the typing pattern, we need to imminently call the /check API to verify that the enrollment process has begun.
When using a free account, the API calls are limited to one call per second. Therefore, we need to add a one-second delay when making a request to the /check endpoint.
We will use the response from the /check endpoint to know what the status of the authentication process is and when we can have the user login.
First, let’s make a request to /auto endpoint and send the username as well as the typing pattern.
let typingPattern = TypingDNARecorderMobile.getTypingPattern(1, 0, "", 0, typing_pattern);
networkManager.save_pattern(user_id: userId, typing_pattern: typingPattern) { (json) in
user.pattern_response = json
}
This will return the following JSON response:
{"status":200,"message_code":10,"action":"enroll","message":"Pattern(s) enrolled. Not enough patterns for verification.”,"enrollment":1}
The full documentation for the response is here.
For our application, we are considered the action parameter. From the documentation:
“Returns one of the following values, corresponding to the action performed on the request: enroll, verify, verify;enroll. Enroll is returned if the typing profile has less than 3 previous enrollments. Verify is returned if initial enrollments are met, only a verification was performed, and the pattern was not additionally enrolled. If both a verification and enrollment are performed, the value is verify;enroll.”
Next, we need to call the /check endpoint. This is used to get the number of times the user has tried to authenticate. The JSON payload from the /check app looks like this:
{"mobilecount":1,"type":1,"count":0,"message":"Done","status":200,"success":1,"message_code":1}
For our example, we need to know the mobilecount, which is the number of times the user tried to authenticate. Please note that the mobilecount parameter will only increment when on a mobile device. If you are using the APIs on the web, the “count” parameter will be incremented.
After the user makes the first attempt of authenticating, the “action” parameter will return “enroll”, which means that the user is in the process of authentication. After the user makes two more attempts of authenticating, the “action” parameter will return “verify;enroll”, which means that the user has been authenticated and can now log in.
Once they log in using the same username and password, they are directed to the AuthenticatedView Controller, and can now use the application as a logged-in user. The following is a video of the demo application:
Conclusion
The TypingDNA Authentication API allows you as a developer to easily add authentication to your iOS application—without having to worry about storing encrypted passwords, which makes it easier for you to focus on building your application.
At the same time, users won’t need to worry about security breaches or hacks that can access your data. Also they no longer need another service to save their password.
To access their accounts, all they need to do is type like they do all day long. It’s the easiest way to ensure only authorized individuals can access their own accounts.

Latest comments (0)