This blog post was written for Twilio and originally published on the Twilio blog.
Twilio acquired Segment last year to help developers unify customer data across every customer touchpoint. I held off on using Segment for a while because I thought Segment was only for businesses, but I learned recently that I, an indie developer, have a use case for it. Read on to learn how to use Segment and Twilio Serverless to send SMS notifications when someone visits your website.
Do you prefer learning via video more? Check out this TikTok summarizing this tutorial in two minutes!

Prerequisites
To follow along with this post, you need three things:
- A Twilio account - sign up for a free one here and receive an extra $10 if you upgrade through this link
- A Twilio phone number with SMS capabilities - configure one here
- Segment account - sign up for a free one here
Add a Segment Source
First off, we need to add a website as a source in the Segment app. In Segment, you create a source (or more than one!) for each website or application you want to track. A source provides data to Segment to use. To make a source, create and go to your Segment Workspace and click Sources on the left.

From your List of Sources, click the blue Add Source button.

From the Catalog of Sources, under Website select JavaScript followed by Add Source.

In Source setup, give your Source a name–for example, Personal Website. You can leave Labels blank, and then add the Website URL. In my case, my personal website is lizziesiegle.xyz.

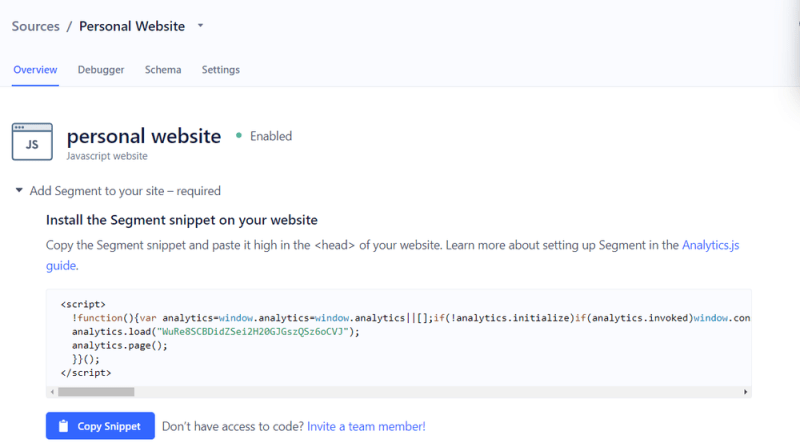
After clicking Add Source, Segment will provide you with code similar to the one below to include in your HTML file's <head>element.

That code adds Segment's Analytics.js library so we can send data from our website to Segment and any Destination. Add this to your website's <head> element.
You can check that Analytics.js is working with your website by inspecting your website and checking that the analytics variable exists–this can be done both locally and also on a deployed site.

Now this tutorial will use Twilio Functions as a Destination: let's make that Twilio Function now.
Make a Twilio Function to Send a SMS
The Serverless Toolkit is CLI tooling that helps you develop locally and deploy to Twilio Runtime. The best way to work with the Serverless Toolkit is through the Twilio CLI. If you don't have the Twilio CLI installed yet, run the following commands on the command line to install it and the Serverless Toolkit:
npm install twilio-cli -g
twilio login
twilio plugins:install @twilio-labs/plugin-serverless
Create your new project by running:
twilio serverless:init segment-site-visitor-detector –template=blank
cd segment-site-visitor-detector
Open the .env file, fill in your AUTH_TOKEN and add an environment variable for your personal phone number. In this blog post, it is saved as MY_PHONE_NUMBER.
Add a new file inside the \functions directory called segment.js containing the following code:
exports.handler = function(context, event, callback) {
  const client = context.getTwilioClient();
  let body = event.request.headers.viewed;
  let to = context.MY_PHONE_NUMBER;
  let from = 'YOUR-TWILIO-NUMBER';
  console.log(`body ${body}`);
  client.messages
  .create({ body, to, from })
  .then((message) => {
    console.log(`SMS successfully sent, ${message.sid}`);
    return callback(null, `Success! Message SID: ${message.sid}`);
  })
  .catch((error) => {
    console.error(error);
    return callback(error);
  });
};
This code returns an initialized Twilio REST Helper Library, gets the inbound request (which will contain the viewed header we will soon set in the Segment console) and sets it as a variable called body, makes the to and from variables (my personal phone number hidden as an environment variable and a Twilio number), and then sends an outbound text message when the Twilio Function is hit (when my website is viewed.)
From the root directory, run twilio serverless:deploy and copy the URL ending in /segment.
Set the Twilio Function as a Segment Destination
Back in your Segment Console beneath the blue Copy Snippet button, click the blue Add Destination button.

Search the Destinations Catalog for webhook and select Webhooks.

Then click the blue Configure Webhooks button.

Select a data source to be your website and now to setup the webhook, we give it a Destination name, followed by clicking Save.

Then select Webhooks (max 5) and enable the toggle next to Setup Guide.

Put in your Function URL ending in /segment and set a header to be something like you see below.
Click the blue Save button and tada! You will get a text message saying "site has been viewed!" whenever someone visits your website.

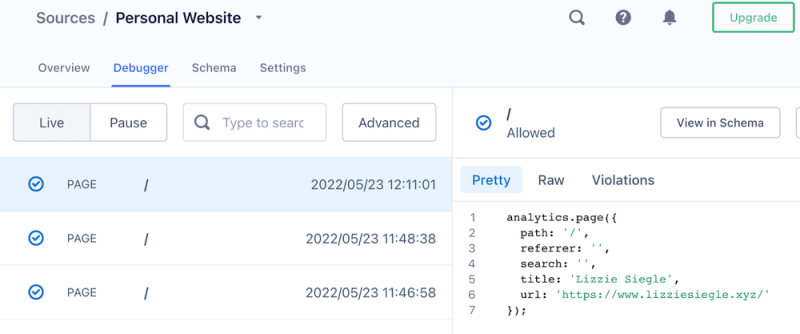
Alternatively in your Segment console you can go to the Debugger section of your Source and see when someone visits the site as well.

What's Next for Twilio Serverless and Segment?
Segment is a handy tool that helps give developers insight into how both users and customers are using your website or application. Let me know online what you're building with Twilio Segment and Serverless!
- Twitter: @lizziepika
- GitHub: elizabethsiegle
- Email: lsiegle@twilio.com
- Livestreams: twitch.tv/lizziepikachu


Top comments (1)
Hi buddy, this is really good post information! Vashikaran Specialist In Varanasi