
This article was originally published at blogs.siliconorchid.com on 26-March-2020
In this article, we'll combine Twilio Media Streams and a .NET Core 3.1 Web App, to save a copy of a telephone conversation as a .wav audio file to Azure Storage.
Introduction
In July 2019, Twilio announced their new service "Media Streams" was available in public beta.
Twilio Media Streams are a really interesting service that further bring together the worlds of telephony and mainstream software development.
The Twilio service provides a way to stream the audio content of a live phone conversation into our own services.
What we then choose to do with this, is down to our own creativity - but suggested examples have been to integrate with voice-recognition and AI-related services such as sentiment-analysis etc.
If you're someone who just wants to see the code, skip straight over to my GitHub : SiliconOrchid/TwilioMediaStreams
Requirements
This article is not intended for beginners and assumes that you already have intermediate experience using:
- C#, .NET Core and experience working with .NET Core Web Applications.
- An account with Twilio and familiarity using the Twilio dashboard.
- An account with MS Azure and experience with creating Azure resources.
If you are an existing .NET developer, but new to .NET Core, you may find resources such as the following useful:-
This article has been produced on a Windows 10 system using VS2019 Community Edition. It has not been written to provide alternative guidance for users of other OS or IDE.
What will we be doing?
Create a webhook (an HTTP "handshaking" endpoint)
When we purchase a phone number from Twilio, their API platform allows us to define instructions to "do something" when that number is interacted with.
For this project, we want to instruct the Twilio service that when a user calls our number, we want to do the following:
- read a brief message to the user
- wire-up the call to a service that can receive Twilio Media Streams.
- maintain the call for 60 seconds (unless the caller hangs up)
We achieve this by:
- Providing a "webhook" (an HTTP endpoint) that the Twilio service is configured to request when a call is made to the Twilio number. This endpoint will return a set of instructions that are formatted in Twilio's bespoke TWIML format. That TWIML will look similar to the following:
<Response>
    <Start>
        <Stream url="yourWebhookUrl"/>
    </Start>
    <Say>Please record a message.</Say>
    <Pause length="60"/>
</Response>
Create a websocket service
Our solution will require us to provide a websocket service that will receive a stream of encoded byte data from Twilio.
Twilio provides this stream as a sequence of websocket messages, which are wrapped as JSON documents. You should read the official documentation about this subject here at Twilio : Voice Streams : Websocket Messages.
These documents contain various pieces of meta-data, but ultimately contain a payload of binary data encoded as base64 which represents part of the audio data. We need to:
- Provide a websocket service for our ASP.NET website. We implement this using ASP.NET Core Middleware.
Tip: If you've not worked with websockets before, don't confuse the use of the word "streaming" with any experience you may have working with .NET streams (e.g.
MemoryStream). Data transmitted using websockets is decomposed into discrete text-based packages called "messages" - it may help you to better picture what's going on, to think of these as a rapidly-received sequence of HTTP requests.
Create a buffering system
The need to have a buffer depends on our usage scenario. For example, if we are building a service that relays audio data immediately onto another service (e.g. a speech-to-text service), we wouldn't need to buffer any data.
However, in our demo scenario, we are writing a file to a storage medium. To do this, we need to have the complete file available to us.
- We achieve this by buffering the received data in server memory until the transmission has ended.
A slight complication to this process is that unlike a regular HTTP handler (whether that be MVC or WebAPI), where a scoped instance of a Controller class handles a single request, our WebSocket middleware will be a singleton instance, dealing with multiple connections.
Because of this, we need a way to separate data being simultaneously received from different connections.
If we didn't do this, a single buffer for the single service would receive the data from multiple streams. Pretending for a moment that issues such as security and privacy aren't a concern … crudely, everyone's audio stream could be blended together in a jumbled mess and/or recordings become concatenated.
Create an audio file
Again, if we were simply relaying a stream of data onward to another service, other than defining what the expected encoding of the data should be, we don't need to become involved.
However, for this project, we have tasked ourselves with creating a .wav audio file, so we need to do a little more work. Fortunately, there are open-source libraries that do all the heavy-lifting for us.
- We need to produce code that calls a third-party library that will assemble a .wav file of the appropriate encoding format, using the
bytearraydata previously collected by our buffer.
Create a storage handler
Finally, we want to write our newly-created audio file to cloud storage.
- For the purpose of this article, we'll be using an Azure Storage account to save the blob

Primary resources/references
Primary resources that we will be building upon include:
- Radu Matei : Creating a WebSockets middleware for ASP .NET Core 3
- Mark Heath : Introducing NAudio - .NET Audio Toolkit
- Microsoft : Quickstart: Azure Blob storage
Twilio have provided sample code for use with a number of tech-stacks and a selection of articles:
- Twilio : TwiML Voice: (Beta)
- Twilio's GitHub.
- (Example using Node.js) : Twilio : Live transcribing phone calls using twilio media streams and google speech-to-text
- (Example using Java) : Twilio : Transcribing phone calls using twilio media streams with Java, Websockets and Spring Boot
I would also recommend reading these articles by Jon McGuire, as aside from explaining many of the issues and problems we need to consider, he also talks about some of the frustrations that he found, as relates to the availability of documentation and learning resources:
- Jon McGuire : A Minimal Full-Feature Kestrel WebSocket Server
- Jon McGuire : How to Close a WebSocket -Correctly

Heads-up : Working with websockets in .NET isn't quite as straightforward as you might expect.
If you're a seasoned .NET developer and you hear about the topic of "websockets", your instinct may likely steer you in the direction of SignalR.
SignalR is terrific, but it solves a different problem. SignalR can be thought of as a wrapper of several technologies - of which websockets represent a major component. It primarily serves the purpose of connecting web-browser clients to a back-end service. Other problems it solves include the maintenance of robust connections and the use of fallback techniques to enable browsers that don't natively support websockets, to still benefit from real-time connections.
For Twilio Media Streams, we need to use websocket connections in a server-to-server configuration. SignalR isn't the right tool for that job.
What makes developing a websocket solution more difficult than it needs to be, is that most resources related to using websockets in .NET either direct us towards SignalR or don't provide examples that would be appropriate for enterprise use.
Regardless, the key to getting this working is that we need to create ASP.NET Core middleware that manages the websocket connections and implements any specific functionality that we require.
You can read more about middleware here at Microsoft : ASP.NET Core Middleware
Use NGrok whilst developing external-facing web services.
I recommend (as does Twilio in their many articles) using the tunnelling/proxy utility NGrok during development.
NGrok is super-useful as it lets us run our web server locally, whilst exposing our endpoints publically to the internet, using a subdomain of ngrok.com.
For development and testing the integration of our service, with other services such as Twilio, this is a time-saving godsend, as it means that we can quickly iterate and debug, without having to mess around with firewalls and port-forwarding on our router.
My recommendation is to follow the instructions in this article Twilio : How to use ngrok with Windows and Visual Studio to test webhooks, which will take you through the steps needed to install and use it.
Briefly, once NGrok is installed:
- we will need to know both the exact local Url and Port number of our locally-hosted development service.
- use the
ngrokcommand as below. Note that:- we specify only the hostname and port
- we do not specify the protocol (i.e. no "http://" etc)
- we do not specify any Url fragments.
ngrok http -host-header="localhost:5000" 5000
Gotcha : Update NGrok to latest version. I wasted hours on this project, assuming that my own code wasn't working, when in fact I was being caught out by a glitch in an older version of NGrok. Briefly, the symptoms where :
- the client could connect and send messages to the server successfully.
- The server was unable to broadcast messages back to any of the connected clients.
I was previously using NGrok v2.2.8 and the problem was resolved by updating the local NGrok client to v2.3.35 (latest at time of writing)
Let's get started!
Create Azure Resources
I recommend that we create a separate Resource Group to organise the resources of our project. You can read about that at Microsoft : Manage Azure Resource Manager resource groups by using the Azure portal
- To develop this project we only require an Azure Storage account
You will need the Azure Storage connection string later, so for convenience, you should keep the portal open in the background, so you can easily cut+paste these settings later. The storage connection string can be found in the "Access Keys" section.
If you plan to deploy your project to an Azure App service, this may be a convenient time to also create that resource now - but we will only be testing using a local copy in this article.
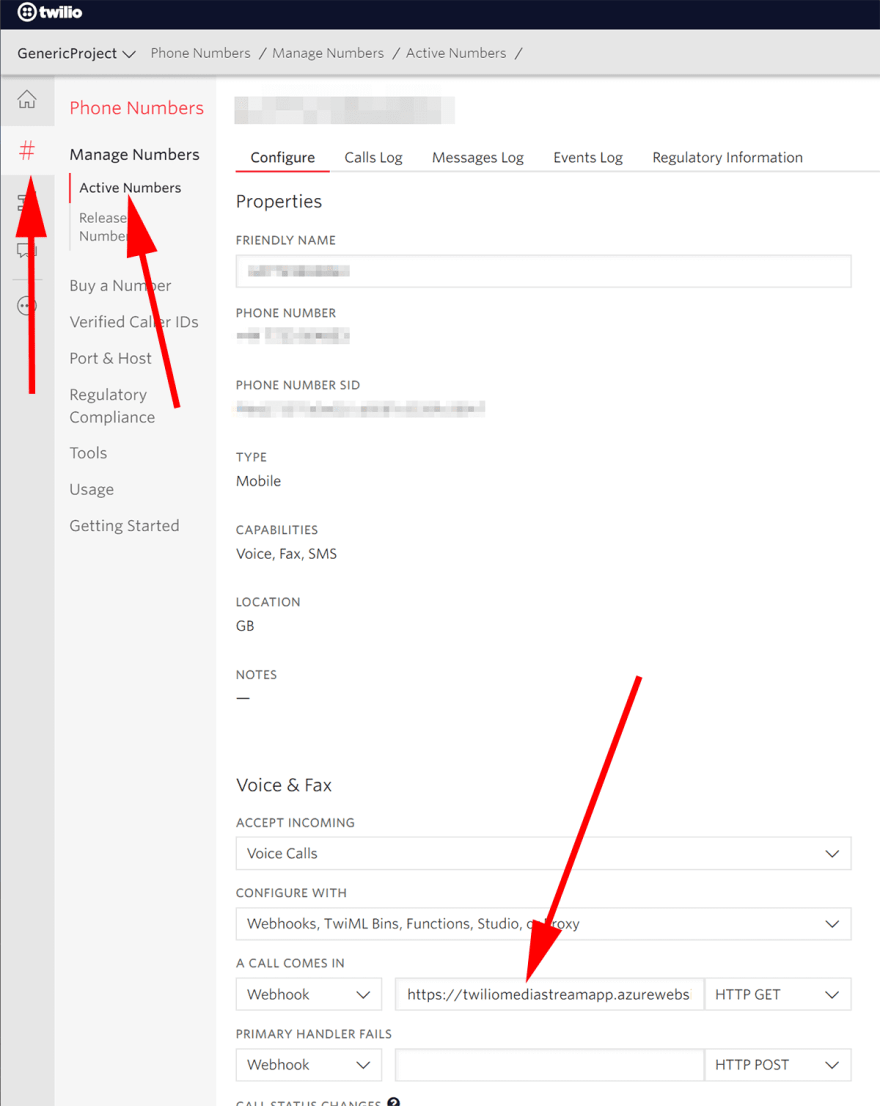
Get a Twilio Phone number and configure the webhook
If you don't already have a Twilio number that you can use for testing purposes, you should go ahead and obtain one now. The following resources will help you here:
When you have your phone number, you should set the webhook to match the domain of our Azure WebApp endpoint. In this demo, we will call that route that GET method to the route /handshake, so go ahead and enter a Uri that looks similar to this:
https://yourwebapp.azurewebsites.net/handshake
Create the project
Template a new solution
Use Microsoft templating to create a new API ASP.NET Core 3.1 web application. For the demo, we will name it
TwilioMediaStreams. We can leave the default options selected, such as SSL support.-
Add references to the following NuGet packages (versions indicated were those used at time of writing):
-
NAudio v1.10.0(Mark Heath & Contributors) -
WindowsAzure.Storage v9.3.3(Microsoft)
-
-
Remove any default template-generated items, such as "weatherforecast":
/Controllers/WeatherForecastController.cs/WeatherForcast.cs
For convenience, you may also prefer to change the default
launchUrlsettings inlaunchSettings.jsonfrom "weatherforecast" to "handshake".There is code in the
startup.csfile that was added during templating, that we won't need to use. Therefore edit the code so that it looks like the following: (for simplicity just cut+paste the following):
using Microsoft.AspNetCore.Builder;
using Microsoft.AspNetCore.Hosting;
using Microsoft.Extensions.Configuration;
using Microsoft.Extensions.DependencyInjection;

namespace TwilioMediaStreams
{
    public class Startup
    {
        public Startup(IConfiguration configuration)
        {
            Configuration = configuration;
        }

        public IConfiguration Configuration { get; }

        public void ConfigureServices(IServiceCollection services)
        {
            services.AddControllers();
        }

        public void Configure(IApplicationBuilder app, IWebHostEnvironment env)
        {
            app.UseHttpsRedirection();
            app.UseRouting();
            app.UseEndpoints(endpoints =>
            {
                endpoints.MapControllers();
            });
        }
    }
}
Set up configuration
In this demo, we'll be using the commonly used IOptions pattern to provide configuration. You can read more about configuration in my article Introduction to .NET Core configuration
- In the root of the project, create a new folder
Models - In this new folder, create a new class
ProjectSettings.csand populate it like this:
namespace TwilioMediaStreams.Models
{
    public class ProjectSettings
    {
        public string TwilioMediaStreamWebhookUri { get; set; }
        public string AzureStorageAccountConnectionString { get; set; }
        public string AzureStorageAccountContainerName { get; set; }
    }
}
- Edit
appsettings.jsonso that it includes the following configuration section:-
  "ProjectSettings": {
    "TwilioMediaStreamWebhookUri": "wss://yourappname.azurewebsites.net/ws",
    "AzureStorageAccountConnectionString": "DefaultEndpointsProtocol=https;AccountName=yourStorageAccount;AccountKey=yourKey;EndpointSuffix=core.windows.net",
    "AzureStorageAccountContainerName": "filecontainer"
  }
You should go ahead and copy in the configuration settings that correlate to the Azure resources you created earlier. You can change the "ContainerName" to something else if you prefer.
Gotcha: Do not use capital letters in your
filecontainername.
- Finally, modify the class
startup.csso that the configuration model is registered, like this:
public void ConfigureServices(IServiceCollection services)
{
    services.Configure< TwilioSettings>(Configuration.GetSection("TwilioSettings"));
    services.AddControllers();
}
Create webhook for Twilio to use
When your Twilio phone number receives a call, Twilio will need a "webhook" to provide further instructions to their service.
These instructions take the form of "TWIML", which is an XML document that we need to supply.
We do this by creating a simple REST method
- Create a new empty API Controller class called
BasicControllerand add the following code:
using Microsoft.AspNetCore.Mvc;
using Microsoft.Extensions.Options;
using TwilioMediaStreams.Models;

namespace TwilioMediaStreams.Controllers
{
    [ApiController]
    public class BasicController : ControllerBase
    {
        private readonly ProjectSettings _projectSettings;

        public BasicController (IOptions<ProjectSettings> projectSettings)
        {
            _projectSettings = projectSettings.Value;
        }

        [HttpGet]
        [Route("/handshake")]
        public IActionResult HandShake()
        {
            return Content($@"<Response><Start><Stream url=""{_projectSettings.TwilioMediaStreamWebhookUri}""/></Start><Say>Please record a message.</Say><Pause length=""60""/></Response>", "text/xml");
        }
    }
}
Gotcha: Make sure to define the content-type of
text/xml- Twilio doesn't like plain text, even if that text happens to be valid TWIML.
Finally, pay attention to the line [Route("/handshake")] - this route needs to match the endpoint that we identified as the webhook in the Twilio control panel.
Recreate the WebsocketManager project
For our project, we're going to use an implementation of a websocket manager by Radu Matei.
You can read about this project at Creating a WebSockets middleware for ASP .NET Core 3
There technically exists a NuGet package for this project, but it hasn't been updated recently and doesn't play nicely with .NET Core 3.x. Also, that package includes dependencies on Newtonsoft.Json, that we don't want to bring into our project, because we're using the System.Text.Json library instead.
However, Radu has updated his project on GitHub to .NET Core 3.x, so we'll be using that version of the code instead.
Within the
TwilioMediaStreamssolution (not the web app project of the same name), create a new .NET Standard 2.0 Class Library project, naming itWebsocketManager.-
Create four classes named as follows. Cut+Paste the entire code, for each of the linked GitHub pages:
-
WebSocketConnectionManager.cs⭠ Get the raw code from GitHub -
WebSocketHandler.cs⭠ Get the raw code from GitHub -
WebSocketManagerExtensions.cs⭠ Get the raw code from GitHub -
WebSocketManagerMiddleware.cs⭠ Get the raw code from GitHub
-
Finally, make a project reference to
WebsocketManager, from theMediaStreamSandboxweb app project by right-clicking on the project and going "add > reference".

Scaffold the code of our project
We'll start by creating the structural outline of our project. Later in the article, we'll return to flesh-out the details, along with any necessary explanations.
- Within the
TwilioMediaStreamsweb project, create a new folder calledServices. - Within the
Servicesfolder, create a new class calledMediaStreamHandlerand populate it with the following code:
using System;
using System.Collections.Generic;
using System.IO;
using System.Net.WebSockets;
using System.Text;
using System.Text.Json;
using System.Threading.Tasks;

using Microsoft.Extensions.Options;
using Microsoft.WindowsAzure.Storage.Blob;

using WebSocketManager;
using TwilioMediaStreams.Models;


namespace TwilioMediaStreams.Services
{
    public class MediaStreamHandler : WebSocketHandler
    {
        private readonly ProjectSettings _projectSettings;

        private Dictionary<string, List<byte[]>> dictionaryByteList = new Dictionary<string, List<byte[]>>();


        public MediaStreamHandler(WebSocketConnectionManager webSocketConnectionManager, IOptions<ProjectSettings> projectSettings) : base(webSocketConnectionManager)
        {
            _projectSettings = projectSettings.Value;
        }

        public override async Task OnConnected(WebSocket socket)
        {
            throw new NotImplementedException();
        }

        public override async Task ReceiveAsync(WebSocket socket, WebSocketReceiveResult result, byte[] buffer)
        {
            throw new NotImplementedException();
        }

        private void AddPayloadToBuffer(string socketId, string payload)
        {
            throw new NotImplementedException();
        }

        private async Task OnConnectionFinishedAsync(WebSocket socket, string socketId)
        {
            throw new NotImplementedException();
        }

        private async Task ProcessBufferAsync(string socketId)
        {
            throw new NotImplementedException();
        }

        private byte[] CreateCompleteAudioByteArray(string socketId)
        {
            throw new NotImplementedException();
        }
    }
}
- Next, also in the folder
Services, create a new class file calledStorageHandler.csand copy in the following code:
using System;
using System.Threading.Tasks;

using Microsoft.WindowsAzure.Storage;
using Microsoft.WindowsAzure.Storage.Blob;

using TwilioMediaStreams.Models;

namespace TwilioMediaStreams.Services
{
    public static class StorageHandler
    {
        public static async Task<CloudBlockBlob> SetupCloudStorageAsync(ProjectSettings projectSettings)
        {
            throw new NotImplementedException();
        }
    }
}
- Finally, again still in the
Servicesfolder, create a class calledAudioHandler.csand copy in this code:
using System.IO;

using NAudio.Utils;
using NAudio.Wave;


namespace TwilioMediaStreams.Services
{
    public static class AudioHandler
    {
        public static void GenerateAudioStream(byte[] buffer, MemoryStream memoryStream)
        {
            throw new NotImplementedException();
        }
    }
}
The solution file structure should now look like this:-


Layer in the implementation code of our project
Next, let's turn our attention to the detail of the code.
The buffer
If you recall from earlier, we said that we need to buffer data for each websocket connection separately. We address this requirement by using a Dictionary, like this:
private Dictionary<string, List<byte[]>> dictionaryByteList = new Dictionary<string, List<byte[]>>();
We should explain how this is going to be used:
- We'll be using the randomly created "websocket id" as the dictionary key.
- We'll be receiving small "payloads of data" from the websocket messages data, in the form of byte-arrays.
- Byte-arrays are immutable, meaning that we can't simply keep appending new bytes onto the end of a single byte-array (i.e. we could not just use
Dictionary<string, byte[]>). - To work around this problem, we use a
List<T>to create a "list of byte-arrays".
Starting websocket connections
You should modify the placeholder code in MediaStreamHandler to look like this:
public override async Task OnConnected(WebSocket socket)
{
    await base.OnConnected(socket);
    string socketId = WebSocketConnectionManager.GetId(socket);
    dictionaryByteList.Add(socketId, new List< byte[]>());
}
What's happening here is that when we establish a new websocket connection, we get the id of the connection and create a new entry in the dictionary.
Receiving websocket messages
You should modify the placeholder code in MediaStreamHandler to look like this:
public override async Task ReceiveAsync(WebSocket socket, WebSocketReceiveResult result, byte[] buffer)
{
    string socketId = WebSocketConnectionManager.GetId(socket);

    using (JsonDocument jsonDocument = JsonDocument.Parse(Encoding.UTF8.GetString(buffer, 0, result.Count)))
    {
        string eventMessage = jsonDocument.RootElement.GetProperty("event").GetString();

        switch (eventMessage)
        {
            case "connected":
                break;
            case "start":
                break;
            case "media":
                string payload = jsonDocument.RootElement.GetProperty("media").GetProperty("payload").GetString();
                AddPayloadToBuffer(socketId, payload);
                break;
            case "stop":
                await OnConnectionFinishedAsync(socket, socketId);
                break;
        }
    }
}
This code is run every time we receive a websocket message (so expect this to be triggering continuously when a stream is being received).
You should refer to this part of the technical reference : Twilio : Websocket messages
Briefly, a message sent by Twilio is a JSON string, which contains various pieces of meta information and depending on the type, the payload itself. The Twilio messages are grouped into four main types which can be identified by examining the root-level property event :
-
connected- Twilio : Connected Message. -
start- Twilio : Start Message. -
media- Twilio : Media Message. -
stop- Twilio : Stop Message .
In our demo code, we parse the JSON using the newer technique that uses System.Text.Json and JsonDocuments (where previously we may have done almost the exact same thing using NewtonSoft.Json and JObject).
Our demo code has switch placeholders for connected and start, but we have decided not to do anything with them. In a more advanced version of the code, we could do things such as dynamically using the media format encoding-type and sample-rate dynamically, but in this demo we have left it hardcoded elsewhere.
The key points to note in the switch block is that :
- for
mediamessage types, we extract the stringified payload from the message and pass it to another method calledAddPayloadToBuffer. - for
stopmessage types, we call theOnConnectionFinishedAsyncmethod which performs processing on the buffer and attempts to clean up.
Adding the payload to a buffer
You should modify the placeholder code in MediaStreamHandler to look like this:
private void AddPayloadToBuffer(string socketId, string payload)
{
    //We convert the base64 encoded string into a byte array and append it to the appropriate buffer
    byte[] payloadByteArray = Convert.FromBase64String(payload);
    dictionaryByteList[socketId].Add(payloadByteArray);
}
Perform tasks when the stream closes
You should modify the placeholder code in MediaStreamHandler to look like this:
private async Task OnConnectionFinishedAsync(WebSocket socket, string socketId)
{
    // extract buffer data, create audio file, upload to storage
    await ProcessBufferAsync(socketId);

    // instruct the server to actually close the socket connection
    await OnDisconnected(socket);

    // clean up buffer
    dictionaryByteList.Remove(socketId);
}
This method is orchestration code, which triggers the onward processing of the buffer and attempts to clean up resources.
Orchestrate the creation of an audio file and uploading to storage
You should modify the placeholder code in MediaStreamHandler to look like this:
private async Task ProcessBufferAsync(string socketId)
{
    byte[] completeAudioBuffer= CreateCompleteAudioByteArray(socketId);

    CloudBlockBlob blob = await StorageHandler.SetupCloudStorageAsync(_projectSettings);

    using (MemoryStream memoryStream = new MemoryStream())
    {
        AudioHandler.GenerateAudioStream(completeAudioBuffer, memoryStream);

        // make sure the memory stream is returned to its beginning, ready to stream to storage
        memoryStream.Seek(0, SeekOrigin.Begin);

        //upload memory stream to cloud storage
        await blob.UploadFromStreamAsync(memoryStream);
    }
}
The code in this method is largely related to the orchestration of other tasks. Main activities include :
- creating a single byteArray from the buffer of many smaller chunks, by invoking the
CreateCompleteAudioByteArraymethod. - setting up the connection to cloud storage.
- calling the static method
AudioHandler.GenerateAudioStreamthat generates the audio file. - uploading the audio file, contained in a
MemoryStream, to cloud storage.
Flatten the list of audio data chunks into a single bytearray
You should modify the placeholder code in MediaStreamHandler to look like this:
private byte[] CreateCompleteAudioByteArray(string socketId)
{
    //get the relevant dictionary entry
    List< byte[]> byteList = dictionaryByteList[socketId];

    //create new byte array that will represent the "flattened" array
    List< byte> completeAudioByteArray = new List< byte>();

    foreach (byte[] byteArrayin byteList)
    {
        foreach (byte singleByte in byteArray)
        {
            completeAudioByteArray.Add(singleByte);
        }
    }

    //collate the List< T> of byte arrays into a single large byte array
    byte[] buffer = completeAudioByteArray.ToArray();
    return buffer;
}
Implement audio file writer
You should modify the placeholder code in AudioHandler to look like this:
public static void GenerateAudioStream(byte[] buffer, MemoryStream memoryStream)
{
    // define the audio file type
    var waveFormat = WaveFormat.CreateMuLawFormat(8000, 1);

    // use WaveFileWriter to convert the audio file buffer and write it into a memory stream
    using (var waveFileWriter = new WaveFileWriter(new IgnoreDisposeStream(memoryStream), waveFormat))
    {
        waveFileWriter.Write(buffer, 0, buffer.Length);
        waveFileWriter.Flush();
    }
}
This class is responsible for calling the NAudio library to write an audio file into the MemoryStream.
In this class, we hardcode the audio format selection to use MuLaw - this is a standard encoding format used in telephony. Similarly, we hardcode that the audio sample rate to be 8000 (Khz) - which matches the quality provided by Twilio in the Media Stream.
Finally, it's worth mentioning that at no point do we write temporary files to disk - everything is handled as an in-memory stream.
Implement Azure Storage handler
You should modify the placeholder code in StorageHandler to look like this:
public static async Task SetupCloudStorageAsync(ProjectSettings projectSettings)
{
    // new random filename
    string fileName = $"{Guid.NewGuid()}.wav";

    // set container name
    var containerName = projectSettings.AzureStorageAccountContainerName;

    // create storage account object
    CloudStorageAccount storageAccount = CloudStorageAccount.Parse(projectSettings.AzureStorageAccountConnectionString);

    // create storage account client
    CloudBlobClient client = storageAccount.CreateCloudBlobClient();

    // create reference of storage account container
    CloudBlobContainer container = client.GetContainerReference(containerName);

    // create container if it doesn't already exist
    var isCreated = await container.CreateIfNotExistsAsync();

    // set the permissions to blob
    await container.SetPermissionsAsync(new BlobContainerPermissions { PublicAccess = BlobContainerPublicAccessType.Blob });

    CloudBlockBlob blob = container.GetBlockBlobReference(fileName);

    // MIME type used for MULAW wav files,
    blob.Properties.ContentType = "audio/wav";
    return blob;
}
Register the middleware and finish application configuration
Finally, we need to wire everything together. In the startup.cs code, make the following changes:
using TwilioMediaStreams.Models;
using TwilioMediaStreams.Services;
using WebSocketManager;


public void ConfigureServices(IServiceCollection services)
{
    services.Configure(Configuration.GetSection("ProjectSettings"));
    services.AddControllers();
    services.AddWebSocketManager();
}

public void Configure(IApplicationBuilder app, IWebHostEnvironment env)
{
    var serviceScopeFactory = app.ApplicationServices.GetRequiredService();
    var serviceProvider = serviceScopeFactory.CreateScope().ServiceProvider;

    app.UseHttpsRedirection();
    app.UseRouting();
    app.UseWebSockets();
    app.MapWebSocketManager("/ws", serviceProvider.GetService());
    app.UseEndpoints(endpoints =>
    {
        endpoints.MapControllers();
    });
}
Test the code
With all the code in place and necessary configuration added, we can now go ahead and test our solution.
If you haven't done so already, you should start NGrok and run our web project locally.
We can now grab our telephone and place a call to our Twilio number.
If things are working correctly, we should hear the message defined in the TWIML that we listed in
BasicController.Handshake()(so if you cut+paste the example code exactly, we should hear the message "Please record a message.")Now that we have established that we have called the correct number, we can amuse ourselves by making a selection of farmyard animal impressions and then hanging-up.
At the point that we hang up the call, our service will generate the audio file and save it to Azure Storage.
We now want to download the file and make sure that everything worked.
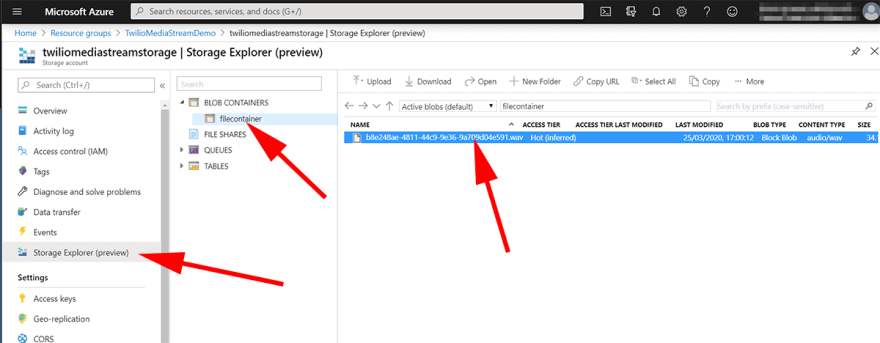
There are a couple of ways to view blobs in containers, but a simple way is to navigate to the Storage Account using the Azure portal.
- Having selected the storage account, locate and click the option "Storage Explorer (preview)" (which by default can be found near the top of the left-hand blade).
- Locate the item "Blob Containers", in the central blade, and expand the option using the caret.
- We should see the container that we defined "filecontainer" - click on this.
- We should now see a list of any files that have been generated. They will have GUID filenames, but should still be easily recognisable by the ".wav" file extension.
- Right-click the file to download.
- Play the file using a media player.
Wrapping up
The code provided in this article is "demoware" and is not something to drop into a production system without further work. There are a number of areas that I would suggest focussing on, to improve the project:
- Security and authentication
- Limiting access to handshake method (e.g. with a token)
- Error handling
- Unit tests
- Using the caller ID
- Diligence to security and privacy related to data received from different callers.
- Taking better care to ensure that connections are closed and that memory used by the buffer is cleaned up afterwards.
- Inspecting the metadata in the
startmessage and setting audio encoding dynamically, based on that information.
Further reading
Base64 Encoding from C#
https://stackoverflow.com/questions/31339708/object-de-serializing-from-base64-in-c-sharp
Disclosure
No third party (i.e. Microsoft or Twilio) compensate me for my promotion of their services in this article. However, I have been recognised by Twilio as someone who promotes their services and have been titled "Twilio Champion". Additionally, my partner Layla Porter is an employee of Twilio Inc, in the capacity of a developer evangelist. Therefore I have a strong bias to recommend their services.


Top comments (0)