This blog post is about using the domain mapping functionality in IBM Cloud Code Engine to use custom domains and TLS certificates for your applications. The source code related to an example setup is in the GitHub project example WebApp build on Vue.js.
When we deploy an application to IBM Cloud Code Engine we get an IBM Cloud domain in following format **[CODE_ENGINE_APPLICATION].[CODE_ENGINE_PROJECT].[IBM_CLOUD_REGION].codeengine.appdomain.cloud** and a TLS certificate provided by Let’s encrypt. We are free to use this out-of-the-box for our application.
But now we are going to use a wild card certificate for our domain *.example.com. With a TLS certificate for that domain.
The blog post is structured in:
- Used services or software
- Simplified architecture overview
- Example setup
- Summary
1. USED SERVICES OR SOFTWARE
These are the services or software which are used in this example.
-
IBM Cloud
- IBM Cloud Code Engine is a fully managed, serverless platform where you can run container images or batch jobs.
- IBM Cloud Domain Name Registration
“IBM Cloud offers domain registration services complete with dedicated support staff, knowledgeable customer service, and reasonable prices, all delivered over a secure network.“
-
Open Source:
“Certbot is a free, open source software tool for automatically using Let’s Encrypt certificates on manually-administrated websites to enable HTTPS.“
“Let’s Encrypt is a free, automated, and open certificate authority (CA), run for the public’s benefit. It is a service provided by the Internet Security Research Group (ISRG).“
-
Red Hat:
“Quay.io is a registry for storing and building container images as well as distributing other OCI artifacts. The service is free for those who want to set up their own public repositories and available for a fee, if you want to create private repositories.“
2. SIMPLIFIED ARCHITECTURE OVERVIEW
The gif above shows a very simplified diagram with dependencies and steps related to the setup for an example application. The example application container is in my case saved in the public Quay.io container registry and the application container is based on the “Example WebApp build on Vue.js” GitHub project. We have in place a Code Engine project and the example web application is already deployed.
The following sections are a very simplified description of the steps in the simplified diagram above.
- First, we buy a domain. In my case I bought the domain
www.suedbroecker-example.comat the IBM Cloud Domain Name Registration for 10,00 Euro. - Then we use Certbot to create/request a TLS certificate at Let’s encrypt from our local computer. In my case I used a wildcard certificate ‘’ for the `.suedbroecker-example.com
domain. I wanted to be flexible so that I can define new subdomains very easily and use this subdomain names for my new applications, for example with a naming likeapp01.suedbroecker-example.com,app02.suedbroecker-example.com` and so on. - Now Let’s encrypt provides a challenge we need to insert at our domain provider.
- We need to insert the challenge to the domain provider in a TXT record. With that challenge Let’s encrypt can verify, if we are able to configure/own the given
www.example.comdomain using the challenge. Let’s encrypt will verify it and provide us the result withcert boton the local computer. That can take sometimes several minutes. - When the verification was successful we get issued from Let’s encrypt a public TLS certifcate and private key which will be saved on our local computer by the cert bot application.
- Now it’s time to start to configure the IBM Cloud Code Engine
domain mapping. We add a newdomain mappingand we insert the public TLS certificate and private key. - Now we need to configure in our domain provider the
CNAME. In my case I configured theCNAMEto map the wild card certificate ‘*’ to the link provided by Code Engine. - In my case I used a wild card ‘’ `.suedbroecker-example.com
certificate, so I can configure a custom domain to point to the application. I configured the domainwebapp.suedbroecker-example.com`. - Now we can invoke the domain
webapp.suedbroecker-example.comwithhttps. Our connection is now secured, and the browser can verify the TLS certificate is valid. The image below shows my running application on Code Engine using my TLS certificate.
The image below shows the example application.

3. EXAMPLE SETUP
These are the steps you can follow along to run the example application on IBM Cloud Code Engine. The GitHub project “Example WebApp build on Vue.js” contains the source code for this simple Vue.js web application.
3.1 GET THE SOURCE CODE
STEP 1: CLONE THE PROJECT
git clone https://github.com/thomassuedbroecker/vue-simple-webapp
cd vue-simple-webapp/code
STEP 2: SET THE NEEDED ENVIRONMENT VARIABLES IN THE .ENV FILE
cat .env-template > .env
Edit the .env file.
ASSISTANT_INTEGRATION_ID="YOUR_ID"
ASSISTANT_REGION="YOUR_REGION"
ASSISTANT_SERVICE_INSTANCE_ID="YOUR_SERVICE_INSTANCE"
ROOTFOLDER="YOUR_ROOTFOLDER" #Location on your local machine
MYPROJECT="YOUR_MYPROJECT" #IBM Cloud Code Engine project name
RESOURCE_GROUP="default" #IBM Cloud resource group
REGION="YOUR_REGION" #IBM Cloud region
CERT_EMAIL="YOUR_EMAIL" # If you want to create a TLS certification
CERT_DOMAIN="YOUR_DOMAIN" # If you want to create a TLS certification
You can follow the steps in the README.md of the “Example WebApp build on Vue.js” GitHub project. Then run the Vue.js application locally or as a container. When you run the application in a container a Nginx is used as the webserver. You are also able to deploy the application to IBM Cloud Code Engine. All of the options are automated with bash scripts.
3.2 REGISTER A DOMAIN
The following steps are showing, how to buy a domain at IBM Cloud.
STEP 1: REGISTER DOMAIN AT IBM CLOUD
- Buy the domain

- Verify your contact information

- Configure the data sharing preferences

STEP 2: VERIFY YOUR DOMAIN IS READY TO USE

3.3 REQUEST/CREATE A TLS CERTIFICATE WITH LET’S ENCRYPT AND CERTBOT
In this context this blog post Generate Wildcard TSL certificate using Let’s Encrypt/Certbot was very useful. (Certificate authority CA)
STEP 1: INSTALL CERTBOT ON MACOS
brew ``install` `certbot
STEP 2: EXECUTE TO CREATE-CERT.SH TO CREATE THE TLS CERTIFICATE
We are using the staging environment from Let’s encrypt. If you’re experimenting with different ACME clients, use the staging environment Let’s encrypt to avoid hitting rate limits.
The create-cert.sh does following automation:
- It requests/creates the certificate
- Save the
certandkeylocation - Copy the
certandkeyto the current project to read the content - Show the
certandkeyto easily copy the file content to Code Engine
Keep in mind the certificate will be valid for 90 days.
sh create-cert.sh
- Output and interaction:
Insert your wild card domain: *.suedbroecker-example.com
Password:
Saving debug log to /var/log/letsencrypt/letsencrypt.log
Please enter the domain name(s) you would like on your certificate (comma and/or
space separated) (Enter 'c' to cancel): *.suedbroecker-example.com
Requesting a certificate for *.suedbroecker-example.com
- - - - - - - - - - - - - - - - - - - - - - - - - - - - - - - - - - - - - - - -
Please deploy a DNS TXT record under the name:
_acme-challenge.www.suedbroecker-example.com.
with the following value:
n4H_yuDtBb6zXdZWg-XXXXXXX
Before continuing, verify the TXT record has been deployed. Depending on the DNS
provider, this may take some time, from a few seconds to multiple minutes. You can
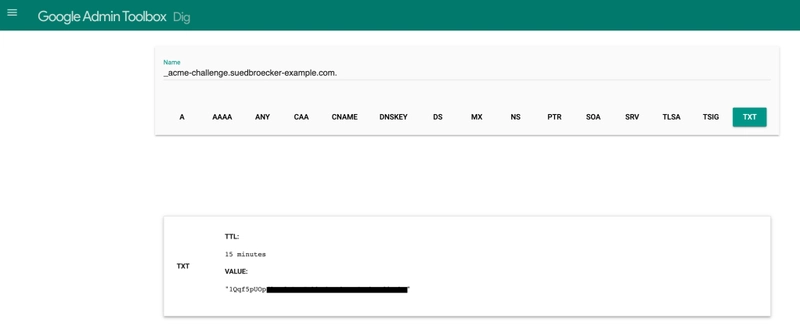
check if it has finished deploying with aid of online tools, such as the Google
Admin Toolbox: https://toolbox.googleapps.com/apps/dig/#TXT/_acme-challenge.www.suedbroecker-example.com.
Look for one or more bolded line(s) below the line ';ANSWER'. It should show the
value(s) you've just added.
- - - - - - - - - - - - - - - - - - - - - - - - - - - - - - - - - - - - - - - -
Press Enter to Continue
- Insert the challenge in IBM Cloud Domain Name Registration in a TXT record:
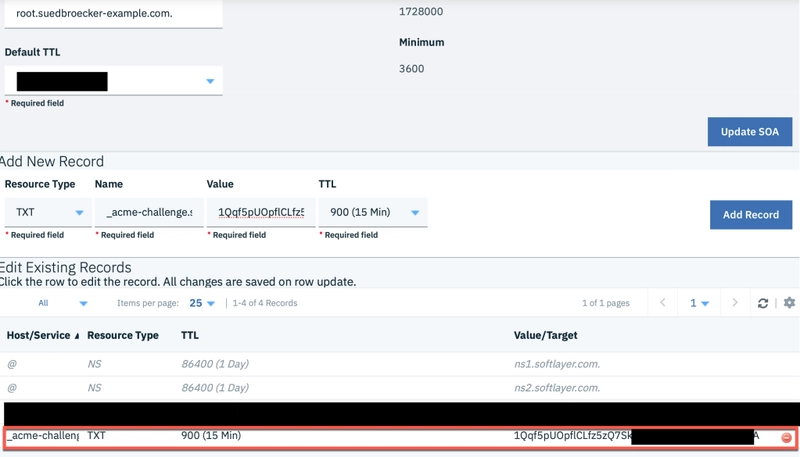
- Verify the challenge with the
Google Toolbox. This task can take several minutes.
- Now we can move on with the script and we see the downloaded certificates.
Successfully received certificate.
Certificate is saved at: /etc/letsencrypt/live/www.suedbroecker-example.com/fullchain.pem
Key is saved at:         /etc/letsencrypt/live/www.suedbroecker-example.com/privkey.pem
This certificate expires on 2023-03-24.
These files will be updated when the certificate renews.

NEXT STEPS:
- This certificate will not be renewed automatically. Autorenewal of --manual certificates requires the use of an authentication hook script (--manual-auth-hook) but one was not provided. To renew this certificate, repeat this same certbot command before the certificate's expiry date.

- - - - - - - - - - - - - - - - - - - - - - - - - - - - - - - - - - - - - - - -
If you like Certbot, please consider supporting our work by:
 * Donating to ISRG / Let's Encrypt:   https://letsencrypt.org/donate
 * Donating to EFF:                    https://eff.org/donate-le
- - - - - - - - - - - - - - - - - - - - - - - - - - - - - - - -
- Now you can insert the given locations for the
certandkeyand the script creates new files with different endings and it displays thecertandkeywe can easily copy and paste to the domain mapping.
Question: How to get .crt and .key files from? I just have .pem files answered here
Insert SOURCE_CERTIFICATE
/etc/letsencrypt/live/www.suedbroecker-example.com/fullchain.pem
Value: /etc/letsencrypt/live/www.suedbroecker-example.com/fullchain.pem

Insert SOURCE_KEY
/etc/letsencrypt/live/www.suedbroecker-example.com/privkey.pem
Value: /etc/letsencrypt/live/www.suedbroecker-example.com/privkey.pem

mkdir: /Users/thomassuedbroecker/Downloads/dev/vue-simple-webapp/simplewebapp/tls-cert
mkdir: /Users/thomassuedbroecker/Downloads/dev/vue-simple-webapp/simplewebapp/tls-cert/letsencrypt

Public cert:
-----BEGIN CERTIFICATE-----
...
-----END CERTIFICATE-----
-----BEGIN CERTIFICATE-----
...
-----END CERTIFICATE-----
-----BEGIN CERTIFICATE-----
...
-----END CERTIFICATE-----
Private key:
-----BEGIN PRIVATE KEY-----
...
-----END PRIVATE KEY-----
STEP 3: CONFIGURE THE DOMAIN MAPPING IN CODE ENGINE
Now we copy the certificate and key content into the domain mapping, and we configure the domain name. In my case I used the name webapp.suedbroecker-example.com, because I am free to choose the name and this related to the wild card certificate I use. In the image below you see the finally saved configuration in Code Engine domain mapping.
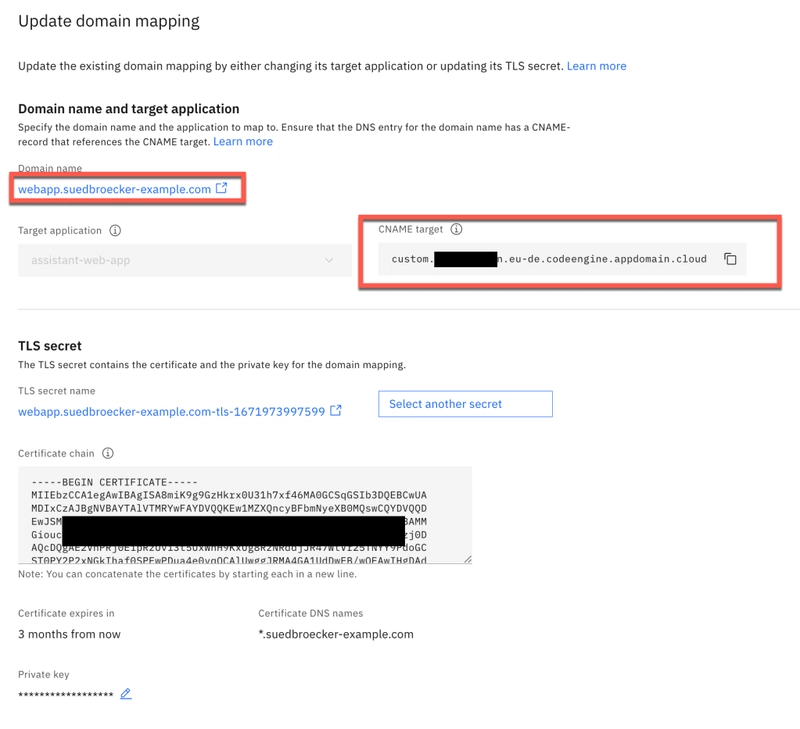
STEP 4: WE NEED TO INSERT THE LINK FROM CODE ENGINE INTO THE CNAME
In my case I mapped the wild card '*' to the link from Code Engine in the CNAME. It can take several minutes until you can use the mapped domain.

For details, please visit the Code Engine documentation custom domain configuration
STEP 5: OPEN THE DOMAIN URL
In my case it was webapp.suedbroecker-example.com.
4. SUMMARY
It’s awesome that Code Engine provides this functionality. With this functionality we are very flexible to configure our own domain. Maybe we can just use an IBM Cloud Domain Name Registration. You need to keep in mind you have to manage the certificate and update, because i will expire after 90 days. There are other blog posts about Code Engine and domain mapping out there like Custom domain for your serverless Code Engine app available.
I hope this was useful to you and let’s see what’s next?
Greetings,
Thomas
Original blog post: suedbroecker.net - CUSTOM DOMAIN AND TLS CERTIFICATE FOR YOUR APPLICATION ON IBM CLOUD CODE ENGINE

Top comments (0)