This post walks through the process of adding a rating system to a Turbo powered single page application. The application in question was built up in a previous post. If you want to follow along with the post, you can grab the repo at the starting point or just read the pull request.
What We're Building
In this walkthrough, we're going to be adding a basic star bar rating system to our movies single page application. You might be surprised to see that we can get a basic working version of this with no additional javascript whatsoever!
Add Ratings
The first step is to add ratings to our movies. Run the following in your terminal to create a migration file that will add a new column to our movies table.
bin/rails generate migration add_rating_to_movies rating:integer
Open the file and edit it to add a not-null constraint and a default value of 0.
class AddRatingToMovies < ActiveRecord::Migration[7.0]
  def change
    add_column :movies, :rating, :integer, null: false, default: 0
  end
end
We can also add a validation to our Movie model to ensure the rating stays within a sane bound that we can display on our star bar.
class Movie < ApplicationRecord
  validates :rating, numericality: { in: 0..5 }
end
Now we can run db:migrate to add the column. If you open
up a console with bin/rails console now you'll be able to update the rating on a movie e.g. Movie.first.update(rating: 5). Our validation will prevent you from setting the rating to something we can't display like -1 or 6.
Now we can update the view for our movies to display the rating.
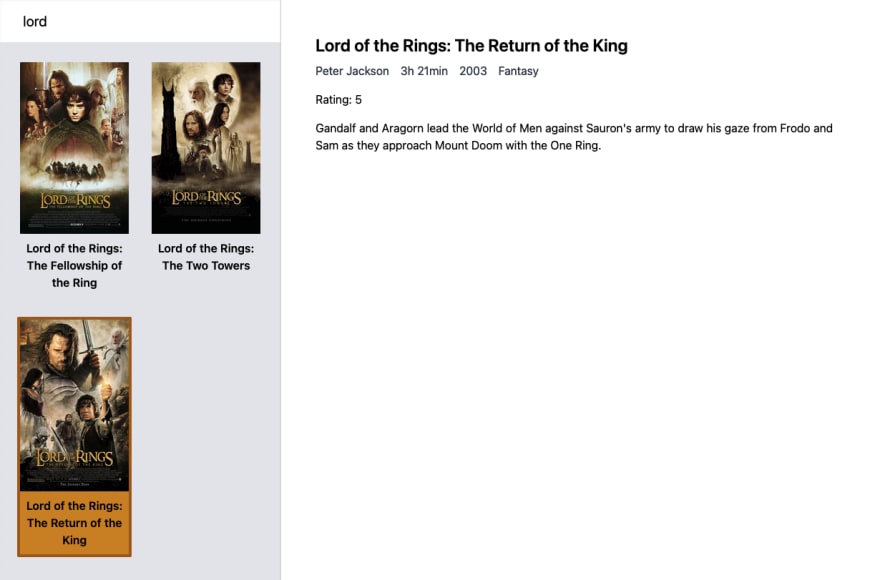
It's pretty basic though, we can improve on that.
Add the Star Bar
The next step in creating our star bar is the stars! We're going to use icons from the wonderful heroicons which is a suite of beautiful SVG icons from the makers of TailwindCSS.
There's an icon called star that we'll use, copy the SVG contents of the icon and paste it into a file called app/assets/images/star.svg.
The best way to style an SVG icon (which is one of the big advantages of the format, in my opinion) is to embed the SVG in the HTML document (render it inline with the rest of the HTML) and from there apply CSS styles as you might expect. There's a gem called inline_svg that we'll make use of to make that easier.
Add to your Gemfile:
gem "inline_svg"
Run in your terminal:
bundle install
Now we can use the inline_svg_tag in our views.
To render our star bar we need to swap out the text rating we just added and replace it with this.
<div class="flex gap-x-3 mb-4">
  <% Movie::MAX_RATING.times do |n| %>
    <%= inline_svg_tag("star.svg",
      class: "w-8 h-8 #{star_rating_class(@movie, n)}") %>
  <% end %>
</div>
We going to render stars using the inline_svg_tag a total of
Movie::MAX_RATING number of times. This is a constant we've introduced for the maximum rating i.e. the maximum number of stars. To avoid duplication, we should reuse it in the validation.
class Movie < ApplicationRecord
  MAX_RATING = 5

  validates :rating, numericality: { in: 0..MAX_RATING }
end
We've also extracted a new helper method star_rating_class so we can keep the template readable by extracting the logic for which CSS classes the star should have, based on what rating the movie has. If the movie has a rating of 4 then
stars with index 0 through 3 should be solid yellow and the last star, with index 4, should be a grey outline.
# app/helpers/rating_helper.rb

module RatingHelper
  def star_rating_class(movie, index)
    if index < movie.rating
      "fill-yellow-400 stroke-yellow-400"
    else
      "fill-transparent stroke-gray-400"
    end
  end
end

Our star bar looks a lot nicer, but it's still not really doing anything. Let's change that next.
Submit a Rating
We want users to be able to click a star and apply that as a rating. We will need to add the update action to the routes for movies and implement that action in the MoviesController.
# config/routes.rb

Rails.application.routes.draw do
  resources :movies, only: %i[index show update]
end

# app/contollers/movies_controller.rb

def update
  @movie = Movie.find(params[:id])

  @movie.update(rating: params[:movie][:rating])

  render :show
end
The update action is fairly simple CRUD, but we only support updating the rating so there's no need for mass assignment. We're also rendering the show template at the end where we would normally redirect back to the show action. Redirecting would work here, but we're going to make use of not redirecting later when we add feedback.
In the template, we just need to turn the stars into buttons that will submit a form to the update endpoint PATCH movies/:id. We'll use the button_to template helper to do this. We'll set the method to :patch, the default is :post. We also need to add the index of the star
(plus 1 to account for the 0-based index) as a parameter in the form. In the HTML, this will be a hidden field with the name movie[rating].
<div class="flex gap-x-3 mb-4">
  <% Movie::MAX_RATING.times do |n| %>
    <%= button_to movie_path(@movie),
      method: :patch,
      params: { movie: { rating: n + 1 } } do %>
      <%= inline_svg_tag("star.svg",
        class: "
          w-8 h-8
          hover:fill-yellow-500 hover:stroke-yellow-500
          #{star_rating_class(@movie, n)}
        ") %>
    <% end %>
  <% end %>
</div>
If you try clicking stars now, you'll notice that it works perfectly, without any page refreshes. How? Turbo is taking over the form submission so that it is asynchronous, and when the response comes back and includes the :details turbo-frame, it swaps out the contents for the contents of the frame in the response.
In previous versions of Turbo, you could not return HTML from a form submission unless the status code was an error, successful submissions had to redirect. Fortunately for us, this is no longer a restriction.
User Feedback
The star bar is now working as intended, but it happens so seamlessly, it's not obvious that the user's rating has been persisted. We can improve this with a little user feedback. We can add a small 'toast' next to the star bar after the user rates a movie.
Let's start by adding and styling our toast. It's just some plain HTML next to the star bar, coupled with a CSS animation to make it disappear after a short time. The icons used are also from heroicons. I've used the check-circle and exclamation icons.
.toast {
  animation: toast 3s linear 1 both;
}


@keyframes toast {
  0% {
    opacity: 0.0;
    visibility: hidden;
  }


  3% {
    opacity: 1.0;
    visibility: visible;
  }


  80% {
    opacity: 1.0;
    visibility: visible;
  }


  100% {
    opacity: 0.0;
    visibility: hidden;
  }
}
By setting visibility: hidden we remove the toast from the accessibility tree and focus events, though it still affects layout. We use this over display: none since it can be used in an animation, we would need to use javascript to apply a change to the display attribute and it doesn't matter to us here that it still affects layout - you might argue that it's
better since nothing will move when the toast completes.
<!-- app/views/movies/show.html.erb -->

<!-- Within the same flex group as the stars
     but after all the stars have been rendered -->

<% if @toast %>
  <div class="flex items-center gap-x-1 px-4 py-2
    bg-black/75 rounded text-white text-sm
    relative top-[-2px]
    toast">
    <% if @toast == :success %>
      <%= inline_svg_tag("check.svg",
        class: "h-4 w-4 text-green-500 relative top-px") %>
      <span>Rating Added!</span>
    <% else %>
      <%= inline_svg_tag("warning.svg",
        class: "h-4 w-4 text-red-500 relative top-px") %>
      <span>Rating could not be added</span>
    <% end %>
  </div>
<% end %>
The @toast variable comes from the update action. This is why we chose to render the :show template, rather than redirecting. Though we could achieve the same effect with a redirect by making use of the flash object.
def update
  @movie = Movie.find(params[:id])

  if @movie.update(rating: params[:movie][:rating])
    @toast = :success
  else
    @toast = :warning
  end

  render :show
end
We simply set the @toast variable to whether or not the update happened successfully. Since the show action does not define the @toast variable, the message only shows in response to a call to the update action, i.e. clicking on a star.

Filling the Star Bar
If you've ever used a star bar in the past (I'm guessing you have) you'll have noticed that they tend to fill up from 0 to the point you hover over. This is an effect we can reproduce with a small amount of stimulus.
To start with, create a new stimulus controller by running this in your terminal. This will make sure your stimulus manifest is up to date (not applicable if you're using webpacker), as well as add the boilerplate for the controller and create a correctly named file.
bin/rails generate stimulus starBar
The basic expectation of the star bar is that when you hover over a star, that star and all the stars within an index lower than that star will show their hover state. When not hovering over any star, the star bar should simply display the rating.
The StarBarController looks like this.
import { Controller } from "@hotwired/stimulus"

export default class extends Controller {
  static targets = ["star"];
  static classes = ["hover"];

  enter(event) {
    this._fillToStar(event.params.starIndex);
  }

  leave() {
    this._fillToStar(-1);
  }

  _fillToStar(star) {
     this.starTargets.forEach((target, index) => {
      if (index <= star) {
        target.classList.add(this.hoverClass);
      } else {
        target.classList.remove(this.hoverClass);
      }
    });
  }
}
The two actions enter and leave simply toggle the hover class on the appropriate stars, depending on which star the user is hovering over or none if the user is not hovering over any stars.
The controller has one target called star. Since we expect a list of these (the 5 star icons) we're using this.starTargets in the plural to access them. The controller also has a class called hover - we use this so we can define the hover class for the stars in the markup rather than hardcode them in the controller.
Now we just need to add to markup to connect our star bar to the controller.
Our star bar now looks like this.
<div class="flex gap-x-3 mb-4"
  data-controller="star-bar"
  data-star-bar-hover-class="fill-yellow-500 stroke-yellow-500">
  <% Movie::MAX_RATING.times do |n| %>
    <%= button_to movie_path(@movie),
      method: :patch,
      params: { movie: { rating: n + 1 } } do %>
      <%= inline_svg_tag("star.svg",
        class: "w-8 h-8 #{star_rating_class(@movie, n)}",
        data: {
          star_bar_target: "star",
          star_bar_star_index_param: n,
          action: "pointerenter->star-bar#enter
            pointerleave->star-bar#leave"
        }) %>
    <% end %>
  <% end %>
  <!-- the toast is omitted, but would be here -->
</div>
The definition for the hover classes, data-star-bar-hover-class has to be on the same HTML element that attaches the controller. We also mark each of the stars as part of the star target with data-star-bar-target="star", we don't have to treat it differently just because it is going to be used as an array within the controller.
When the user hovers over a star we need to toggle the hover class on for each of the stars up to the star the user hovered over. We can pass parameters to our stimulus controller actions. In our case, we need to pass the index of the
star the user hovered over. This is what the data-star-bar-star-index-param="n" is doing. We can then access the parameter in the action with event.params.starIndex. The generic pattern for this is data-controller-name-param-name="value", the parameter can then be accessed from the action with event.params.paramName - the parameters name is
converted to snakeCase, just like the controller names are.
This star bar is very limited, I only really did it for some fun. For a more complete implementation of a star rating bar, check out a component library like Shoelace.
Conclusion
We've managed to create a fully-featured, interactive star rating bar and most of the changes were in our HTML. We didn't have to write any javascript if we didn't want to.


Top comments (1)
Thank you so much, just what I needed! Hoping I can pull it off without all those nasty looking Tailwind classes though. Also was thinking of letting all users vote by automatically making them guest users with github.com/cbeer/devise-guests. Think that'll work?