
While the TomTom Maps SDK for Web is a JavaScript library, we’ll look at how to incorporate it into a Spring Boot application using the Spring MVC and the Thymeleaf template engine.
In this article, we’ll look at how to incorporate the TomTom Maps SDK for Web into a Spring Boot application written in Java. You can find the source code on GitHub, and there are tags for each step in this article.
While the TomTom Maps SDK for Web is a JavaScript library, we’ll look at how to incorporate it into a Spring Boot application using the Spring MVC and the Thymeleaf template engine that will generate the HTML and JavaScript from the server side.
Get and Protect an API Key
Before you do anything with the TomTom Maps SDK, you’ll need to get an API key, which is required for using the TomTom Maps API. Once you have your API key, place it in a location that’s easily changed, and not in a source code repository. Typically, this would be in an environment variable on the target deployment system, or in a secrets tool. We’ll see some ways to do this in Spring Boot.
Since the API key will eventually appear in the generated HTML page, you’ll want to turn on the Security “Domain whitelist” (also known as “Referer check”) on your TomTom Developer Dashboard so the key can only be used by an application deployed on a specific domain. You’ll also want to minimize the scope of products you turn on for the API Key to just the ones you need for your application.
Create a Spring Boot Project
We’ll use the spring initializr tool to create the basic project, with the following settings:
- Maven project for Java 11 (you can use Java 8, if needed) packaged as a JAR
- Spring Boot 2.3.2 (the latest release at the time of this writing)
- Dependencies:
- Spring Boot DevTools (always handy for development)
- Spring Web (for the Spring MVC support)
- Thymeleaf (the template engine)
Once you’ve generated and downloaded the project, open it in your favorite development environment.
Add the TomTom Maps SDK
We’ll first create a basic Thymeleaf template that will include the necessary TomTom Maps SDK references.
Create a new HTML file in the /src/main/java/resources/templates directory, name it home.html, and put the following content into it:
<!DOCTYPE html>
<html lang="en"
     xmlns="http://www.w3.org/1999/xhtml"
     xmlns:th="http://www.thymeleaf.org">
<head>
 <meta charset="UTF-8">
 <title>TomTom Mapping Example</title>
 <link rel='stylesheet' type='text/css'
       href='https://api.tomtom.com/maps-sdk-for-web/cdn/5.x/5.63.0/maps/maps.css'>
 <style>
   #map {
     width: 100vw;
     height: 100vh;
   }
 </style>
 <script src='https://api.tomtom.com/maps-sdk-for-web/cdn/5.x/5.63.0/maps/maps-web.min.js'></script>
</head>
<body>
<div id='map' class='map'></div>
<script th:inline="javascript">
 var map = tt.map({
   key: [[${apikey}]], // this will be replaced by Thymeleaf at runtime
   container: 'map',
   style: 'tomtom://vector/1/basic-main'
 });
 map.addControl(new tt.FullscreenControl());
 map.addControl(new tt.NavigationControl());
</script>
</body>
</html>
This code will load both the CSS and the Maps SDK JavaScript directly from the TomTom CDN.
In the body of the page, create a placeholder for the map that will take up the full display area (due to the #map style tag in the head).
To invoke the display of the map, use the tt.map function, which requires we pass in our API key. In order to not hard-code the key into this page, we load it via a special Thymeleaf JavaScript inlining attribute. By adding the th:inline="javascript" attribute to the tag, we tell Thymeleaf to look for the special inlining “double-square-bracket” syntax. This means that the following will be processed by Thymeleaf and it will replace the double-bracket contents with the apikey that will come from the Spring Model.
key: [[${apikey}]], // this will be replaced by Thymeleaf at runtime
The resulting generated HTML will look like this:
key: YOUR_TOM_TOM_API_KEY, // this will be replaced by Thymeleaf at runtime
Create a MapController
The initial controller we’ll construct is straightforward. Create a new class called MapController and add the following code to it:
import org.springframework.beans.factory.annotation.Value;
import org.springframework.stereotype.Controller;
import org.springframework.ui.Model;
import org.springframework.web.bind.annotation.GetMapping;

@Controller
public class MapController {

 @Value("${tomtom.apikey}")
 private String tomTomApiKey;

 @GetMapping("/")
 public String homePage(Model model) {
   model.addAttribute("apikey", tomTomApiKey);
   return "home";
 }

}
Here we’re using the @Value annotation to inject the value of the property tomtom.apikey, which comes from the first one found in the following:
- The .spring-boot-devtools.properties file (if you have one, and only when running locally)
- An environment variable
- The application.properties file
This isn’t a complete list — see the Spring Boot Externalized Configuration doc for more details.
Our @GetMapping is also straightforward: we put the apikey into the model (so it’s available to be rendered in the Thymeleaf template), then return the name of the view (in this case home, to match the home.html file we created earlier).
Run the Application
If you’ve set up everything correctly and run the application, you can see a map of the world by opening up a browser tab and going to http://localhost:8080:

Add Popup Markers
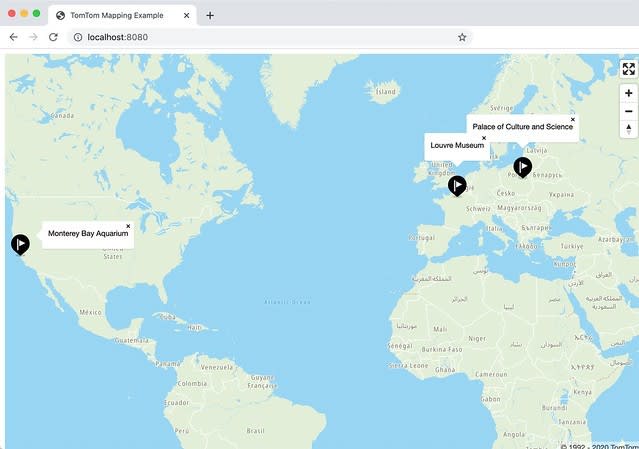
We can use more of the TomTom Maps SDK by adding some JavaScript code to the page as well as more Thymeleaf inlining. In this example, we’ll add popup markers for a few locations, which will end up looking like this:
First we’ll change the starting center point and zoom by adding two more properties to the map configuration:
let map = tt.map({
 key: [[${apikey}]], // key will be filled in by Thymeleaf
 container: 'map',
 style: 'tomtom://vector/1/basic-main',
 center: [-35.4400, 37.2787],
 zoom: 2
});
The zoom property supports values from 1 to 20, corresponding to most zoomed out to most zoomed in. We’ll use 2, just a little bit zoomed in. The center property takes a longitude/latitude pair of coordinates to center the initial map display. Note that these coordinates (and those used throughout the API) are the reverse of what most coordinate lookups will get you, so make sure you’ve got them in the correct order: longitude first, then latitude.
Next we’ll set up the popup offsets (see the TomTom SDK reference documentation for details):
const popupOffsets = {
 top: [0, 0],
 bottom: [0, -50],
 'bottom-right': [0, -70],
 'bottom-left': [0, -70],
 left: [25, -35],
 right: [-25, -35]
}
Placeholder for Inlining the Data
Now we’ll add a variable to hold an array of marker information, which will be replaced at runtime by Thymeleaf, and add those as popup markers using the SDK:
// placeholder for data that will be filled in by Thymeleaf
const coolLocations = /*[[${coolLocations}]]*/ null;
coolLocations.forEach(location => {
 const marker = new tt.Marker().setLngLat(location.lnglat).addTo(map);
 const popup = new tt.Popup({offset: popupOffsets}).setHTML(location.description);
 marker.setPopup(popup).togglePopup();
});
Next, in MapController, add some of those cool locations to the Model.
First, create a simple static inner class (to be used as a data transfer object) to hold the lnglat coordinate pair and the description used in the above JavaScript:
private static class Location {
 private final double[] lnglat;
 private final String description;
 public Location(double[] lnglat, String description) {
   this.lnglat = lnglat;
   this.description = description;
 }

 public double[] getLnglat() {
   return lnglat;
 }

 public String getDescription() {
   return description;
 }

}
Then create a few locations (remember, it’s longitude first, then latitude):
private List<Location> coolLocations() {
 return List.of(
     new Location(new double[]{-121.901481, 36.618253}, "Monterey Bay Aquarium"),
     new Location(new double[]{21.006010, 52.231606}, "Palace of Culture and Science"),
     new Location(new double[]{2.337612, 48.860717}, "Louvre Museum")
 );
}
And now add them to the model:
@GetMapping("/")
public String homePage(Model model) {
 model.addAttribute("apikey", tomTomApiKey);
 model.addAttribute("coolLocations", coolLocations());
 return "home";
}
What’s nice is that Thymeleaf will take care of the conversion of our List of Location objects to a JavaScript array for us when inlining the coolLocations variable.
When you run the application now, you’ll see the map with the popup markers appearing.
Using Restful APIs
Of course, you don’t have to use inlining to pass the locations to the JavaScript, but sometimes it’s useful if the locations list isn’t very long, since the page is rendered once on the server and then no additional calls to an API are needed to display the locations.
Otherwise — for example, if you have many locations or want some JavaScript-based filtering — you could write just a small amount of JavaScript code to fetch those locations from a Spring Boot application’s endpoint.
Wrapping Up
In this article we’ve seen how to create a Spring Boot-based application to create a server-side rendered mapping application that leverages the powerful TomTom Maps JavaScript SDK. We’ve also seen ways to include data from the Spring MVC model directly into the JavaScript code so that a rendered page is all set to go, with no additional server API calls.
To learn more about popup markers, see the TomTom Store Location tutorial, as well the tutorial that shows how to use the Routing API for services such as Pizza Delivery. You’d use the same techniques you’ve seen in this article to create a Spring Boot-based application to serve up all the necessary HTML and JavaScript for an interactive mapping application.
This article originally appeared on developer.tomtom.com. The original author is Robert Dyball.

Top comments (0)