
Introduction: Using React & Mobile-First
Modern web standards allow developers to deliver location-aware features to users based on device GPS or network information. This information could be useful on its own — but, when combined with a mapping service, this information enables many additional interesting features.
This tutorial will describe how to build a responsive web application with a point of interest (POI) location search feature using the React web framework and the TomTom Search API.
We’ll use a mobile-first design approach. We can use the Chrome DevTools device toolbar to target different devices.

I usually choose an iPhone 5 because this model uses one of the smallest screens. If our design looks good there, it usually scales up well on larger devices.

A demo of the final product is shown below.
Why React?
React is a popular JavaScript library for building user interfaces (UIs). It’s distinguished from other UI frameworks by the following features:
- Declarative — React allows you to describe what your UI should look like instead of how to construct it. This can make React code easier to understand and debug. This is accomplished using a “reactive” system which automatically updates the UI as data changes.
- Component-based — The basic building block of a React UI is a component. Traditional UI code separates the presentation (HTML) and business logic (JavaScript). React mixes the presentation and business logic in favor of a separation of concerns.
The TomTom location APIs provide easy-to-use services for mapping, geolocation, routing and navigation, and more. This data can benefit a wide variety of applications. We’ll be using the TomTom Search API, which allows us to search a location for nearby POIs including restaurants, retail stores, bars, and so on.
You can go to https://developer.tomtom.com/ to create an account and obtain an API key. That’s all you will need to follow along.
We’ll use the popular react-search-box component to implement an autocomplete POI search. This will display a collection of changing suggestions as the user types in the search box. The autocomplete suggestions will be populated by the TomTom Search API. This allows the user to query local places and pick from a list of relevant suggestions.
Building the App
The goal is to build a React Single Page Application (SPA), so we’ll be using HTML, CSS, and JavaScript as the basic building blocks. The app will also use JSX, React’s syntax extension to JavaScript, to mix HTML templates with JavaScript code.
Building the app consists of the following steps:
- Scaffold a blank application using Create React App
- Obtain, store, and display the user’s GPS coordinates using a Banner component
- Create a PlaceFinder service to query the TomTom Search API
- Configure the react-search-box to use the TomTom suggestions
- Create a Place component to display details of the selected place
Start by using Create React App to scaffold the application. This is an officially-supported Command Line Interface (CLI) tool to create new React applications. You’ll need to install the latest version of Node.js if you don’t have it. Then run the following command in your terminal to scaffold the application in a new folder called poi-app. These commands should work in bash or PowerShell, but you may need to modify them for your terminal of choice.
npx create-react-app poi-app # Create new react app in new poi-app folder
cd poi-app # Change directory to new app
npm install react-search-box --save # Add react-search-box'
Then run the app using the NPM “start” script.
npm run start
Now that the default React application is up and running, we can start to make it our own.
First build the GPS banner. We can obtain the user’s GPS coordinates using the TomTom Geolocation API. This should be done right at the beginning, as our app cannot do anything without the user’s coordinates.
The componentDidMount() component lifecycle method is a good place for this. It is called immediately after the component is inserted into the DOM. Here’s the code:
componentDidMount() {
  navigator.geolocation.getCurrentPosition((e) => {
    this.setState({
      geoLocation: e.coords
    });
  }, async (err) => {
    this.setState({
      geoError: err
    });
  });
}
The result and the error are stored in the App component state. Here’s the full component at this point:
export default class App extends Component {

  constructor(props) {
    super(props);
    this.state = {
      geoLocation: {},
      geoError: null
    };
  }

  componentDidMount() {
    navigator.geolocation.getCurrentPosition((e) => {
      this.setState({
        geoLocation: e.coords
      });
    }, async (err) => {
      this.setState({
        geoError: err
      });
    });
  }
}
To display this data, we’ll create a Banner component. If the user grants GPS permission, it will display the user’s GPS coordinates. If permission is denied, it will display the error message to the user. Here is the Banner component:
export default class Banner extends Component {
    render() {
        if (this.props.geoError) {
            return <p className="banner warn">{this.props.geoError.message}</p>;
        } else if (this.props.geoLocation.latitude) {
        return <p className="banner success">
            Lat: <strong>{this.props.geoLocation.latitude.toFixed(4)}</strong>,
            Long: <strong>{this.props.geoLocation.longitude.toFixed(4)}</strong>
        </p>;
        } else {
            return null
        }
    }
}
Finally, we will render the Banner component in the App’s render() function, passing in the geoLocation and the geoError as props.
render() {
  return (
    <div>
      <Banner
        geoLocation={this.state.geoLocation}
        geoError={this.state.geoError}
      />
    </div>
  );
}
Here is a reactive diagram of the GPS banner feature. Adding diagrams is an important part of building more serious projects, helping you think through steps at a more component-based level. As we go along, we’ll update this diagram to include the different features we continue to add.

Here is a demo of the banner behavior when granting GPS permissions:

And when denying GPS permissions:

TomTom Search API
Next we create a PlaceFinder service to obtain place suggestions using the Points of Interest Search endpoint of the TomTom Search API.
export default class PlaceFinder {
    constructor(apiKey) {
        this.apiKey = apiKey;
    }

    async getNearbyPlaces(query, lat, long, limit = 5, radius = 10000) {
        let baseUrl = 'https://api.tomtom.com/search/2/poiSearch';
        let queryString = `limit=${limit}&lat=${lat}&lon=${long}&radius=${radius}&key=${this.apiKey}`;
        let response = await axios.get(`${baseUrl}/${query}.json?${queryString}`);
        return response.data.results;
    }
}
The API key is passed into the constructor of the class to be used in all subsequent API calls.
The PlaceFinder service accepts a query which will be the input the user types in. It also accepts the GPS latitude and longitude to narrow POIs down to ones that are nearby. It further accepts optional limit and radius parameters, which are defaulted to 5 and 10000 respectively. The radius is measured in meters.
The Search API returns details about the POI like the name, website, phone number, address, and GPS coordinates.
The React-Search-Box Component
The react-search-box component implements autocomplete functionality for us. All we have to do is feed the query from the search box into the getNearbyPlaces method and populate the suggestions with the results.
Here are the relevant parts of the App component with the react-search-box added:
async onSearchChange(query) {
  if (query.length > 0) {
    let placeFinder = new PlaceFinder('YOUR_API_KEY');
    let results = (await placeFinder.getNearbyPlaces(query, this.state.geoLocation.latitude, this.state.geoLocation.longitude));
    this.setState({
      searchResults: results
    });
  }
}

render() {
  return (
    <div>
      <Banner
        geoLocation={this.state.geoLocation}
        geoError={this.state.geoError}
      />

      <ReactSearchBox
        placeholder="Search for nearby places"
        matchedRecords={this.state.searchResults
          .map(result => ({
            key: result.id,
            name: result.poi.name,
            dist: result.dist,
            value: `${result.poi.name} | ${(result.dist / 1000).toFixed(2)}km `
          }))
          .sort((a, b) => a.dist - b.dist)
        }
        data={this.state.searchResults
          .map(result => ({
            key: result.id,
            name: result.poi.name,
            dist: result.dist,
            value: result.poi.name
          }))
          .sort((a, b) => a.dist - b.dist)
        }
        onSelect={(place) => console.log(place)}
        autoFocus={true}
        onChange={(query) => this.onSearchChange(query)}
        fuseConfigs={{
          minMatchCharLength: 0,
          threshold: 1,
          distance: 100000,
          sort: false
        }}
        keys = {['name']}
      />
    </div>
  );
}
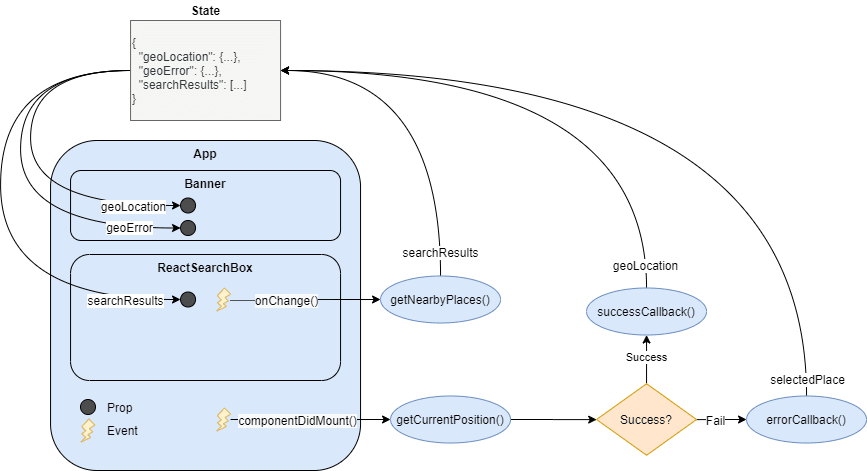
Here is the updated diagram with the react-search-box added:
Displaying Place Details
Finally, we can display more details for a POI when the user selects it from the react-search-box. We add a selectedPlace property to the state object and set it in the react-search-box’s onSelect() event.
setPlace(key) {
  let place = this.state.searchResults.find((p) => p.id === key);
  this.setState({
    selectedPlace: place
  })
}

render() {
  return (
    <div>
      ...
      <ReactSearchBox
        ...
        onSelect={(place) => this.setPlace(place.key)}
        ...
      />
    </div>
  );
Then we need to display the details of the selectedPlace. For this we add a Place component that accepts the POI data from the TomTom API as a prop.
export default class Place extends Component {
  render() {
    if (this.props.data) {
      return (
        <div className={this.props.className}>
          <h1>{this.props.data.poi.name}</h1>
          <h3>{this.props.data.poi.classifications[0].code} | {(this.props.data.dist / 1000).toFixed(2)}km away</h3>
          <p>
            {this.props.data.address.streetNumber
            +  ' '
            + this.props.data.address.streetName}
            <br/>
            {this.props.data.address.municipality
            + ', ' + this.props.data.address.countrySubdivision
            + ' ' + this.props.data.address.postalCode}
          </p>
        </div>
      );
    } else {
      return null;
    }
  }
}
Then we add the Place component to the end of the App component’s render function.
<Place
  className="place-box"
  data={this.state.selectedPlace}>
</Place>
Here is the final diagram showing the application with all components.

After a little CSS magic (the stylesheet can be found in the linked repository), here’s what we have.

Where to Next?
Let’s recap our accomplishments:
- We took advantage of the GeoLocation API to determine the user’s GPS location.
- We obtained nearby places using TomTom’s Search API.
- We used React to build a simple application leveraging a popular autocomplete search box component and our own custom components.
From here we could continue adding functionality depending on our goals:
- Use additional APIs to obtain traffic or routing information from the user’s location.
- Use mappings services to render the select POI on a map.
- Integrate with online menus or delivery services to display additional information.
Additionally, we called the Search API directly here. The TomTom Maps SDK for Web lets you easily add maps to your app and has built in helper functions for accessing TomTom location API services.
Using location data and thinking spatially allows developers to engage the user in new and exciting ways. The possibilities are endless and you’re off to a good start!
This article originally appeared on https://developer.tomtom.com/blog.

Top comments (0)