
In this post, I will be demonstrating how to do the basic database operations in
Cloud Firestore in an Android App, using a published app I built as a practical
example.
You will learn how to implement the core database operations in Cloud
Firestore: how to get (read), add (write), edit, and delete data in the database
in an Android app.
Note: This article does not cover setting up Cloud Firestore, Firebase
Authentication for Android, and documents/collections in Cloud Firestore, which
are prerequisites for this tutorial. *If you are unfamiliar with these topics,
*I highly encourage you to read Evana
Margain’s article to set up Cloud
Firestore,
read how to implement FirebaseUI for
authentication, and
watch this video to learn about documents and collections in Cloud
Firestore
before returning to this article.
Reply App Background

Reply is an
Android app I built from scratch and published to the Google Play Store. I will
use this app to provide clear, practical examples of how to implement the core
Cloud Firestore operations.
I have the code available on Github
and you can download the app
here.
Reply helps you easily create your own custom, pre-defined messages through any
platform.
With the app, you create your custom message templates which you can categorize
based on the type of message (i.e. personal, social, and business messages).
Each tab corresponds to a category.
Once you create your own messages, you can preview, send, edit, and delete them
using the main button in the bottom right corner.

Step 0: Creating Users in the Database
Before we start adding user data in the database, we first need to create users
which we will save the user data to in the database. This should be done after
registering/signing in to the app and only if it is a new user.
If you are using Cloud Firestore, you can also use Firebase Authentication to
register and sign in users. If you are implementing Firebase Authentication for
the first time, I recommend using
FirebaseUI, because
it provides a pre-built UI and requires less work.
❗️❗️Please note that authenticating/signing in a user does NOT create a user
for you in the database.
Signing in a user and creating a user in the database are two separate
operations you must implement.
This can be confusing because once a user has signed, you will see an
authenticated user with a uID in the Authentication tab in the Firebase console.
*These are the Firebase Users. *After a successful initial sign in or
registration, a FirebaseUser is created. A FirebaseUser contains data such as
name (called ‘display name’), email, and an automatically generated uID to
identify the FirebaseUser.

Reply Authentication in Firebase Console
To create users in our actual database, we will use the data provided by the
FirebaseUsers to create users in our database; namely, we will use the uID and
the name.
Before we begin adding users to the database, we need to create a simple User
model class. We will be using instances of this to create Users in our database.
*In other words, these are the objects we will actually be saving to Cloud
Firestore. *Since Cloud Firestore supports custom objects, we do not need to be
concerned about converting or serializing the data before saving it to the
database. For example, we can start with a simple model which will just contain
a name and a user ID:
If you are using FirebaseUI to sign in users, you should have code similar to
the gist below. The code below is from my app; the only difference between the
FirebaseUI Sign in
Example and my code
is that I put some of the code to handle the sign in response into a method.
The important parts to pay attention to are the IdpResponse and the current
FirebaseUser.
We are going to use the IdpResponse to check if it is a new user and the
FirebaseUser to create a user in the database using the FirebaseUser uID and
display name.
To check if we have a new user (signing in for the first time), we can call
isNewUser() on our IdpResponse. If it is a new user, we should create a user in
the database, using our User model class.
To create a new user in the database, we will do the following:
- Get the current FirebaseUser. This should return the user who just signed in.
- Create a new User object from our User model class, using the uID and the display name from the FirebaseUser to set the uID and name of the User object.
- Create a collection called “users” and add a user (a document) to it, setting the document id as the FirebaseUser uID.
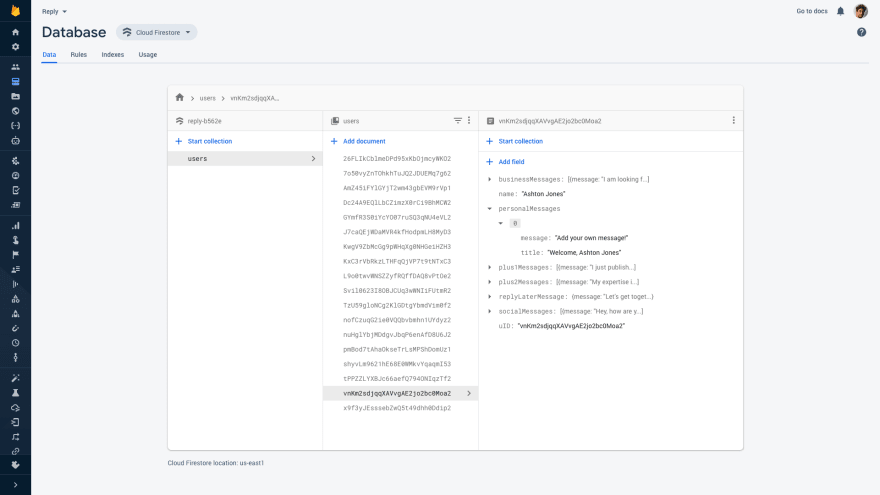
If done successfully, we should see a users collection with a user document:

Reply Cloud Firestore Database in Firebase Console
Each document in Cloud Firestore has a document ID to identify it. We use the
‘set’ method instead of the ‘add’ method so we can explicitly set a document ID
instead of it being automatically generated.
❗️❗️ *We set the document ID to be the same as the corresponding FirebaseUser
uID. We do this so we can easily retrieve the user data later.*
When a user is signed to our app, we can call:
FirebaseUser firebaseUser = FirebaseAuth.getInstance().getCurrentUser()
This will return the id of the signed in user.
Since we set the document ID (for the document of the FirebaseUser) to be the
same as the corresponding FirebaseUser uID , we can simply retrieve the document
(and thus, the data) by calling the following, passing in the signed in user’s
id:
DocumentReference userDocument =

firebaseFirestore.collection("users").document(uID)
These calls are compartmentalized into methods below:
We will use these two methods over and over whenever we need to access data in
the database, as you will see shortly.
Now let’s get to the meat of this article and learn how to work with data and
the database.
Adding Data to the Database

Add Message in Reply
Adding data to Cloud Firestore can be implemented in multiple different
ways:
The ‘add’, ‘set’, and ‘update’, and ‘update + FieldArray.union’ methods can all
be used to add data.
I recommend reading the
documentation
to fully understand when to use each add method, but here is a brief overview:
- ‘add’: Add a document with an auto-generated id
- ‘set’: Add or overwrite a document with an explicit id. If the document does not exist, it will be created. If the document does exist, its contents will be overwritten with the newly provided data
- ‘update’: Add fields to document without overwriting the entire document
- ‘update + FieldArray.union’: Add an element to an array field of a document.
Adding initial data when we create the users in the database:
Before we get into the add feature of Reply, let’s learn how to add data when we
first create users in the database. This is useful to have placeholder data,
such as welcome messages when the user first signs in:

Placeholder message in Reply
To do this, we first need to add the data we want to our User model class. For
the Reply app, I added a message list for each category to show a placeholder
message in each one:
Reply User Model with Placeholder Data
Then when I created a User to save to Cloud Firestore, I added a placeholder
message to each list which displays their name:
Adding new data to an existing array field
Now we are going to learn how to add data. This is how data is added in Reply
when a user adds a new message.
Since we created placeholder data, we already have a fields for the messages,
which are lists. In Cloud Firestore, lists are stored as arrays, so we are
actually working with an array field.
In this case, we have to update an existing array field; we must add an element
(message) to the list while retaining the existing elements (messages). To do
this, we use ‘update + FieldArray.arrayUnion’.
Notice we are using the two methods I mentioned earlier to access data in the
database. Here they are in action. We are retrieving the user document which
corresponds to the user who is signed in.
If executed correctly, we should see the new message added to the existing array
field. (In this case, the personalMessages field)

Deleting Data From the Database:

Deleting data from Cloud Firestore can be implemented in multiple different
ways.
Again, I recommend reading the
documentation
to get a full grasp of when to use each method. Here is a brief overview:
- ‘delete’: Delete an entire document
- ‘update + FieldValue.delete’: Delete a field from a document
- ‘update + FieldValue.arrayRemove’: Remove an element from an array field within a document
Similar to the add message case, we need to update an existing array field; we
must remove an element (message) from the list while retaining the existing
elements (messages). To do this, we use ‘update + FieldArray.arrayRemove’.
If implemented correctly, the message should be deleted and the field,
personalMessages, should still contain the other messages. Here we removed the
the “Get Together” message, which happened to be 1st element in the array field.
Editing Data in the Database:

Continuing with our trend, editing data also has multiple implementations and
use cases. Let’s take a look:
- ‘update’: Update fields of a document without overwriting the entire document
- ‘update + dot notation’: Update nested fields within a document
- ‘update + FieldArray.union’ & ‘update + FieldArray.remove’: Update elements in an array field within a document
- **‘update + FieldValue.increment’ & ‘update + FieldValue.decrement’: **Increment or decrement a numeric field within a document
For the Reply app, what we need to do is replace the old message with the new
message. To do this, we will use ‘update + FieldArray.union’ & ‘update +
FieldArray.remove’:
Notice what is going on here. To ‘update’ the message, we are actually just
deleting the old value, then adding a new one- a clever way to ‘edit’
something.
Getting Data From the Database:

Now that we have data in the database, we can retrieve it. I saved getting data
for last because it is the most cumbersome and complex data operation to
implement.
Fortunately, there is really only one method we need to know when getting data:
‘get’.
Here is what we need to do to retrieve our data:
- We first create an empty ArrayList to hold the data we will get from our database
- We then query the database for the data we need
- Since the data is returned to us as a Map, we need to convert it to our User model class so we can easily retrieve the data; to do this, we use the ‘toObject’ method from the DocumentSnapshot class
- Once our data is converted to a User object, we can get the data we need; in this case, we are retrieving the list of personal messages
- Finally, we return the list of messages to show them in the UI
Whew, I know that was a lot, but you made it!
Now you can truly be a (Fire)base User. 🔥
If you learned something from this article, *please consider buying me a
coffee.*

Hi, I’m Ash 👋🏼 Let’s connect!
🌐 ashtonjones.dev | 👥
@TJgrapes | ✉️
ashtonjonesdev@gmail.com
👨💻 Google Certified Android
Engineer |
✍ Writer |
🧘♂️ Stoic && Meditator
📱 Need an app built? Contact me here.

Top comments (0)