It has been just under a year since I wrote my initial blog post about deploying static sites to AWS via GitHub Actions and a number of things have changed since then. Github Actions has now been generally available for some time and although number of the referenced actions have changed, the main principles remain the same. In this post I'll explain my process for deploying static sites to AWS using Github Actions in greater detail and whats changed since the initial version of the article.
If you're just interested in the build template, it is posted in its entirety at the end of the article.
Assumed infrastructure
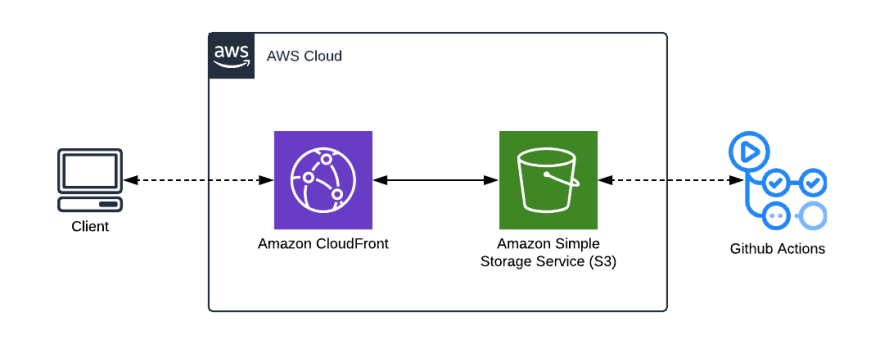
The template assumes you are using a privately hosted S3 static site and serving the content using CloudFront. You could just as easily use a public S3 static site and omit the Invalidate Cloudfront CDN step.
Breaking down the build template
One of the more conventional approaches to continuous integration builds is breaking it down into 3 distinct steps, test, build and deploy. Doing so allows us to easily pinpoint at a glance where things have gone wrong when the build fails. In my previous build template, I had combined the build and deploy steps because at that point it was unclear how to share assets between jobs. However this changed upon discovering the actions/upload-artifact and actions/download-artifact actions.
The test job
The test job is fairly straightforward, it simply checks out the code, installs the dependencies and runs the tests. Not much to see here.
 test:
    runs-on: ubuntu-latest

    steps:
      - uses: actions/checkout@v2

      - name: Install dependencies
        run: npm ci

      - name: Run developer tests
        run: npm test
The build job
This is one of the differences from the previous article, I am splitting up the build and deploy jobs since I now know how to manage build artifacts between steps. In this step, I again check out the code and install dependencies then follow it by building the site. Next, I upload the build artifact to GitHub using the actions/upload-artifact action specifying the build folder as our source and naming it frontend-artifact. This name will be used later on as well as showing in the GitHub interface.
  build:
    runs-on: ubuntu-latest

    steps:
      - uses: actions/checkout@v2

      - name: Install dependencies
        run: npm ci

      - name: Build frontend
        run: npm run build

      - uses: actions/upload-artifact@v2
        with:
          name: frontend-artifact
          path: build
The deploy job
The deploy job is the other big difference from the previous article since it now uses the aws-actions/configure-aws-credentials action to authenticate with AWS and then perform operations. Firstly, I set 2 conditions for running the deploy job; that we only run on the master branch and not on other branches, and we only run after successfully running the test and build jobs. This is simply because I only want to deploy code I am happy to merge into the main branch which has passed all the tests and successfully builds.
I start by downloading the frontend-artifact that I uploaded in the build step, then I configure my access to AWS using GitHub secrets (see Keeping your secrets safe in the previous article) before uploading the code to S3 and invalidating the CloudFront cache so that it knows about the most recent version of the site.
deploy:
    needs: [test, build]
    runs-on: ubuntu-latest
    if: github.ref == 'refs/heads/master'

    steps:
      - uses: actions/download-artifact@v2
        with:
          name: frontend-artifact

      - name: Configure AWS Credentials
        uses: aws-actions/configure-aws-credentials@v1
        with:
          aws-access-key-id: ${{ secrets.AWS_ACCESS_KEY_ID }}
          aws-secret-access-key: ${{ secrets.AWS_SECRET_ACCESS_KEY }}
          aws-region: <<YOUR REGION HERE>>

      - name: Deploy to S3 Bucket
        run: aws s3 sync ./ s3://<<YOUR S3 BUCKET NAME HERE>>

      - name: Invalidate Cloudfront CDN
        run: aws cloudfront create-invalidation --distribution-id=$CLOUDFRONT_DISTRIBUTION_ID --paths '/*'
        env:
          CLOUDFRONT_DISTRIBUTION_ID: <<YOUR CLOUDFRONT DISTRIBUTION ID HERE>>
Putting it all together
So thats all the individual build jobs and a bit of a breakdown of each, the full template is below. There are 2 points worth mentioning about the full template; we are running it on each push and pull request so that we are informed of any issues sooner and the test and build steps run concurrently despite having to install dependencies each time. The reason for this is simply to get quick feedback and this way I don't have to deal with any form of hand off between each of the stages.
I hope you've found this post useful and now have an idea of how easy it is to deploy you static sites to AWS using GitHub Actions.
name: Frontend CI

on: [push, pull_request]

jobs:
  test:
    runs-on: ubuntu-latest

    steps:
      - uses: actions/checkout@v2

      - name: Install dependencies
        run: npm ci

      - name: Run developer tests
        run: npm test

  build:
    runs-on: ubuntu-latest

    steps:
      - uses: actions/checkout@v2

      - name: Install dependencies
        run: npm ci

      - name: Build frontend
        run: npm run build

      - uses: actions/upload-artifact@v2
        with:
          name: frontend-artifact
          path: build

  deploy:
    needs: [test, build]
    runs-on: ubuntu-latest
    if: github.ref == 'refs/heads/master'

    steps:
      - uses: actions/download-artifact@v2
        with:
          name: frontend-artifact

      - name: Configure AWS Credentials
        uses: aws-actions/configure-aws-credentials@v1
        with:
          aws-access-key-id: ${{ secrets.AWS_ACCESS_KEY_ID }}
          aws-secret-access-key: ${{ secrets.AWS_SECRET_ACCESS_KEY }}
          aws-region: <<YOUR REGION HERE>>

      - name: Deploy to S3 Bucket
        run: aws s3 sync ./ s3://<<YOUR S3 BUCKET NAME HERE>>

      - name: Invalidate Cloudfront CDN
        run: aws cloudfront create-invalidation --distribution-id=$CLOUDFRONT_DISTRIBUTION_ID --paths '/*'
        env:
          CLOUDFRONT_DISTRIBUTION_ID: <<YOUR CLOUDFRONT DISTRIBUTION ID HERE>>


Top comments (0)