
This post has been published initially on my blog at thorsten-hans.com
Terraform is a product in the Infrastructure as Code (IaC) space, it has been created by HashiCorp. With Terraform you can use a single language to describe your infrastructure in code. This guide explains the core concepts of Terraform and essential basics that you need to spin up your first Azure environments.
- What is Infrastructure as Code (IaC)
- What is Terraform
- Setting up Terraform
- DataTypes in HCL
- How does a Terraform project look like
- Variables in HCL
- Outputs in HCL
- Overrides
- The Azure Provider
- Your first Azure Environment with Terraform
- Destroying Terraform Environments
- The Terraform Lifecycle
- Download the code from GitHub
- Summary
What is Infrastructure as Code (IaC)
Infrastructure as Code (IaC) is the process of describing infrastructural components such as servers, services, or databases using a programming language. Once all infrastructural requirements are described in code, that code can be stored in source control.
Source control means that the infrastructure is versioned, transparent, documented, testable, mutable and discoverable. Once the first version is stored in source control, all team members see which infrastructure is required to bring a project alive. Everyone sees which configuration settings are required to make -for example- the database perform as good as expected.
Changes are done to the infrastructure exist as dedicated commits -or more significant changes as pull requests- and will be reviewed by peers before being merged into the latest version. The code is also easy to test and on top, Continuous Integration (CI) builds can execute existing tests automatically with no human interaction. Having tests means errors in the infrastructure configuration are spotted earlier.
Also, having code in a repository is 100% more documentation as if all necessary information is stored in just one human brain. This is also a critical risk reduction for every project. Let's elaborate on risk reduction a bit:
Before Infrastructure as Code, John -the smart guy everyone has on his/her software projects- was responsible for maintaining the infrastructure. John gave his best to describe all essential infrastructure parts and their configuration values. However, modern software projects evolve. Services have to be added or removed from the overall architecture; things must be scaled dynamically and/or manually based on external events. So there is a good chance that John has some critical information only in his head... Maybe has Tim -the guy who sits next to John- some tribal knowledge about the Redis configuration, but would you bet on it?
That said, everyone on the team knows John. Everyone trusts him. However, every teammate is afraid when John wants to take a couple of weeks off and go on vacation.
Look at your current project team and try to spot John. Everybody knows situations or constellations like these. To be clear: It's not Johns fault. It's the fact that the entire organization isn't using IaC.
Having Infrastructure as Code would remove that critical path.
What is Terraform
Now, knowing what Infrastructure as Code is, it's time to look at Terraform itself. Terraform is currently the best tool to implement IaC. And it doesn't matter if you're using Azure, Azure Stack or other vendors as a target for your infrastructure. With Terraform you can create, modify and destroy environments safely and efficiently.
For me, these are the three significant benefits offered by Terraform:
- It works with almost every environment (On-Demand and On-Premises)
- You've to learn only a single and simple language
- Terraform can preview changes before applying them
Let's take a closer look at those three benefits now.
Terraform Providers
HashiCorp created a small, yet powerful tool which can talk to numerous platforms using a flexible provider model. Vendors like Microsoft expose functionalities as APIs, and the corresponding Terraform provider is responsible for making those APIs accessible to you. If you ask yourself which platforms Terraform is supporting, go and check the list of providers.
So, means dealing with different APIs, that each platform supports different features?
Yes. Take Azure Functions as an example. You can quickly query information about an existing Azure Functions instance or create/modify/destroy another Azure Function instance using the Azure provider for Terraform. However, if you talk to a local VMWare Cluster, you can't interact with Azure Functions because VMWare doesn't have a first-class citizen of type Azure Function.
The HashiCorp Configuration Language (HCL)
The HashiCorp Configuration Language (HCL) is a small domain-specific language which is based on JSON. The HashiCorp team removed some language-specific plumbings to make us a bit more productive by saving some keystrokes.
On the other side, Terraform adds some powerful interpolation features to HCL, which you'll use and love every day. You'll dive into HCL later in this guide. However, take the following short snippet as sneak-peek to see how Terraform scripts look like:
resource "azurerm_redis_cache" "sample" {
  name                = "tf-redis-basic"
  location            = "${azurerm_resource_group.test.location}"
  resource_group_name = "${azurerm_resource_group.test.name}"
  capacity            = 0
  family              = "C"
  sku_name            = "Basic"
  enable_non_ssl_port = "${var.redis_enable_non_ssl}"
  tags                = "${local.all_tags}"
}
Previewing changes
Being able to preview changes before they are applied to a platform is the most significant benefit offered by Terraform in day-to-day business. You can think of it as the git status of IaC. You describe your infrastructure in HCL and use the handy terraform plan command to see what would happen if that Terraform script gets applied to the chosen platform.
Besides those three major benefits, Terraform offers things like:
- centralized state management
- implicit dependency resolution
- parallelization of execution
- reusable modules
- terraform module registry
and many more.
Setting up Terraform
Setting up Terraform is quite smooth. Terraform can be used on every popular operating system. It can be downloaded directly from the official website.
On macOS you can install it also using homebrew by executing brew install terraform.
On Windows you can install it using chocolatey by executing choco install terraform.
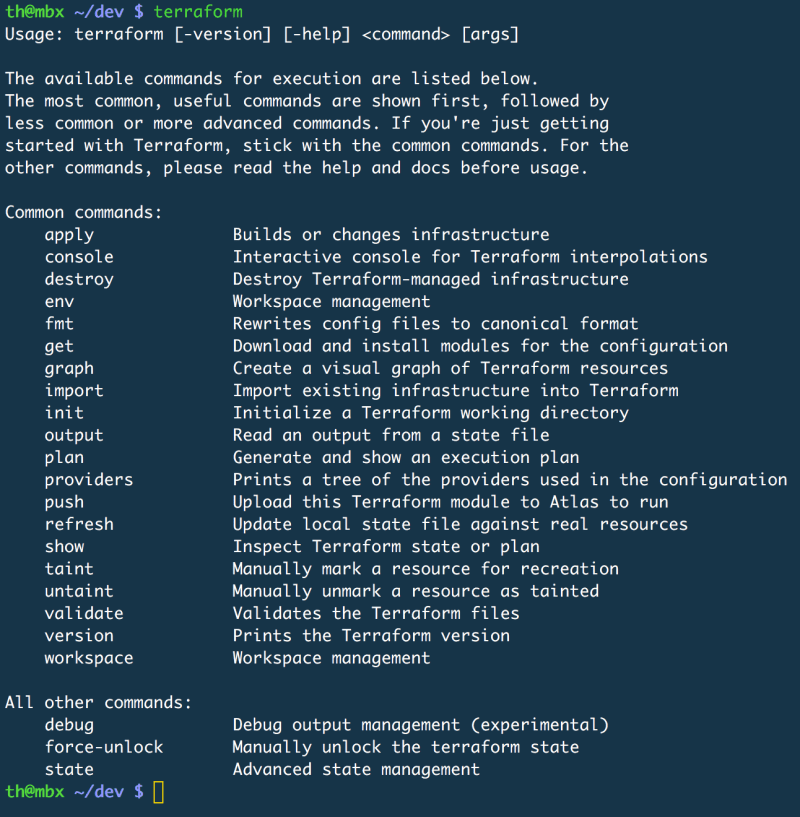
The installation can be verified by executing the terraform command. Terraform should now show all available subcommands.
Terraform Extension for Code
There is an extension for Visual Studio Code called Terraform (by Mikael Olenfalk). Once installed Code can do syntax highlighting, code completion, IntelliSense and on top of that you can drill through your resource graph using a nice visual tree.

DataTypes in HCL
The introduction already mentioned that HashiCorp Configuration Language (HCL) is a relatively simple language. This simplicity continues when we dive deeper in HCL DataTypes. Currently HCL knows four different data types that you'll use to craft your scripts.
Booleans
A boolean in HCL must have a value. The value can either be true or false. HCL has no native support for booleans; instead, it converts every string into a boolean if possible.
variable "storace_account_enable_firewall" {
  type    = "string"
  default = true
}
Strings
A string in HCL is either a single line of text or text that spreads over multiple lines. The following snippet shows, how those two kinds of string can be defined:
variable "single_line_string" {
  type    = "string"
  default = "value"
}

variable "multi_line_string" {
  type = "string"
  default = <<EOF
This value spreads
over several lines.
EOF
}
When receiving string values, HCL inspects the value and converts it to a number or a boolean if possible (as mentioned earlier). However, there are some important caveats that every Terraform user needs to know. You can read more about those caveats here.
Lists
A list in HCL is a collection of string values which are indexed by numbers. Lists in HCL are zero-based (so the first index of a list is always 0 in HCL). It's a typed JSON Array.
variable "simple_list" {
  type    = "list"
  default = ["development", "staging", "production"]
}
Maps
A map in HCL is a dictionary of string values, indexed by string keys. You can think of it as a regular JavaScript object. Defining a map looks like this:
variable "custom_tags" {
  type      = "map"
  default   = {
    author  = "Thorsten"
    version = "1.0.0"
  }
}
How does a Terraform project look like
Terraform projects are easy to understand. Every folder is a valid Terraform project if it contains at least a single .tf or .tf.json file. (Yes you can write your scripts in plain old JSON, but my advice is to stick with .tf files)
However, if you have multiple .tf files in a folder, files are processed in alphabetical order. While processing, .tf files are merely appended together.
Variables in HCL
In Terraform variables can be specified to make scripts more flexible and dynamic. Variables are either created directly inside of regular .tf scripts or they could be organized in dedicated variables.tf files. There is no real best practice here because each Terraform projects differ in both: size and complexity.
Because of Terraform's implicit dependency resolutions, variables are always available, no matter where they end up in the final script. To keep things organized, we'll start with a dedicated variable file. In such a situation, I choose names like variables.tf. frontend-variables.tf or backend-variables.tf.
A variable has a reasonably simple schema in HCL.
variable "storage_account_name" {
  type        = "string"
  default     = "thorstensstorage"
  description = "provide a unique name for the Storage Account"
}

variable "storage_account_location" {
  type        = "string"
  description = "name of the Azure datacenter where the Storage Account should be generated"
}
Every variable requires a value at runtime. There are five ways how the value of a variable could be specified in Terraform.
- The actual value of the variable is provided by the
defaultproperty as part of the variable definition as shown above forstorage_account_name. - The variable
storage_account_locationhas nodefaultvalue. Whenterraform applyorterraform planis executed, a simple wizard will ask for a value. - Actual variable values could also be specified using
Environment Variables. This is an excellent approach to build servers or scenarios where Terraform scripts are applied without human interaction.Environment Variablesare pulled if their name follows the schemaTF_VAR_{variable_name}(TF_VAR_storage_account_locationin this example) - Values can be specified by passing arguments to the
terraform applycommand. This approach is great for development time or -if required due to limitations- for unattended execution contexts such as build servers - The last and most convenient method to specify variable values are so-called
.tfvarsfiles..tfvarsfiles should never go to source control. In real-world scenarios, it's often required to pass some sensitive data into Terraform scripts (Think of Service Principal credentials for example). My projects normally contain avalues.tfvars.templatefile which is explicitly added to git and tells other teammates which values should be defined. Providing concrete values for the samplevariablesabove could look like this.
storage_account_name = "storagethorsten"
storage_account_location = "West Europe"
Referencing Variables
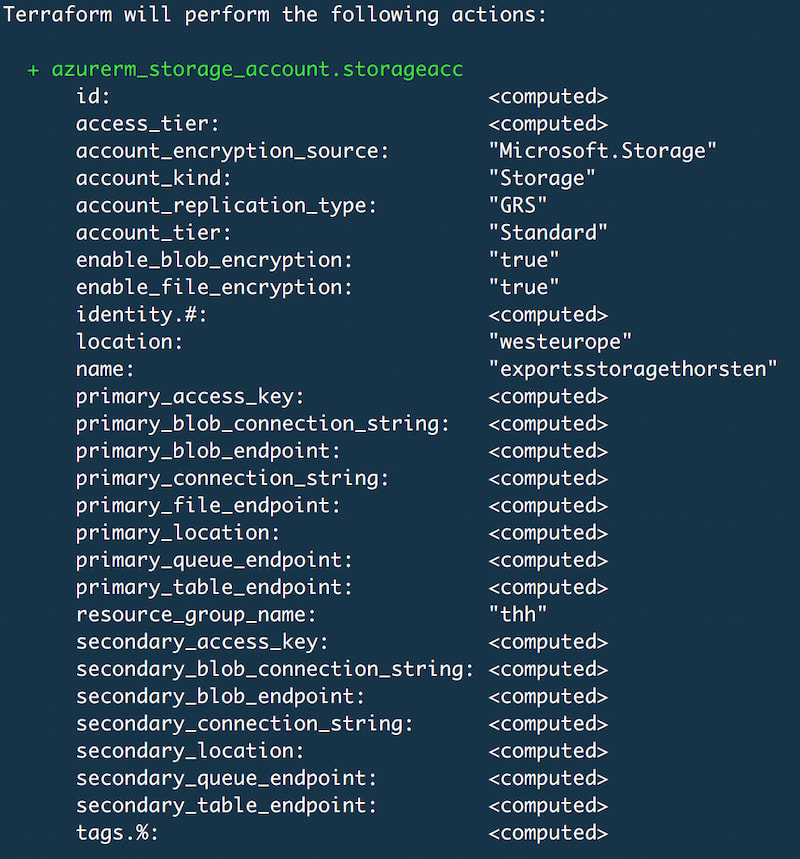
Referencing variables in Terraform scripts is done by using the Terraform interpolation syntax. Both variables that were defined above are used in the following sample to provide essential metadata for an Azure Storage Account. The following script contains HCL keywords that weren't explained yet. Don't worry about those for now. The concept of using variables is essential for now.
resource "azurerm_storage_account" "storageacc" {
  name                     = "exports${var.storage_account_name}"
  resource_group_name      = "thh"
  location                 = "${var.storage_account_location}"
  account_tier             = "Standard"
  account_replication_type = "GRS"
}
Execute terraform plan and see how the interpolations construct runtime values.
Outputs in HCL
Every Terraform script has to read data from resources. Data like Connection Strings, IP addresses or DNS names from items that are created as part of the script itself. This can be achieved using so-called outputs in HCL. The definition syntax is quite similar to variable definitions. For smaller projects, my advice is to put all outputs into a single file called all_outputs.tf. A simple output that grabs the primary access key from the Azure Storage Account specified above may look like this:
output "storage_account_access_key" {
  value       = "${azurerm_storage_account.storageacc.primary_access_key}"
  description = "The storage account's primary access key"
  sensitive   = false
}
The value of the output is queried from the Azure Storage Account, once again the resource is referenced by interpolation. To identify the custom resource, the combination of the type azurerm_storage_account and the custom, unique name storageacc is used for identification. When the resource is identified, the exported property is referenced by the name (here primary_access_key).
The official Azure provider documentation is providing a list of all exported attributes. Check the documentation of azurerm_storage_account here.
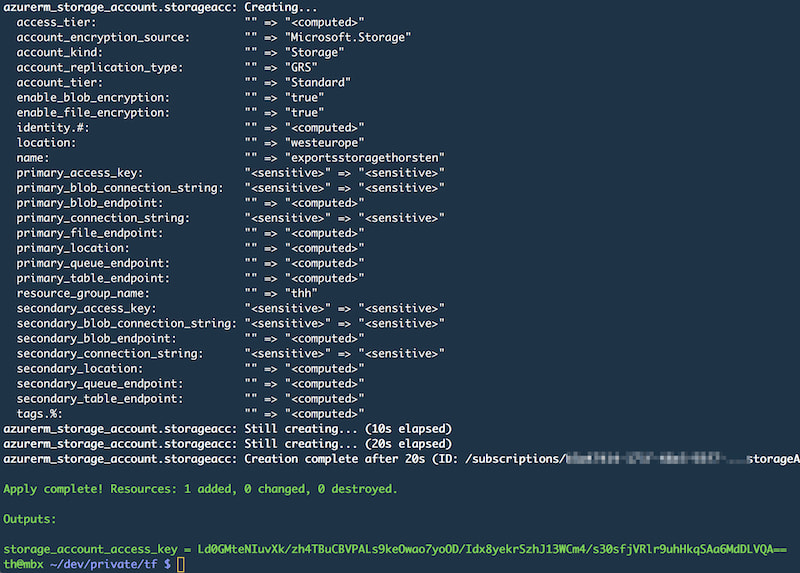
Besides description, the output scheme defines another important property called sensitive. If the output is marked as sensitive, Terraform won't write the actual value to logs. sensitive is set to false in the definition above for demonstration purpose.
Execute the Terraform script using terraform apply and check the log messages for the storage_account_access_key.
Overrides
As said, all .tf files within a Terraform project are appended together. Overrides behave a bit differently, they're loaded at the end, and their values are merged into existing configurations instead of being simply appended. Overrides are a great solution to change simple properties without actually changing the configuration itself.
Typical scenarios for Overrides are
- build servers
- temporary modifications
Override files must be named override.tf or end with _override.tf. If multiple Override files are present, they're merged in alphabetical order. For example, consider the following Azure App Service:
resource "azurerm_app_service" "webapi" {
  name    = "sample-api"
}
The name can be modified by defining override.tf like this:
resource "azurerm_app_service" "webapi" {
  name    = "override-sample-api"
}
The Azure Provider
The real power of Terraform is defined by the actual provider that is used. Luckily, the Azure provider is a compelling one. Besides creating, modifying or deleting resources, existing resources (including those, that were not created by Terraform) could be used as a data source, and their values can quickly be brought into every Terraform scripts.
Bevor we're diving deeper into resources and data sources, a new Terraform project must be created, and the Azure provider has to be configured. Create a new folder azure-sample and a new file called main.tf with the following content:
provider "azurerm" {
  version = "=1.22.0"
}
To download the desired provider, you've to execute terraform init in the project's folder. The terraform providers command can be executed in any project to list all providers used in the current project.
Without further configuration, the Azure provider will reuse existing authentication from Azure CLI. The project runs in the security context provided by the local az installation. All modifications are applied to the currently selected Azure Subscription.
You can verify this in Azure CLI using az account list. Terraform uses the default subscription. You can change the subscription in az by executing
az account set --subscription 00000000-0000-0000-0000-000000000000
# replace 00000000-0000-0000-0000-000000000000 with your subscription ID
Authenticating mechanisms offered by the Azure Provider
The Azure provider supports four different kinds of authentication mechanisms. Depending on your security implementation, you've to select the proper mechanism for your needs.
- Authenticating to Azure using the Azure CLI
- Authenticating to Azure using a Service Principal and a Client Secret
- Authenticating to Azure using a Service Principal and a Client Certificate
- Authenticating to Azure using Managed Service Identity
Authenticating to Azure using Azure CLI is excellent to get started, however, you should switch to an authentication which is independent from az early.
The other guy on the team may not have a local instance of az or think of the build server. You should not add az as a dependency, except for local development.
Authenticating to Azure using a Service Principal (SP) is more convenient. To configure this kind of authentication, either a combination of ClientId and ClientSecret or -for Service Principal identification by a certificate- the combination of client certificate password and client certificate path is required.
To authenticate to Azure using a Managed Service Identity (MSI), the use_msi variable must be set to true and a msi_endpoint could optionally be specified. Last but not least the actual Azure Environment can be specified on the provider. You can chose between public (default), usgovernment, german or china.
Instead of putting those sensitive data into .tf files either .tfvars files or Environment Variables should be used. The Azure Provider excepts the names of those environment variables to follow a strict schema ARM_{variablename}. (eg.: ARM_ENVIRONMENT or ARM_USE_MSI).
No matter which kind of "authentication mechanism" used, ARM_ENVIRONMENT and ARM_TENANT_ID and ARM_SUBSCRIPTION_ID should always be specified.
To keep things simple, this guide will stick with tokens being acquired by Azure CLI. But environment, tenant and subscription will be pinned by using Environment Variables.
export ARM_ENVIRONMENT=public
export ARM_TENANT_ID=00000000-0000-0000-0000-000000000000
# replace 00000000-0000-0000-0000-000000000000 with your Tenant ID
export ARM_SUBSCRIPTION_ID=11111111-1111-1111-1111-111111111111
# replace 11111111-1111-1111-1111-111111111111 with your Subscription ID
Of course, those export commands are not required if the suggested Azure Subscription matches the current one chosen one in Azure CLI, but it's a good practice and critical to understanding. Especially if Terraform will be executed without human interaction (eg. on the build server).
For further information on how to configure the different authentication mechanisms, check out the official provider documentation.
Your first Azure Environment with Terraform
Having the provider configuration in place, it's time to dig into Azure specific resources and data sources. Everything in Azure belongs to a Resource Group so let's get started with such a Resource Group:
provider "azurerm" {
  version = "=1.22.0"
}

variable "location" {
  type        = "string"
  default     = "westeurope"
  description = "Specify a location see: az account list-locations -o table"
}

variable "tags" {
  type        = "map"
  description = "A list of tags associated to all resources"

  default = {
    maintained_by = "terraform"
  }
}

resource "azurerm_resource_group" "resg" {
  name     = "terraform-group"
  location = "${var.location}"
  tags     = "${var.tags}"
}
So far so good. Verify what Terraform would do in Azure with terraform plan. Before applying it to Azure, some refactorings are required, to ensure our project remains clean and readable. First, all variable should be moved to a dedicated global_variables.tf file.
#global_variables.tf
variable "location" {
  type        = "string"
  default     = "westeurope"
  description = "Specify a location see: az account list-locations -o table"
}

variable "tags" {
  type        = "map"
  description = "A list of tags associated to all resources"

  default = {
    maintained_by = "terraform"
  }
}
Your local main.tf should now look like this:
provider "azurerm" {
  version = "=1.22.0"
}

resource "azurerm_resource_group" "resg" {
  name     = "terraform-group"
  location = "${var.location}"
  tags     = "${var.tags}"
}
Although the tags variable is specified in global_variables.tf, you should always specify critical variables using .tfvars files (keep in mind that those will not go to source control!). Add local.tfvars and provide specify tags as shown below.
tags = {
  author = "Thorsten Hans"
}
To verify, use terraform plan -var-file=local.tfvars now. Terraform should print something matching the following picture:
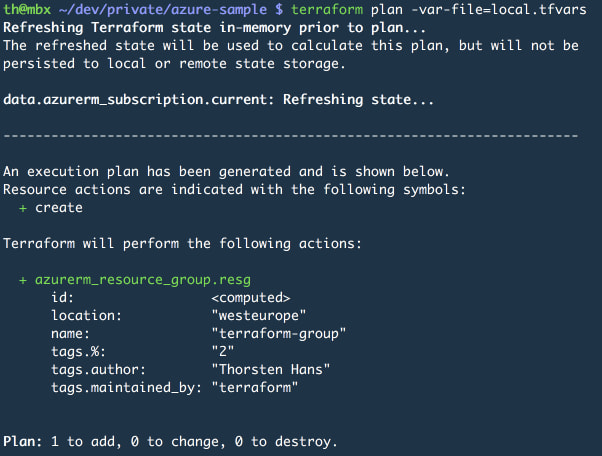
The tags variable isn't overwritten, the values from default and those from local.tfvars are merged (in case of looking at a map variable). However, if both maps contain the same key, the value from the .tfvars file is used.
Next, add a all_outputs.tf file. This file will query essential, resource-independent data from Azure once resources are applied or modified. For now, the name of the Azure Subscription will be queried and written to the console once the script will be applied.
#all_outputs.tf
data "azurerm_subscription" "current" {}

output "target_azure_subscription" {
  value = "${data.azurerm_subscription.current.display_name}"
}
Let's apply this state to the cloud!
Execute terraform apply -var-file=local.tfvars and confirm the execution plan by answering Terraforms confirmation-question with yes. (You can also prevent Terraform from asking for confirmation by adding the --auto-approve flag). Once finished, Terraform will print the name of the modified Azure Subscription to the console.
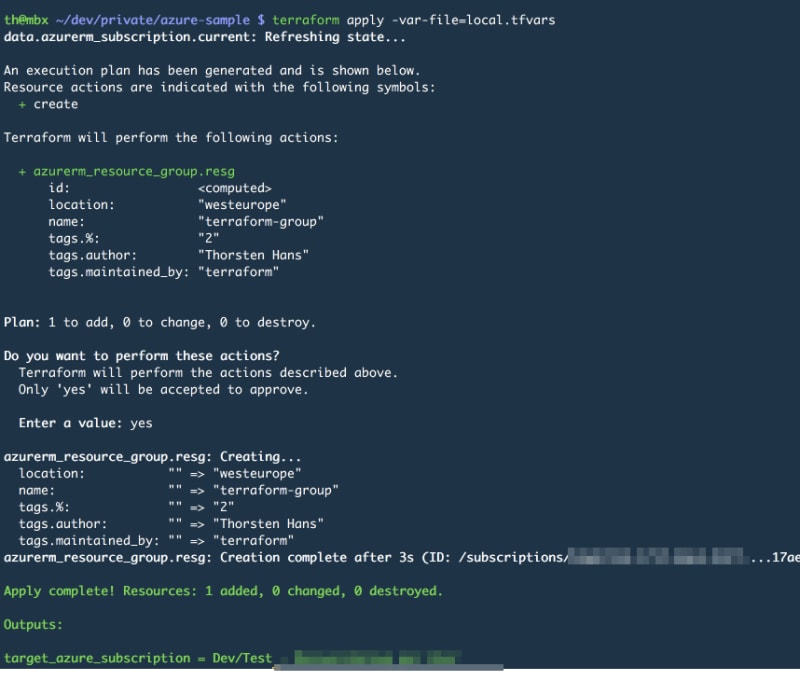
Great! But having only a Resource Group being deployed to Azure solves no need. For demonstration purpose, extend the script and deploy an instance of Application Insights. Add the following to main.tf;
resource "azurerm_application_insights" "ai" {
  name                = "terraform-ai"
  resource_group_name = "${azurerm_resource_group.resg.name}"
  location            = "${azurerm_resource_group.resg.location}"
  application_type    = "Web"
  tags                = "${var.tags}"
}
When working with Application Insights, the instrumentation_key is critical. It has to be provided to any resource which should write application-specific logs using Application Insights. Add an output and query the instrumentation_key in all_outputs.tf:
output "instrumentation_key" {
  value = "${azurerm_application_insights.ai.instrumentation_key}"
}
Execute terraform plan -var-file=local.tfvars again and verify, that only one resource will be added. Terraform looks at the currently deployed resources in Azure and verifies that all properties are still matching those described in your script. If so, no action is required for that resource(s).
If the changes look good, go ahead and apply them by invoking terraform apply -var-file=local.tfvars --auto-approve. Finally Terraform should display the following result:
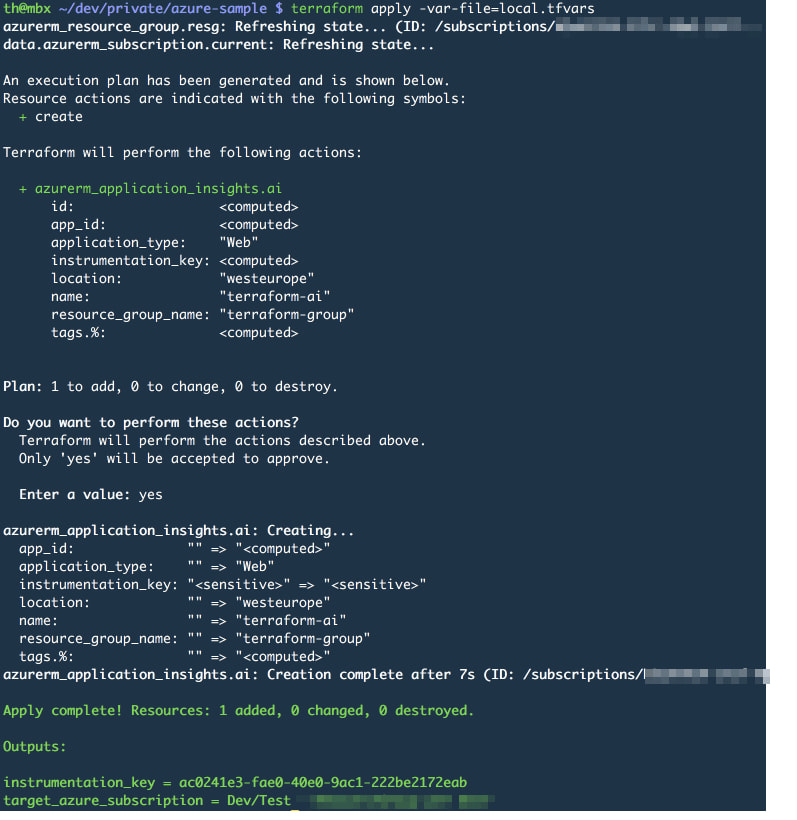
Last, but not least, the actual Azure App Service and the underlying Azure App Service Plan have to be created to complete the sample. Both resources expose a vast of properties, which have to be set depending on the kind of App Service / App Service Plan you want to create. Again, the official documentation helps to spot and to understand all those properties. This sample will create a Linux App Service Plan and a App Service for Containers. For demonstration purpose, a plain NGINX Docker Image will be deployed to the App Service.
To ensure flexibility, several configuration properties should be set by variables. Add a frontend.variables.tf and provide the following content:
variable "appservice_plan_tier" {
  type        = "string"
  default     = "Standard"
  description = "Specify the SKU tier for the app service plan"
}

variable "appservice_plan_size" {
  type        = "string"
  default     = "S1"
  description = "Specify the SKU size for the app service plan"
}

variable "appservice_plan_kind" {
  type        = "string"
  default     = "Linux"
  description = "Specify the kind for the app service plan (Linux, FunctionApp or Windows)"
}

variable "appservice_always_on" {
  type        = "boolean"
  default     = true
  description = "Specify if the app service should be always online"
}

variable "appservice_docker_image" {
  type        = "string"
  default     = "nginx:alpine"
  description = "Specify the Docker image that should be deployed to the app service"
}
Having the variables in place, the actual resource (App Service Plan) goes to main.tf:
resource "azurerm_app_service_plan" "appsvcplan" {
  name                = "terraform-app-svc-plan"
  resource_group_name = "${azurerm_resource_group.resg.name}"
  location            = "${azurerm_resource_group.resg.location}"
  kind                = "${var.appservice_plan_kind}"
  reserved            = true
  tags                = "${var.tags}"

  sku {
    tier = "${var.appservice_plan_tier}"
    size = "${var.appservice_plan_size}"
  }
}
An Azure App Service Plan without an actual App Service is useless. Add the following resource to main.tf.
resource "azurerm_app_service" "appsvc" {
  name                = "terraform-app-linux-app-svc"
  resource_group_name = "${azurerm_resource_group.resg.name}"
  app_service_plan_id = "${azurerm_app_service_plan.appsvcplan.id}"
  location            = "${azurerm_resource_group.resg.location}"
  tags                = "${var.tags}"

  app_settings {
    WEBSITES_ENABLE_APP_SERVICE_STORAGE = false
  }

  site_config {
    always_on        = "${var.appservice_docker_image}"
    linux_fx_version = "DOCKER|${var.appservice_docker_image}"
  }
}
Did you recognize that all required variables were already specified in the previous snippet? If not, verify their existence. To verify our deployment once it has been applied, add another the public DNS name of the Azure App Service as output to global.outputs.tf:
output "appservice_dns_name" {
  value = "${azurerm_app_service.appsvc.default_site_hostname}"
}
Finally, the runtime configuration has to be specified in local.tfvars as shown below.
appservice_plan_tier = "Basic"
appservice_plan_size = "B1"
Execute terraform plan -var-file=local.tfvars to preview the upcoming changes. If everything looks good, apply the changes using terraform apply -var-file=local.tfvars --auto-approve. Terraform will now print the public DNS name as part of all output variables to the console. Open that URL using your favorite browser. You should see the beautiful NGINX Welcome Page as shown below.
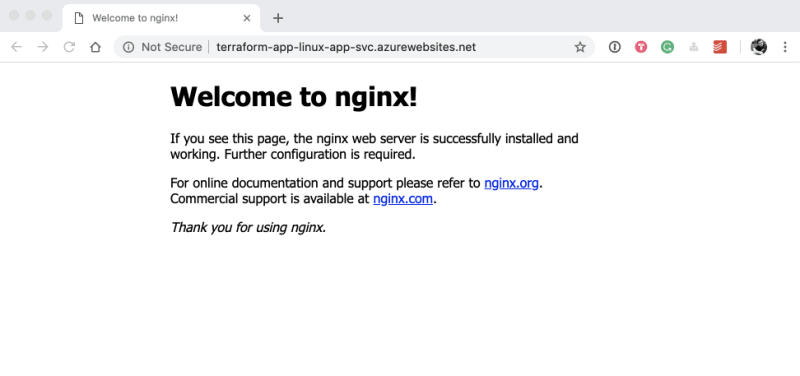
Cool!
But did you recognize the values specified in the .tfvars file? Those differ from the default values defined in frontend_variables.tf. Imagine, that you recognize a bigger load as expected on the App Service, so let's scale up to the App Service Plan to Standard and S1 as initially defined as default values. Change local.tfvars to:
tags = {
  author = "Thorsten Hans"
}
appservice_plan_tier = "Standard"
appservice_plan_size = "S1"
Because terraform apply also prints the execution plan before actually modifying the target, you can use terraform apply -var-file=local.tfvars and preview the upcoming changes before they are applied. Now you should see that Terraform will modify exactly one resource - the Azure App Service Plan. It's even more precisely. It tells you exactly which properties it'll change. If it looks good, go ahead and confirm the changes.
That wasn't the only issue in our script. We've also forgotten to set the instrumentation_key on the Azure App Service. To demonstrate Terraform state management, let's set the instrumentation_key on the Azure App Service manually using Azure CLI. You'll use terraform output to query actual information from Azure and finally set the appsetting manually using the following script:
terraform output instrumentation_key
# will print the Instrumentation ID (GUID) to the terminal
# 22222222-2222-2222-2222-222222222222

terraform output appservice_dns_name
# will print the entire DNS name of the web app to the terminal
# terraform-app-linux-app-svc.azurewebsites.net

#!! HERE WE NEED ONLY the SUBDOMAIN

az webapp config appsettings set --resource-group terraform-group
     --name terraform-app-linux-app-svc
     --settings INSTRUMENTATION_KEY=22222222-2222-2222-2222
Having the appsettings updated, move on and execute terraform plan -var-file=local.tfvars. Terraform recognized that an untracked change has happened to the Azure App Service. It suggests to change the appsettings back to the value specified in the Terraform script - which is not existing indeed. We want to keep the App Service as it is, for now, so cancel the script at this point.
No worries you can reuse the output of one resource as variable in another, but that requires to have Modules in your Terraform script, so definitive content for another article on Terraform.
Destroying Terraform Environments
Terraform is also able to destroy entire environments it has created previously. Just execute terraform destroy inside of the project's folder and after reviewing the execution plan -and confirming- Terraform will destroy all resources. Once finished, the Azure Subscription should be clean again.
The Terraform Lifecycle
Now that you've created, modified and destroyed resources in Azure using Terraform, you covered all aspects of the single developer Terraform workflow. Several actions -like creating resources- has been executed quite often and I hope you memorized those basics already. To visualize it again, here the single developer Terraform Lifecycle:

Download the code from GitHub
The entire Terraform project is available on GitHub. Browse through it and use it to grasp even more knowledge on Terraform in an Azure world.
Summary
I hope you enjoyed reading Terraform - The definitive guide for Azure enthusiasts. If you made it through the post, you gained a ton of knowledge about Terraform, and you made some necessary steps with the Azure Provider for Terraform. Having this introduction in place, I'll publish more advanced posts on Terraform and Infrastructure as Code in the upcoming weeks and months.
Infrastructure as Code is something every developer and IT-Pro should care about. Modern applications are way more complex than those five years ago. Developers, teams, and organizations are combining cloud services from different vendors to build the best user experience for their customers. With IaC and Terraform you can manage the jungle of services and make that essential knowledge discoverable and collaborate on it. However, keep in mind that moving a real-world project or perhaps an entire organization on the IaC and Terraform track isn't an easy task!
If you need further assistance on that journey, reach out. I would be thrilled to help.

Top comments (0)