If you've used fetch to retrieve data from API using Javascript, then doing it with React will be pretty similar. In this article, we'll discuss the steps you need to use fetch to get data from an API using React.
But before we get into the details, we need to be familiar with some basic definitions.
API: An API is basically a set of data, often in JSON format with specified endpoints. When we access data from an API, we want to access specific endpoints within that API framework. For example, if in the scenario we are using today, we are going to be using the random user API. Within this API, it has randomly generated user data, basically like Lorem Ipsum, but for imaginary users. It has data within the API like phone numbers, email addresses, names and pictures for each user. We don’t want all the data, but we’ll use certain endpoints to grab only the data we want.
Fetch: Since all the data we want is stored in an API, the fetch is used to retrieve the data. By this command, we are basically requesting the API to send the data stored in it. We can also specify how we want the data to be returned. JSON data is often the easiest to use, so if the server returns anything other than JSON format, if that’s what we’ve requested, we may get an error.
Lifecycle Method: In React, there are several lifecycle methods. We’ll be using three of these lifecycle methods in this exercise, Constructor, componentWillMount and Render.
State: State can be very confusing for someone who is new to React. The state can be compared with the state of water- it is the same thing but different according to the state.
Now that we're done with the basics, let us dive into the process.
Because React uses components, it’s easy to make a fetch request, or pull data from an API, store it in one component, and then import the entire component to the app or parent component. Since you may need to fetch from multiple sources or have multiple fetches from the same source, dividing it up into components will help keep your code less cluttered. Here’s how I set up the architecture of this app:

The background component contains all of the user photos that we’ll pull from the fetch. But I’ve made Background it’s own component, and then import it into Splash, so that the code remains cleaner and less cluttered. You can go ahead and set up the architecture of your app before you begin making the API if it’s easier for you to work that way. Now, let’s take a look at the Random User API, so we can see what data we want to grab.

Before you get too far into the project, it’s usually a good idea to go to the API and read any documentation available. This will usually give you a good idea of how the API is structured and how to access the data. Often, bigger APIs will have you register for a key, or have specific ways you need to access the data. Random User API is open source and easy to use, so we can avoid a lot of that hassle.
Once you’ve had time to look over the API documentation, I usually like to pull the data up in a program called Postman. Postman is a great way to see the data and target the specific data you want. If you haven’t downloaded it already, go ahead and take a second to do that.

Here, in postman, you will notice a couple of things. At the top, I’ve put the API address into the search bar. Since we’re retrieving data, I’ve set the request to a GET request. If this were an API that we had constructed, we could also do a POST, PUT or DELETE request, if we needed to. After the API address I’ve added one line, “results=500”. I want to make sure the Thumbnail pictures we pull fill the entire background, so I’m asking the API to return 500 results.
Now, suppose we were pulling data from the API, and instead of the background, we were making a user profile site. We might only want 1 result, or 3, or whatever. You can filter the results in many different ways, but for now, this is as complicated as we are getting. If you scroll through the data, you can see there’s quite a lot there. I’ve highlighted the data that we want. We don’t want any text data, only the pictures. And not just pictures. We only want the thumbnails, which are part of the picture object. Once we know what we want, and we can see in postman where that data is nested, it’s easier for us to target later.
Okay, now comes the fun part.
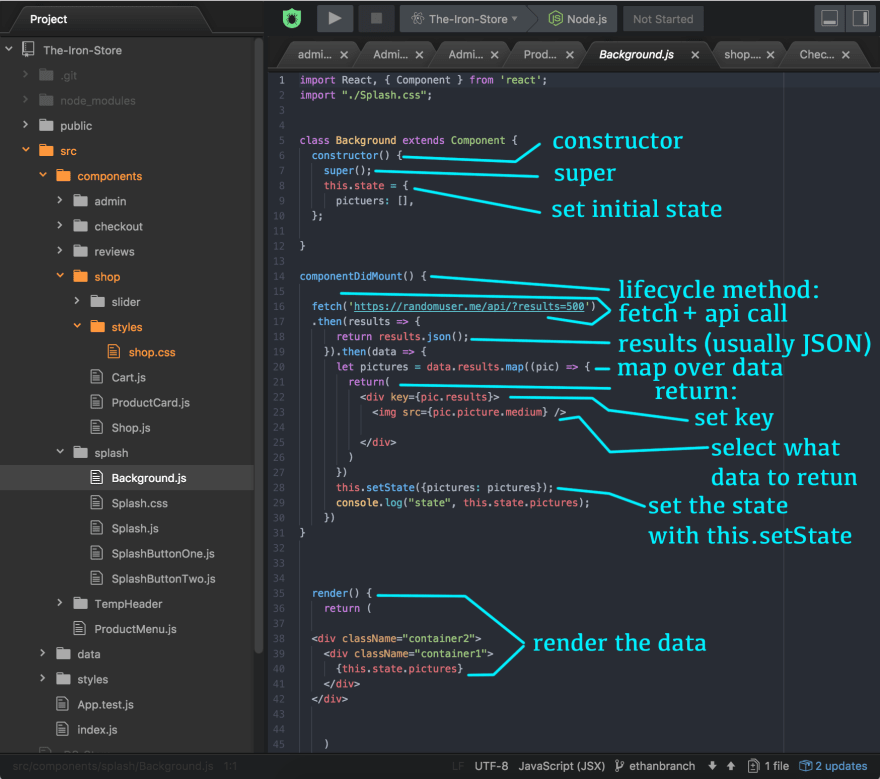
Here we are in the background component. Like I mentioned earlier, to do a fetch in React, we’ll need to use 3 lifecycle methods. You can look at this as a 3 step process.
Step 1: Constructor Method
In the constructor method, we only have to worry about two things. Once we call the constructor method, we use super to pass any props from the parent to the child component. Then we set the state. I mentioned the state earlier. When you set the initial state, you want to set it as empty, or blank. If it’s going to be a string, it would be an empty string. If an array, an empty array, etc. In this scenario, we only have one thing that we need to set the state of, and that’s the pictures. Because we want our pictures in an array, we’re setting it now to an empty array. Then, once we use the fetch to retrieve the data, we’ll go in afterward, and set the new state to the data that we’ve pulled.
Step 2: ComponentWillMount
In React, lifecycle methods including “Will” are called before something happens. Lifecycle methods including “Did” are called after something happens. In this case, we want to call the method before, and then pull the data, which is why we are using componentWillMount instead of componentDidMount.
Step 2, part A: Fetch:
Once you’ve done one fetch, you’ve basically done a thousand. The format will be more or less the same for each one, with just minor differences in how you want to map over the data, etc. In this fetch, we’re calling the fetch, and if you’ll notice in the web address, I’ve included the “results=500” filter that I pointed out earlier. Once you have targeted the data the way you want in postman, you can just copy and paste that URL into your fetch.
Step 2, part B: Results:
Here, we’re just specifying how we want the data returned. Since JSON is easy to work with, and that’s how this data is formatted, that’s what we’re expecting here.
Step 2, part C: Map:
Here, we’re mapping over the data that we’ve pulled. This is basically the same thing as doing for a loop. If you’re more comfortable using a for loop, there’s probably no reason you can’t do that. However, sometimes the map function just seems to work better. Think of mapping like this, We’ve told the API we want to get 500 user data objects. If we go back to the postman, we can see that each user data object contains a lot of information we don’t want, like numbers, addresses, etc. So we need to map over it first. Then, we can tell the API, “Hey dude, all we really need are these pictures here. Let’s just discard everything else”.
Step 2, part D: Key and Return data:
There are two parts to this step. First, we have to set the key, and then specify the data object. The key attribute is used by React to ensure that dom elements correspond with data objects. Here, we’ve set the key to pic.results. Then, we’ve created an image tag, with a source that’s set to the data we want to pull. Basically what’s happening here is we’ve set a key inside the parent container. Then, inside the parent container, we’re saying, “Okay here’s an element…and whenever all the data is mapped over, we want it to populate this element with that data.” Because we want pictures, that’s why we’re using an img element.
Step2, Part E: Set State
Now the last part of this lifecycle method, and arguably the most important. We need to set the new state of our pictures empty array. Using ‘this.setState’, we’re basically saying, “Hey React, remember that empty array we defined as ‘pictures’ earlier? Well, now we want to change its state. So we’re changing it to this array of pictures we pulled from the API. Is that okay with you?” React is usually pretty nice, so I don’t think it will mind.
Step 3: render:
Finally, the last lifecycle method, which is the render. Here, we want to use the new state we defined in the componentWillMount lifecycle method. So, we’re setting up a structure here, and then using curly braces to bring in that state “{this.state.pictures}”
I hope you enjoyed the article and understood how to fetch API data with ReactJS.


Top comments (1)
The lifecycle method
componentWillMounthas been deprecated since react version 16.3 (around March '18), so I wouldn't recommend using it. It's been replaced withUNSAFE_componentWillMountobviously meant for the legacy codebase upkeep. Feel free to implement data fetching in thecomponentDidMountfunction or even outside of the view component when external state management (e.g., redux) is used in your stack.