In my previous posts, I covered a wide range of topics about LitElement and TypeScript. Then I created a Single Page Application based on Web Components.
Let's dive deep into this project to understand how to add the End-to-End(E2E) testing capability using Cypress and TypeScript.
The Shadow DOM
The Shadow DOM API is about web components encapsulation, meaning it keeps the styling, markup, and behavior hidden and separate from other code on the page. This API provides a way to attach a separated DOM to an element.
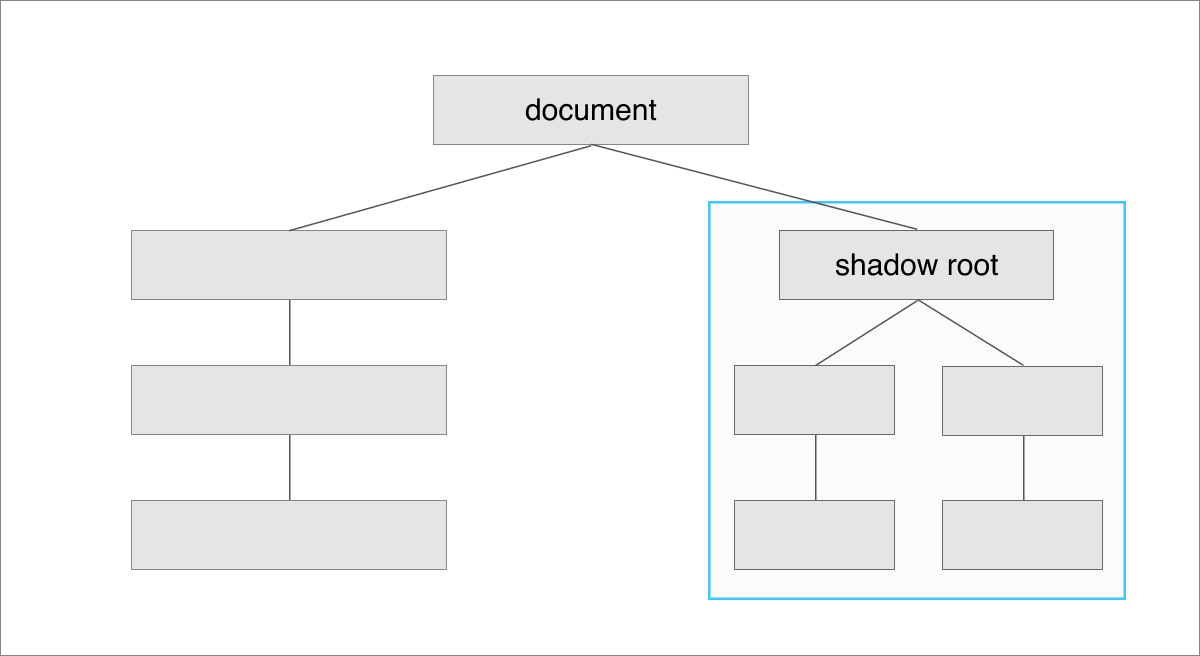
To clarify, let's consider the /about page from our application:

As you can see, The Shadow DOM allows hidden DOM trees and starts with a shadow root: #shadow-root (open). The word open means you can access the shadow DOM through JavaScript.
However, it's feasible to attach a shadow root with a closed mode, meaning you won't be able to access the shadow DOM. It's a really good way to encapsulate an inner structure or implementation.
Adding Cypress Support
Installing Cypress
Install Cypress as part of the development dependencies:
npm install --save-dev cypress
This will produce the following output:
litelement-website$ npm install --save-dev cypress

Installing Cypress (version: 5.3.0)

  ✔ Downloaded Cypress
  ✔ Unzipped Cypress
  ✔ Finished Installation /Users/luixaviles/Library/Caches/Cypress/5.3.0

You can now open Cypress by running: node_modules/.bin/cypress open

https://on.cypress.io/installing-cypress
After runing the Cypress installer, you'll find the following folder structure:
|- lit-element-website/
    |- cypress/
        |- fixtures/
        |- integrations/
        |- plugins/
        |- support/
By default, you'll have several JavaScript files in those new folders, including examples and configurations. You may decide to keep those examples for Cypress reference or remove them from the project.
Adding The TypeScript Configuration
Since we have a TypeScript-based project, we can consider the new cypress directory as the root of a new sub-project for End-to-End testing.
Let's create the /cypress/tsconfig.json file as follows:
{
  "compilerOptions": {
    "strict": true,
    "baseUrl": "../node_modules",
    "target": "es6",
    "lib": ["es5", "es6", "dom", "dom.iterable"],
    "types": ["cypress"]
  },
  "include": ["**/*.ts"]
}
This file will enable the cypress directory as a TypeScript project and we'll be ready to set more properties and configurations if that is needed in the future.
Cypress Configurations
Next, we'll update the autogenerated cypress.json file as follows:
{
  "supportFile": "cypress/support/index.ts",
  "experimentalShadowDomSupport": true
}
- The
supportFileparameter will set up a path to the file to be loaded before loading test files. - The
experimentalShadowDomSupportflag was needed to enable shadow DOM testing in previous versions. However, sincev5.2.0it is no longer necessary.
Webpack Configuration and TypeScript Compilation
First, install the following tools:
npm install --save-dev webpack typescript ts-loader
Since we'll use TypeScript for our Cypress tests, we'll be using Webpack and ts-loader to compile and process these files.
The Cypress Webpack preprocessor
Install the cypress-webpack-preprocessor:
npm install --save-dev @cypress/webpack-preprocessor
Update the content of plugins/index.js file to:
const cypressTypeScriptPreprocessor = require('./cy-ts-preprocessor');

module.exports = on => {
  on('file:preprocessor', cypressTypeScriptPreprocessor);
};
On other hand, create a JavaScript file: cypress/plugins/cy-ts-preprocessor.js with the Webpack configuration:
const wp = require('@cypress/webpack-preprocessor');

const webpackOptions = {
  resolve: {
    extensions: ['.ts', '.js'],
  },
  module: {
    rules: [
      {
        test: /\.ts$/,
        exclude: [/node_modules/],
        use: [
          {
            loader: 'ts-loader',
          },
        ],
      },
    ],
  },
};

const options = {
  webpackOptions,
};

module.exports = wp(options);
At this point, make sure the file structure is as shown below:
|- lit-element-website/
    |- cypress/
        |- fixtures/
        |- integrations/
        |- plugins/
            |- index.js
            |- cy-ts-preprocessor.js
        |- support/
            |- commands.ts
            |- index.ts
        |- tsconfig.json
    |- cypress.json
Adding npm scripts
Add the following scripts into package.json file:
{
  "scripts": {
    "cypress:run": "cypress run --headless --browser chrome",
    "cypress:open": "cypress open"
  }
}
-
cypress:rundefines a script to run all End-to-End tests in a headless mode in the command line. That means the browser will be hidden. -
cypress:openWill fore Electron to be shown. You can usecypress run --headedas another option with the same effect.
You can see all available parameters to run commands on Cypress here.
Adding the Tests
You should be ready to add your test files at this point.
Testing the About Page
Let's create our first test file into cypress/integration folder as about.spec.ts:
// about.spec.ts
describe('About Page', () => {
  beforeEach(() => {
    const baseUrl = 'http://localhost:8000/about';
    cy.visit(baseUrl);
  });

  it("should show 'LitElement Website' as title", () => {
    cy.title().should('eq', 'LitElement Website');
  });

  it("should read 'About Me' inside custom element", () => {
    cy.get('lit-about')
      .shadow()
      .find('h2')
      .should('contain.text', 'About Me');
  });
});
The previous file defines two test cases. The second one expects to have access to the Shadow DOM through .shadow() function, which yields the new DOM element(s) it found. Read more about this syntax here.
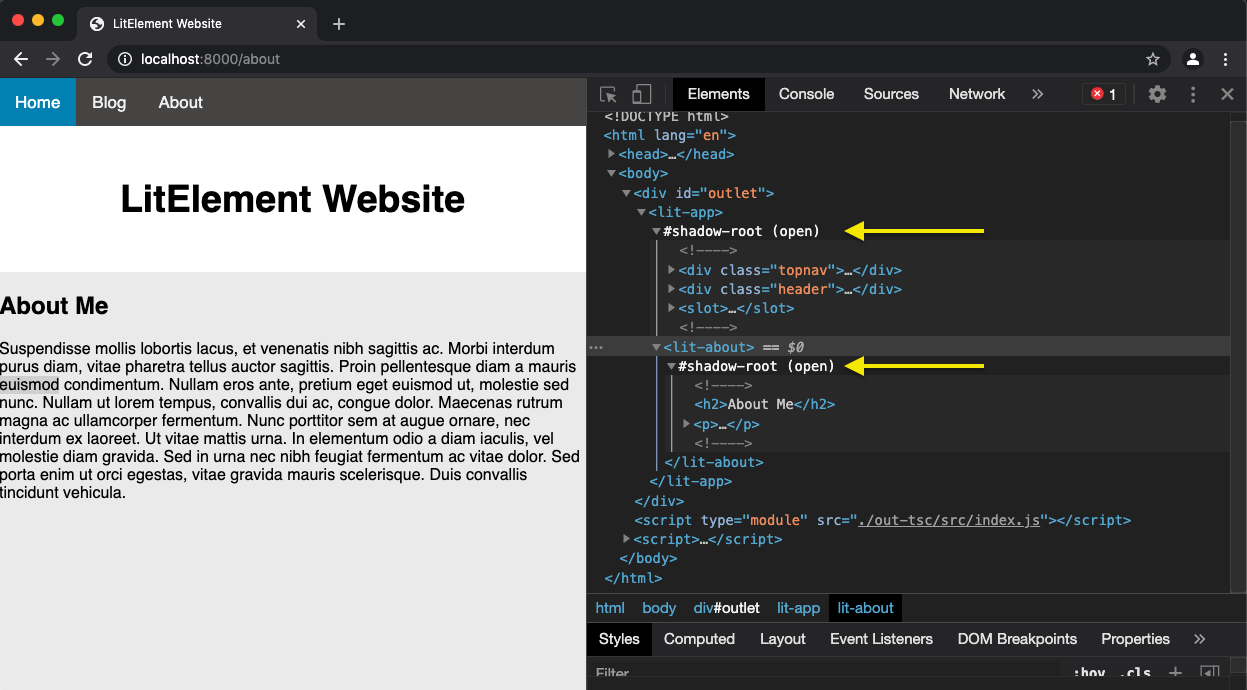
As this screenshot shows, the h2 element contains the title of the About page and we can use contain.text to complete the assertion.
In case you want to take more control of the DOM content of your web component, you can try something like this instead:
it("should read 'About Me' inside custom element ", () => {
    cy.get('lit-about')
      .shadow()
      .find('h2')
      .should(e => {
        const [h2] = e.get();
        // Here we have the control of DOM conten from custom element
        console.log('h2!', h2, h2.textContent);
        expect(h2.textContent).to.contains('About Me');
      });
  });
Testing the Blog Posts Page
Let's create a new TypeScript file inside cypress/integration folder as blog-posts.spec.ts:
// blog-posts.spec.ts

describe('Blog Posts Page', () => {
  beforeEach(() => {
    const baseUrl = 'http://localhost:8000/blog';
    cy.visit(baseUrl);
  });

  it("should read 'Blog Posts' as title", () => {
    cy.get('lit-blog-posts')
      .shadow()
      .find('h2')
      .should('contain.text', 'Blog Posts');
  });

  it("should display a list of blog cards", () => {
    cy.get('lit-blog-posts')
      .shadow()
      .find('blog-card')
      .its('length')
      .should('be.gt', 0);
  });
});
In this case, we expect to have some blog-card elements inside the Blog Posts page.
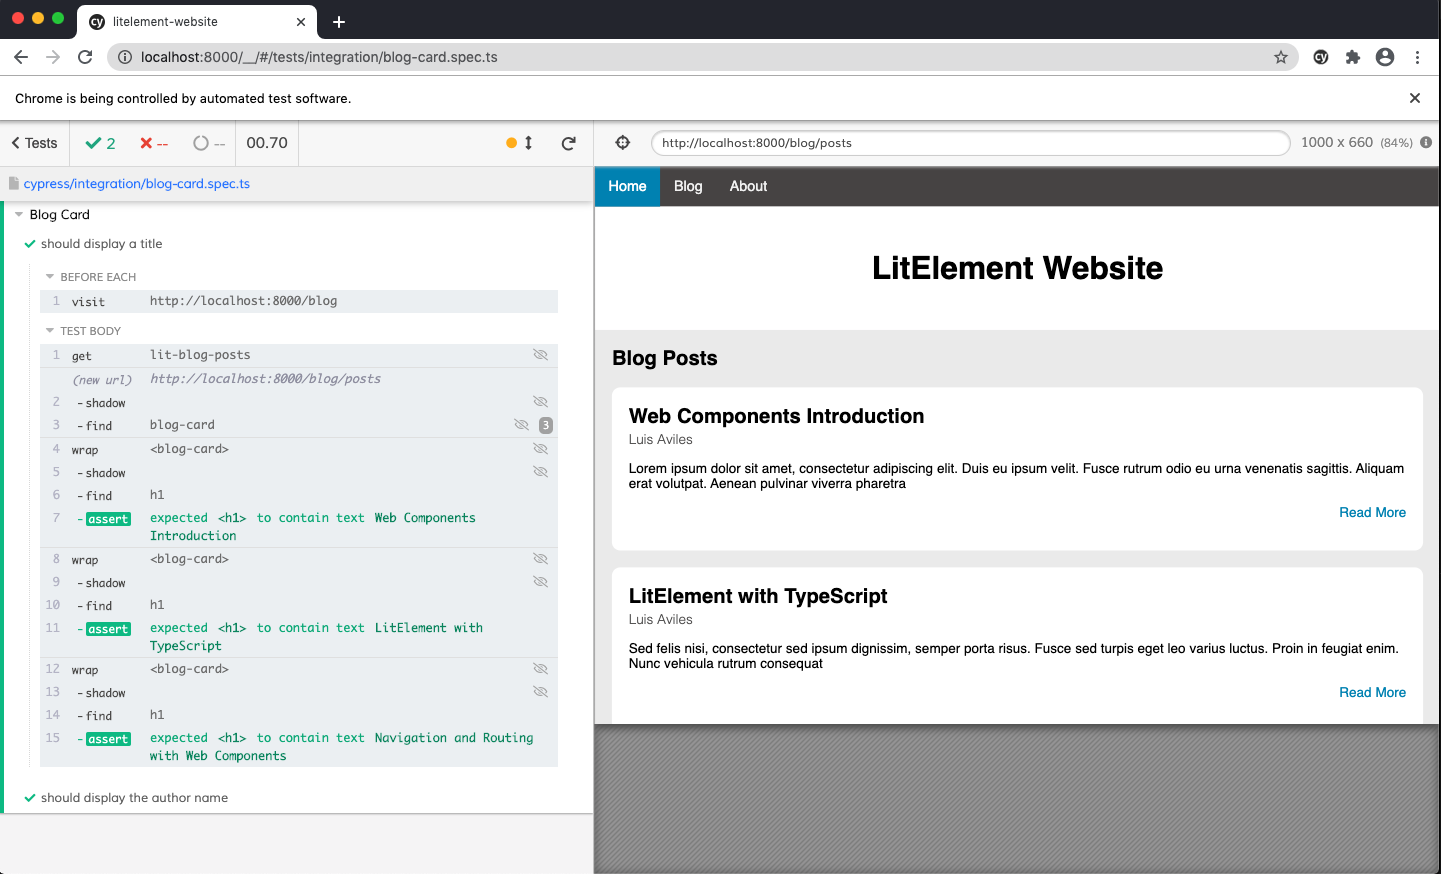
Testing the Blog Card Elements
Let's create a new TypeScript file inside cypress/integration folder as blog-card.spec.ts:
// blog-card.spec.ts

describe('Blog Card', () => {
  const titles = [
    'Web Components Introduction',
    'LitElement with TypeScript',
    'Navigation and Routing with Web Components',
  ];

  const author = 'Luis Aviles';

  beforeEach(() => {
    const baseUrl = 'http://localhost:8000/blog';
    cy.visit(baseUrl);
  });

  it('should display a title', () => {
    cy.get('lit-blog-posts')
      .shadow()
      .find('blog-card')
      .each((item, i) => {
        cy.wrap(item)
        .shadow()
        .find('h1')
        .should('contain.text', titles[i]);
      });
  });

  it('should display the author\'s name', () => {
    cy.get('lit-blog-posts')
      .shadow()
      .find('blog-card')
      .each((item, i) => {
        cy.wrap(item)
        .shadow()
        .find('h2')
        .should('contain.text', author);
      });
  });
});
The Blog Card scenario defines the title values for every blog post and the author's name for all of them.
- The
should display a titletest case iterates through allblog-cardelements and access(again) to the Shadow DOM through.shadow()function to compare the title value. - The
should display the author's nameapplies the same logic as above to verify the author's name.
See more details in the following screenshot:
Running the Tests
Some tests have been implemented already. Let's run the scripts we defined before as follows:
npm run cypress:run
As stated before, the previous script will run all End-to-End(E2E) tests entirely on the command line.
npm run cypress:open
This command will open the Cypress Test Runner through the Electron window.
Source Code Project
Find the complete project in this GitHub repository: https://github.com/luixaviles/litelement-website. Do not forget to give it a star ⭐️ and play around with the code.
You can follow me on Twitter and GitHub to see more about my work.

Top comments (0)