
In this article, I will talk about something that's been a game-changer for my development workflow - combining VS Code Dev Containers with Claude AI. This setup lets your AI assistant to access and interact with your project files directly.
By using the Model Context Protocol (MCP), we create a connection that keeps Claude's access limited to just the files in your container, maintaining that important isolation and security we all want.
One thing I love about this approach is the full control it gives you over code generation. While there are many excellent dev tools available, many of them operate as black boxes with considerable functionality happening under the hood. With our MCP and Dev Container combination, your main IDE remains VS Code, but you gain the flexibility to use any chat client that supports MCP. Since these tools aren't VS Code plugins, they're typically easier to understand, tweak to your liking.
Here's another compelling advantage: there are no API costs associated with this setup! All you need is a monthly Claude Desktop subscription. This setup also works with Claude's free plan, though you'll encounter lower usage limits there.
To show you how this works in practice, we'll build a simple Tic-Tac-Toe game in both React and Angular. You'll see how Claude can help implement the game, identify bugs, and streamline your development process regardless of which framework you prefer.
Understanding Dev Containers
What Are Dev Containers?
Dev Containers allow you to encapsulate your entire development environment - including tools, libraries, and configurations - in a containerized setup that runs directly within Visual Studio Code.
Key Benefits
The advantages of using Dev Containers extend beyond just environment consistency:
- Isolation from your local system: Your projects and their dependencies exist in contained environments, preventing conflicts between different projects or with your host system.
- Portable configurations: Your development setup travels with your project, no matter who's working on it or where.
- Reproducibility: Every developer experiences the same environment, reducing debugging complexity.
If you want to dive deeper, the VS Code Dev Containers documentation provides excellent reference material.
Windows Setup with WSL2
I'm using Windows for my examples, but don't worry - Dev Containers work just as well on macOS and Linux.
For Windows users, I'd recommend using Docker with WSL2 the backend for optimal performance. This setup is particularly beneficial for development containers due to improved filesystem performance and better resource utilization.
If you haven't set this up before, check out the Docker Desktop WSL2 backend documentation - they've got great step-by-step instructions.
Setting Up the Dev Container
Let's start with a pre-configured Dev Container template that includes MCP server integration for Claude: @gergelyszerovay/aibd-base-devcontainer. This foundation saves significant time compared to creating the setup from scratch.
This dev container comes with all the essentials: Node.js, popular package managers (npm, yarn, and pnpm), and Git. One nice touch is that it automatically uses the Git credentials you've already set up on your host machine, so you can start pushing and pulling code right away without extra authentication steps.
Let's set up our development container with a few simple commands:
mkdir your-project-name
cd your-project-name
git clone https://github.com/gergelyszerovay/aibd-devcontainer.git ./
code .
Opening the Container
After opening the your-project-name directory in VS Code, you'll see a notification asking if you want to reopen the folder in a container—go ahead and accept this prompt. If you miss it, no worries! Just click the green button in the lower-left corner of VS Code and select "Reopen in Container."
VS Code will build and start your container, which might take a minute on the first run. Subsequent starts will be significantly faster.
The container creates a Docker volume named after your project directory (like your-project-name-volume) and mounts it at /workspaces/your-project-name/volume/ inside the container. This approach ensures your development files persist across container restarts and rebuilds.
Why use a Docker volume instead of a simple host directory mount? It makes a huge difference for file watching functionality, which you'll definitely appreciate when you want features like auto-recompiling to work properly.
Project Setup
Now that your container is running, let's add your project files. Open a terminal within VS Code, navigate to the volume directory, and clone your repository:
cd /workspaces/your-project-name/volume
git clone https://github.com/your-username/your-project.git ./
pnpm install
Your project files now live in a persistent volume that both VS Code and Claude can access.
For those looking to jumpstart development with modern frameworks, I've created two specialized boilerplate templates that work in this Dev Container setup:
Angular Template
The AIBD Angular Template provides a ready-to-use Angular 19.2 foundation with:
- PNPM package manager for faster, more efficient dependency management
- TailwindCSS 3
- Testing configuration with Jasmine and Angular Testing Library
React Template
If React is more your style, check out the AIBD React Template featuring:
- React 19 with Vite
- TailwindCSS 3
- Zustand for lightweight state management
- TypeScript configuration for type safety
- Vitest and Testing Library for comprehensive testing
Both templates integrate seamlessly with the Dev Container approach we're discussing.
Integrating Claude AI Assistant
To connect Claude Desktop to your container's MCP server, you'll need to update your Claude configuration. Add this to your claude_desktop_config.json:
{
  "mcpServers": {
    "devcontainer": {
      "command": "npx",
      "args": ["-y", "supergateway", "--sse", "http://localhost:3100/sse"]
    }
  }
}
We're using Supergateway as a proxy between Claude Desktop and our container's MCP server. This proxy is necessary because Claude Desktop currently can't connect directly to an MCP server running in a container.
After updating your configuration, make sure to restart Claude Desktop so it can recognize the new settings and connect to the MCP server in your Dev Container.
File Operations
With the MCP server properly configured, Claude becomes much more than just a chatbot, it can now:
- Read your code to understand what you're working with
- Examine directory structures to understand your project organization
- Suggest code changes with proper context
- Write or edit files
- Run shell commands to test your code, install packages, or perform other operations
This direct access transforms Claude from a conversational assistant to a coding partner that actually understands your project in context.
Here's a handy tip: when you want Claude to work with a specific file or directory in your project, VS Code makes it easy - just right-click on any file or directory in the VS Code Explorer and select "Copy Path". Then you can paste that exact path when talking to Claude.
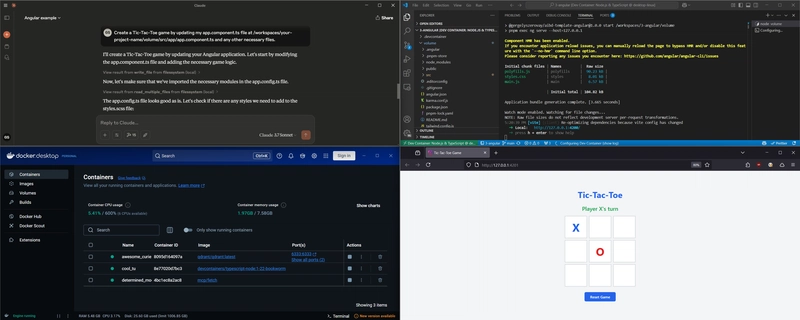
Real-World Examples (React and Angular)
Let's walk through a practical example of this AI-assisted setup. I'll show you how to build a simple Tic-Tac-Toe game, which works whether you're using Angular or React.
Imagine you want to quickly prototype this game in your framework of choice. Here's what the workflow might look like:
Clone a Framework-Specific Boilerplate
First, let's clone one of our specialized boilerplates into the volume directory. When setting up our project, make sure to run these commands inside the dev container (not on your host machine):
For Angular:
cd /workspaces/your-project-name/volume
git clone https://github.com/gergelyszerovay/aibd-template-angular.git ./
pnpm install
pnpm run start
For React:
cd /workspaces/your-project-name/volume
git clone https://github.com/gergelyszerovay/aibd-template-react.git ./
pnpm install
pnpm run start
This gives us a solid foundation with all the essential tooling already configured - much better than starting from scratch!
Let Claude Explore Your Project Structure
Now, let's ask Claude to get a feel for our project:
🧑: Could you analyze my project structure in /workspaces/your-project-name/volume/
and identify the main component files?
This gives Claude context about your codebase organization before making changes - just like you'd want to orient yourself before diving into a new codebase.
Request the Implementation
For Angular:
🧑: Create a Tic-Tac-Toe game by updating my app.component.ts file at
/workspaces/your-project-name/volume/src/app/app.component.ts and any
other necessary files.
For React:
🧑: Create a Tic-Tac-Toe game by updating my App.tsx file at
/workspaces/your-project-name/volume/src/App.tsx and any
other necessary files.
Test the Implementation
Let's ask Claude to verify the code works correctly and catch any compilation errors:
🧑: Can you run `pnpm run build` and tell me if there are any
compilation errors?
If you encounter any issues, could you help me fix them?
Refine the implementation
After Claude creates the initial version, you might want to enhance it:
🧑: Could you add a game history feature that lets players review
previous moves?
Conclusion
Combining Dev Containers with Claude AI through MCP creates a powerful development environment that changes how you interact with AI assistance while coding. You're firmly in control of your workflow, but you get to leverage AI capabilities in a secure, isolated environment.
Looking ahead, I'm planning to publish coding guidelines specifically designed for LLMs to ensure consistent coding style across your projects. These guidelines will help Claude generate code that follows our standards automatically, without you having to rewrite or adjust everything afterward. By establishing a shared understanding of your preferred patterns and practices, we can make AI assistance feel like a natural extension of your development team rather than just another tool.
Have you tried using AI assistants in your development workflow? I'd love to hear what's worked well for you!
About the Author
My name is Gergely Szerovay. I've worked as a data scientist and full-stack developer for many years, and I've been a frontend tech lead focusing on Angular development for the past three years. To closely follow the evolution of AI-assisted software development, I've decided to start building AI tools in public and publish my progress on AIBoosted.dev.
Follow me on Substack (Angular Addicts), Substack (AIBoosted.dev), Medium, Dev.to, X or LinkedIn to learn more about Angular and how to build AI apps with AI, TypeScript, React, and Angular!

Top comments (0)