You have written an exciting application and now you want to deploy it somewhere, preferably on the cloud. Heroku is one of the notable cloud platforms that allows developers to deploy and run their apps. If your app is a simple hobby project, you may even be able to deploy your app for free.
Once you have your app in your github repository, Heroku allows you to deploy your app using either Heroku CLI or by connecting connecting your Heroku app to the github repository or by using their Container Registry mechanism (which also uses Heroku CLI). However, we are going to explore another way of deploying your app to Heroku, using Travis CI.
What is Travis CI?
“Travis CI is a hosted, distributed continuous integration service used to build and test software projects...” — Wikipedia
Travis CI is a continuous integration tool that lets you build, test and deploy (among other things) your code from github. Its services are free for public repositories. So you do not have to pay anything for using Travis CI in your hobby project if you make your github repository public.
Create a Heroku app
First step, we have to create a Heroku account. Once we have that, we can create a new app in our Heroku account by just typing the app name and the region where we want to deploy it. In our case, we need to give our Heroku app the same name as our github repository. If the Heroku app name is different from our github repo’s name, Travis CI cannot find which app to deploy to.
Once created, our new app will appear in the dashboard. If the app needs any environment variables / config variables, now is a good time to add them to our Heroku app. Look for the Config Vars section under the Settings tab of the app.
Once the app is setup, note down the Heroku account’s API Key. This will be available in the Account detail page (Account Settings menu under the user profile icon). Remember that this is a secret key; do not share it with anyone.
Configuring Travis CI
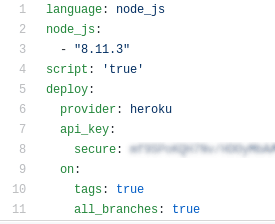
To use Travis CI in our project, we first have to create a file named .travis.yml. This file has to be in the root directory of our application. This files servers as the configuration file for all the things that we want Travis CI to do with our code. Let us assume that we have written a node.js app that we now want to deploy to Heroku. In that case we would need to tell Travis CI what kind of app we have, where to deploy it, when to deploy it and we also have to give it the secret API key from our Heroku account (after encrypting it, of course).
To encrypt your heroku account key, we can use travis cli as explained in the travis documentation here.
The .travis.yml file configures how our project is deployed. The first three lines the file mentions that our project is a node.js project and that Travis CI should use node.js environment with version 8.11.3 to build the project.
The deploy.on section has two fields tags and all_branches. If they both are set to true, Travis CI will fire the deployment whenever a new tag is created in our github repository. So, all we have to do to deploy our app is just create a new tag.
Create a new tag
We can create a new tag in the repo of our node.js app just by bumping the version of our app by using the npm-version command. For example, if we choose to bump the patch version of our app, just run the command npm version patch in your terminal. It will automatically create a commit and tag with the new version. Push those changes to the remote github repo.
Once pushed, we can sit back and relax! Travis will automatically kick-off the deployment of our app from the newly created tag to our heroku app.


Top comments (0)