
In this tutorial, I want to explore how to Arc enable your SQL servers and bring the power of Azure to your non-Azure servers.
💡
If you are unfamiliar with Azure Arc, you can check out my blog post “What is Azure Arc_” which will explain more about the feature. _
Benefits of Arc-enabling your SQL Servers
By installing Azure Arc on your SQL servers you can control and govern your entire data estate from Azure.
Once you have the Arc agent installed on your SQL server you can enable Microsoft Purview and start to use it to:
- Gain visibility into data across your organisation
- Safeguard and manage sensitive data across it’s lifecycle
- Manage critical data risks and regulatory requirements
You can view your Arc-enabled servers within the Azure portal, meaning you can view all your on-prem, Azure and Edge data servers in one place. You will also have access to tag your Arc-enabled servers just like you do with your Azure resources.
You also have access to a best practice assessment, that will evaluate your SQL server from several angles, security, compliance, performance, scalability and much more.
From an asset management and licensing point of view, you can view that from within the Azure portal as well, review your SQL server licence position and update it if required. As well as purchasing and enabling Extended Security Updates (ESU) for any SQL server versions that have gone End of Life (EOL), ensuring you stay compliant.
These are just the first steps of benefiting from Arc-enabling your servers, the next steps are to start exploring how to use things like Microsoft Defender for Cloud, Azure Synapse Analytics, Azure Active Directory, Azure Update Management and much more on your on-prem servers.
Step-by-Step Guide to Enabling SQL Server with Azure Arc
Let’s walk through the steps you need to go through to Arc-enable your servers.
Register Azure resource providers
An Azure resource provider is a collection of REST operations that provide functionality for an Azure service.
To use Azure Arc-enabled servers, the following Azure resource providers must be registered in your subscription:
- Microsoft.HybridCompute
- Microsoft.GuestConfiguration
- Microsoft.HybridConnectivity
- Microsoft.AzureArcData
To enable them you can use Azure PowerShell, Azure CLI or the Azure portal. We’re going to use Azure CLI this time.
Head over tohttps://shell.portal.com
Paste the following code into your shell window:
az provider register --namespace 'Microsoft.HybridCompute'
az provider register --namespace 'Microsoft.GuestConfiguration'
az provider register --namespace 'Microsoft.HybridConnectivity'
az provider register --namespace 'Microsoft.AzureArcData'
Networking prerequisites
One of the first things you must consider is how your Azure Arc agent will communicate from your environment to Azure. You can have the Arc agent communicate directly from each server to Azure, you can direct traffic through a Proxy server or you can use private link. To fully understand the network topology options for Azure Arc check out the official documentation.
Regardless of what method of communication you choose, you need to ensure that the Arc agent can communicate with a list of URLs. You can find an updated list of URLs here.
Some URLs are there to ensure authentication between the Arc agent and Azure, others are there to help enable certain services.
💡
_What I would encourage you to do is allow all the URLs needed for Azure Arc, think about the future and don’t restrict the URLs for functionality you aren’t using right away. Allow all the required URLs so your business can expand and use more functionality from Arc when you are ready. _
Azure Resource Group
When you install Azure Arc onto a server a resource within Azure will be created. This will be like any other resource inside Azure meaning you need to store it within an Azure Resource group and specify an Azure region to store that group and resource in.
You should create an Azure Resource Group to store all your Azure Arc resources.
Enable SQL Server registration
As we are focussing on Azure Arc for SQL server implementation we need to ensure we are setting up automatic Arc-enabled SQL server registration Azure Policy to aid our environment to be set up correctly now and for the future.
Open up the Azure portal at https://portal.azure.com
Navigate to the Azure Arc management blade
Down the left-hand side select “ SQL server instances ”

Within the management area select the Automatic Arc enabled SQL server registration button.

Azure Arc SQL discovery policy
This launches a configuration window.

Azure Arc Automatic Arc enabled SQL server registration policy
There are two questions you will be asked, the scope of the policy and also the SQL licensing model you are using. Depending on your licensing model you may need to set up more than one Automatic Arc-enabled policy SQL server registration policies.
If all your SQL servers on-prem are licensed via a SQL Enterprise or Standard licence with Software Assurance, select that option and then set your subscription/resource according to where you are storing your Azure Arc objects.
Once you’ve selected the options with the configuration window, click on Enable.
Install the Azure Arc agent
From the Azure Portal , search for Azure Arc to launch the wizard.
When the Azure Arc management blade loads, select Machines from the left-hand side.
Now select Add/Create
You can either register servers individually, through a bulk process or via Update Management. In this tutorial, we are going to select the multiple servers option.
Azure Portal - Server - Azure Arc

There are some prerequisites you need to meet, ensure you have met them before going any further.
In the next step, you are asked to select some information. You are asked to select the subscription, resource group, operating system (OS), connectivity method and region.
Azure Portal - Server - Azure Arc

When using the multiple server onboarding option you are asked to create a service principal. This is used for authentication when registering the Azure Arc agent on each of your servers.
If you don’t already have an appropriate Service principal you can use, you can create one from the Azure Arc wizard by selecting Create New organisation's *. * This will launch a side configuration window.
When creating the Service principal you will be asked some information:
- Service principal name - Give your Service principal an appropriate name matching your organisation's naming conventions.
- Scope assignment level - Select where your Service principal will have permissions, either at the all-up subscription level or specifically within a resource group.
- Description - This is an optional field.
- Expiry - You can configure how long the Service principal account is active within your environment, ensure you set the expiry length long enough for you to onboard all your servers.
- Roles - These are the permissions that the Service principal will have, ensure you select at least Azure Connected Machine Onboarding and Azure Connected Machine Resource Administrator.
Once you’ve filled in all the information select Create.
Now you are back to the main configuration window select Next.
The next step is to populate any values for the suggested tags or you can create your own.

The last screen will show you the command to run your Windows or Linux server. Copy it and close the wizard.
Now you have the Azure Arc installation script, head over to your server and copy the installation script.
Within a few minutes, the agent install will complete and you will have a server listed within the Azure portal.
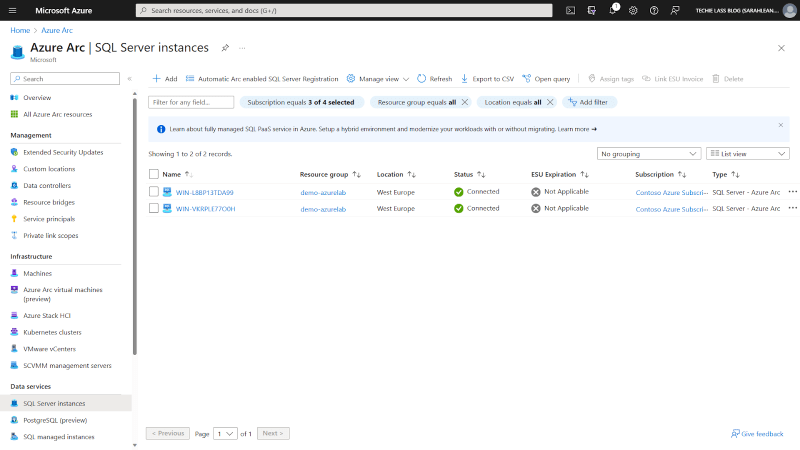
Because you have set up your Azure environment to automatically detect any SQL instances installed on your Azure Arc-enabled servers, your SQL servers will be listed and visible under SQL Server instances within your Azure Arc management blade.
Azure Portal - Server - Azure Arc
Azure Arc enabled SQL server best practices assessment
Now that your SQL servers are Azure Arc-enabled, you can take advantage of the best practice assessment feature. When enabled this feature will provide recommendations on things like:
- SQL Server and database configurations
- Index management
- Deprecated features
- Enabled or missing trace flags
- Statistics
- & more
For full instructions on how to enable and run the best practices assessment tool on your servers, check out the official Microsoft implementation instructions.
Conclusion
In conclusion, Arc-enabling your SQL servers through Azure Arc provides a centralised and comprehensive solution for managing your entire data estate. The benefits include enhanced visibility, safeguarding sensitive data, and addressing critical data risks and regulatory requirements.
Leveraging the Azure portal allows you to seamlessly view and tag your Arc-enabled servers, conduct best practice assessments, and manage licensing for optimal compliance. As you embark on this journey, consider exploring additional features such as Microsoft Defender for Cloud, Azure Synapse Analytics, Azure Active Directory, and Azure Update Management.


Top comments (0)