webMethods Integration Server supports OAuth 2.0. The Integration Server (IS) can be used as an OAuth client, an authorization server, or a resource server. This post describes how to use OAuth 2.0 with Integration Server.
Integration Server supports four types of OAuth grant types –
- Authorization Code Grant
- Client Credentials Grant*
- Implicit Grant
- Resource Owner Password Credentials Grant
Theoretical Knowledge
The authorization code grant type is used to authenticate and provide access to clients that are registered on the authorization server (Here our Integration Server is acting as an Authorization server as well).
This grant type requires the claiming client to authenticate to the authorization server before obtaining an access token and provides access to confidential and public clients.
When using the authorization code grant type, the authorization server can issue a refresh token to the registered client application along with the access token.
A refresh token enables clients to get a new access token without requesting additional approval from the resource owner. When the access token expires, the client application can use the pub.oauth:getToken(replaced by now depreciated getAccessToken) service to pass the refresh token to the authorization server to request a new access token.
Practical Knowledge
Step 1 - Client Configuration:
A client must register himself and obtain client_id from the integration server. In the IS console go to Security->OAuth->Client Registration page and click on ‘Register Client’. Enter the information as shown below. Redirect URL should be the URL, where IS will redirect the page after authorizing the request. I have created a simple RESTful service on the IS as a redirect URL.
Remember that the Client ID will be generated when you click Save Changes. Please note that in order to get the client secret generated for your client. Please select the type as ‘Confidential’ from the drop down menu.

Your client will use this ‘Client ID’ to authorize himself and request an access token.
Step 2 - Scope Management:
The scope indicates the resources the client can access on behalf of resource owner. You need to indicate one or more folders or services on the IS in the scope. Once a client is granted access to a scope, he can access the folders and services included in that scope.
Go to Security->Oauth->Scope Management page and click on ‘Add Scope’. Once the page is open, mention the scope details as shown below
Here I have created a simple calculator API for demonstration purpose and included it’s
a. Fully qualified name of the calculator flow service.
b. Resource path mapped to it in the REST descriptor service i.e. - /oauth2/calculate
c. And the package name it is residing in(Optional, and to be done only if you want to include other services residing in the same package also to have the same scope).


Once the scope is added, map the scope with the client using the Associate Scope to Clients nested option in the Scope Management option in OAuth.
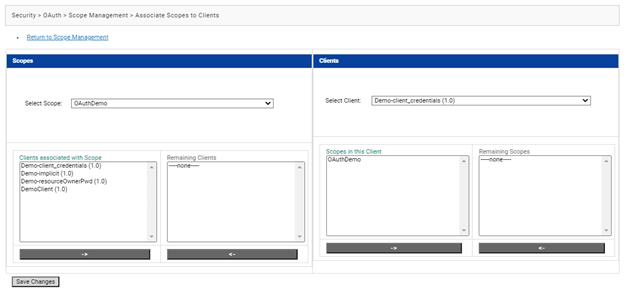
Once this setup is done your client is ready to request for the access token to Authorization Server.
Step 3 - Authorization Code Generation
Requesting token for authorization code approach is a 2-step process. In the first step, the client authorizes himself with the authorization server using pub.oauth:authorize service and receives the authorization code. Once the authorization code is received, it can be used to obtain the access token using pub.oauth:getToken service.
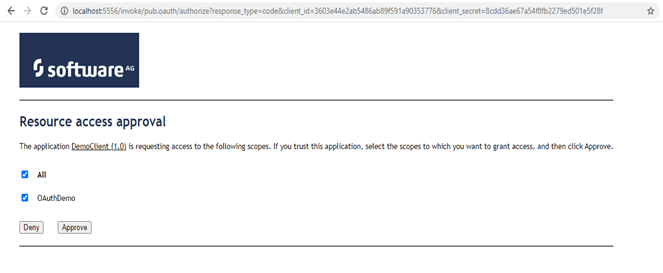
When the client initiates the pub.oauth:authorize request, it brings up a page for the resource owner to either approve the access request or reject it.
Official Documentation Link - OAuth Documentation
Step 4 - Access Token
When the resource owner approves the request, the integration server generates the authorization code and redirects the page to the ‘redirect URL’ specified in the client configuration.
The service hosted at redirect URL passes the authorization code to pub.oauth:getToken service to exchange authorization code for an access token as shown below.

Integration Server administrator can verify all the tokens in the IS console.

The client application can use the token as a bearer token to access the resource on the server i.e. to run the calculator API in my case. 
Homework for my audience -
- How did I invoke getTokenService?
- Can we skip the approval page to by default approve every incoming request?
- How do we check whether our access token has been expired, explicitly? Is there more than one way?
- Which service is invoked as a listener of that Approve button on the dynamic server page as depicted in the above screenshot?
- Can that back-end service (mentioned in #4) be invoked normally or is there a specific way to invoke it?
Hint - Hints to all these questions are either in screenshots or the information mentioned above. I will answer these as well but would like you to try them first.
Comment below to let me know what did you think of this post & whether you require more such posts from me in the respected Tech community of Software AG. Also, do let me know if you need more information on other grant types and their respective implementation.
Thank you for being a patient audience!


Top comments (0)