Introduction
Cumulocity IoT provides a MQTT endpoint dedicated to the Cumulocity Data format to connect MQTT devices. But what about devices using a pre-defined topic structure and any custom payload which cannot be modified because they are closed?
In this article I will guide you on an example how you can connect such devices!
In the first part I will explain some patterns and concepts behind Device Connectivity and MQTT devices. In the second part I will provide a step-by-step guide how to connect a sample MQTT device and to send telemetry data to Cumulocity IoT.
Let’s go!
Concepts
Device Connectivity Patterns
Before we get started on the step-by-step guide to connect MQTT devices let us spend some lines about concepts.
In Cumulocity IoT we expect to have an agent running somewhere. The agent definition is:
A Cumulocity Agent retrieves data from a device or protocol, maps this to the Cumulocity Domain Model and transports the mapped data to Cumulocity IoT via IP-Protocol
Cumulocity IoT offers 3 core IP-Protocols to connect devices:
- HTTP/REST - custom JSON data format
- MQTT - custom SmartREST2 & JSON (proprietary)
- LWM2M
Multiple types of agents possible:

- Device Agent - runs embedded in the device. Most likely it is part of the firmware
- Gateway Agent - runs on a separate hardware (gateway) connecting multiple IP and Non-IP devices. thin-edge.io is a very good example for a prebuild agent here.
- Service Side Agent - runs as Microservice in Cumulocity IoT. Optionally exposing custom REST endpoints.
- Backend Agent - very similar to Server Side Agent but runs on 3rd Party Server and therefore can expose other TCP/UDP ports if required.
In this guide we focus on Server Side Agents and devices which are IP-enabled which I summarize as MQTT device. That means the device itself does not run a Cumulocity agent but just a client that publishes messages to any MQTT Broker in any data format using a custom topic structure.
Unfortunately Cumulocity IoT not yet offers a generic MQTT Broker but only a limited MQTT endpoint which only accepts SmartREST and custom JSON data formats on pre-defined topics. Sending any data on any topic will be ignored.

Coming back to agent types: This MQTT endpoint concept only works for Device & Gateway Agent but not for devices which are closed and cannot be modified with an additional agent.
Generic MQTT
With the release of 10.16 the Generic MQTT feature will be available which covers this gap as part of the platform. Still it will not cover the map and the transport part of an agent. So this must be covered by a custom component which I want to highlight as a potential solution in this article:
Dynamic MQTT Mapper
As stated in the chapter before the Dynamic MQTT Mapper tries to address the need to dynamically map any topic structure and data payload to the Cumulocity IoT domain model.
Architecture
For that we rely on an external hosted MQTT Broker which can be any available broker. The Dynamic MQTT Mapper provides a microservice which can be uploaded to Cumulocity IoT and a frontend as a plugin which can extend existing Applications like the Administration App.

Components
The Dynamic MQTT Mapper has multiple components:
- MQTT Client - using PAHO MQTT Client to connect and subscribe to a MQTT broker
- Data Mapper - handling of received messages via MQTT and mapping them to a target data format for Cumulocity IoT. Also includes an expression runtime JSONata to execute expressions. Data Mapper again can be separated in Processors. For example there is a JSONProcessor handling any JSON payload and FlatFileProcessor for processing flat-file payload (e.g. 10,Temperatur,20,°C)
- C8Y Client - implements part of the Cumulocity IoT REST API to integrate data
- REST Endpoints - custom endpoints which are used by the MQTT frontend plugin or can be used to add mappings programmatically
- MQTT Frontend - A plugin for Cumulocity IoT to provide an UI for MQTT Configuration & Data Mapping
In the following I will guide you step-by-step to make use of that Dynamic MQTT Mapper.
Step-by-step guide
1. Prerequisites
To follow this guide you need the following:
- A Cumulocity IoT Tenant with microservice feature enabled. In trial tenants this feature is disabled. Please get in contact with your sales rep or support to request that feature for your tenant.
- A MQTT Client Tool like MQTTx
- A public available MQTT Broker. You can setup your own one or use existing sandboxes like test.mosquitto.org or others. For this guide I will use test.mosquitto.org.
2. Setup & Deployment
1. Download of artifacts
As a next step we gonna download the artifacts of the Dynamic MQTT Mapper: Releases · SoftwareAG/cumulocity-dynamic-mqtt-mapper · GitHub
Make sure to select the latest release. In the assets part of the release you’ll find two zip files:
- mqtt-mapping-service.zip - This is the microservice of the dynamic mqtt mapper.
- mqtt-mapping.zip - This is the frontend plugin of the dynamic mqtt mapper.

Download them and store them somewhere on your disk.
2. Upload of artifacts
Now we go the our Cumulocity IoT Tenant and upload both assets.
Microservice
We start with the microservice (mqtt-mapping-service.zip).
In the Application Switcher we go to Adminstration. Afterwards we select Ecosystem → Microservices. Now we should see the “Add microservice” button on top right. If this is not the case please check the Prerequisites that the microservice-hosting-feature is assigned to your tenant.

Select the mqtt-mapping-service.zip or drag & drop it in the area of the popup. When asked to Subscribe please click the “Subscribe” button.

After a couple of seconds the microservice should be uploaded and activated. We can check that by selecting Mqtt-mapping-service in the list of microservice and checking the status.

Frontend Plugin
Let’s continue with the frontend plugin (mqtt-mapping.zip).
Plugins are supported starting with 10.16. With 10.14+ we can already use them by adding the “beta=true” URL property to the Administration web app.
Example
https://<yourtenant>apps/administration/index.html?beta=true
Now we can navigate to Ecosystem → Applications → Packages and click on Add package.
Select the mqtt-mapping.zip or drag & drop it in the area of the popup.
You should see the Mqtt-mapping package in the packages list afterwards.

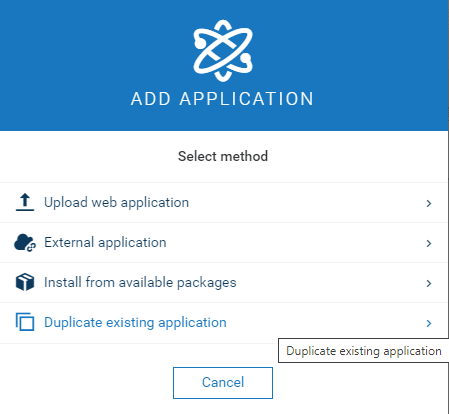
Now we want to assign that plugin to the Administration App. Go to Applications and click on Add application. Click on Duplicate existing application and Administration afterwards.
Change the name, key and path of the application to administration-mqtt and click on “Duplicate”.

It will take a few seconds and you should see the application Administration-mqtt in the Application list. Select it by clicking on the name.
Go to the Plugins Tab. In the bottom right you see a button Install plugin. When clicked you see all available plugins in your tenant.

Select MQTT mapping plugin and click Install.
Now we will give it a try by going back to the Application Switcher and select Administration-mqtt.

In the left menu go to Settings. There you should see now MQTT Mapping which is the plugin we have just installed.
Congratulation you’ve successfully installed both components in your tenant!
3. MQTT Broker configuration
Now we have everything installed we set up the connection the external MQTT Broker. Let us use the following connection details
MQTT Host: test.mosquitto.org
MQTT Port: 8886
User: rw
Password: readwrite
ClientId: dynamic-mapping-client-{{anyNumber}}
Make sure to check Use TLS and Log Payload + Log Substitution and click on Save and Connect. After a few seconds the Connection enabled and Broker connected should show a green dot on top of the screen indicating connection is successfully established.

4. Create a device mapping
Now let’s assume we have a device, a CCU installed on a bus, that sends some JSON data like this:
topic: device/express/berlin_01
{
    "line": "Bus-Berlin-Rom",
    "operator": "EuroBus",
    "customFragment": {
        "customFragmentValue": "Express"
    },
    "capacity": 64,
    "customArray": [
        "ArrayValue1",
        "ArrayValue2"
    ],
    "customType": "type_International"
}
We go to the Mapping tab and click on Add mapping. In the next pop-up we select JSON.
Define Topic

-
Subscription Topic :
device/# -
Template Topic :
device/+ -
Template Topic Sample :
device/express/berlin_01 -
Target API :
Inventory. - Active , Map Device Identifier & Update Existing Device : checked
Explanation:
- In Subscription Topic we enter
device/#because we want to subscribe on all devices not only for express busses or the bus berlin_01.This is the topic we subscribe on the MQTT Broker. - In Template Topic
device/+is pre-entered. The meaning is that this mapping will handle all messages for all sub-topics. As our topic isdevice/express/berlin_01we change that to the valuedevice/express/+ -
Template Topic Sample we use
device/express/berlin_01 - In Target API we select Inventory. We keep the external ID Type to
c8y_Serial - Check Active , Map Device Identifier & Update Existing Device - Active will activate the mapping after completion, Map Device Identifier states that we want to correlate an unique ID to a external ID in Cumulocity and Update Existing Device states that it will also update existing object in Cumulocity when exist.
Click on Next.
Define template
In the next view you see on the left the source template and on the right the target template. With the controls in the middle we can manage the mappings.
Let’s start by defining the source template. Click on Tree in Source and change it to Code. We don’t touch the _TOPIC_LEVEL_ but we add our example playload, copy & paste the following JSON message:
{
    "line": "Bus-Berlin-Rom",
    "operator": "EuroBus",
    "customFragment": {
        "customFragmentValue": "Express"
    },
    "capacity": 64,
    "customArray": [
        "ArrayValue1",
        "ArrayValue2"
    ],
    "customType": "type_International",
    "_TOPIC_LEVEL_": [
       "device",
       "express",
       "+"
  ]
}
Now change back from Code to Tree.

Let’s start with the important info the device identifier. We know that it is part of the topic device/express/ berlin_01 _ so we select on the left side + and on the right side `_DEVICE_IDENT` and click on + to add the substitution.

In Defined substitutions we see this afterwards:
00. [* _TOPIC_LEVEL_[2] -> _DEVICE_IDENT_ ]
Second mapping will be the customType to type.
Select customType on the left and type on the right. Again click on +.

For the name we use now two properties from the left operator and line to map it to one property of the right name.
This can be done by using an expression language called JSONata. We select on the right name. Now we use the field Evaluate Expression on Source and the following:
operator&"-"&line
In the field Expression result you see the preview how the expression result will look like.

You can click on ? to get more examples for expressions or full spec of the expression language.
At last, we map the capacity from the left to a new property on the right.
In the Target Tree click on the left icon of any property and click on Insert

Enter capacity as field and 100 as value. The 100 value will be overwritten by the value of the source mapping so it doesn’t matter what we enter here.

Now we have 4 substitutions and we are done with our mapping.
Click on Next
Test mapping

In the next view we can evaluate how our mapping works. First click on Transform Test Message which will execute all substitutions based on provided source data.
With Show Next Test Result we can iterate through all messages if we have array mapped containing multiple device information. In our case we just have one message.
Click on Send Test Message. It will run the mapping and send it to Cumulocity IoT. After some time you will see the response of Cumulocity IoT. Don’t worry as we
Everything look good so we Confirm our mapping.
Our mapping is finished and we can continue sending device data to the MQTT Broker.
Send device data
Now let’s simulate that we connect our device to the generic MQTT Broker we have configured earlier.
Start MQTTx client on your desktop. On Connections click on the + to create a new connection.
We provide the following information:
Name: mosquitto_sandbox
Client_ID: (don't touch)
Host: mqtts://test.mosquitto.org
Port: 8886

Click on Connect.
Please note : The mosquitto sandbox will terminate the connection after a few seconds with no activity. So you might have to re-connect.

In the bottom right corner change the Payload to JSON. Enter the topic device/express/berlin_01 with the payload:
{
    "line": "Bus-Berlin-Rom",
    "operator": "EuroBus",
    "customFragment": {
        "customFragmentValue": "Express"
    },
    "capacity": 64,
    "customArray": [
        "ArrayValue1",
        "ArrayValue2"
    ],
    "customType": "type_International2"
}
Please recognize that we changed the customType to
type_International2. This will result in an update of the existing Device we have created during Testing.
Click on the bottom right button to send the message.
Confirm Device creation
Let’s check what happened! Go back to Cumulocity IoT MQTT Mapping App. Click on Monitoring.
There you should see now an entry:

Meaning at least 1 message has been received without error.
Switch the application to Device Management using the Application Switcher on top right corner.

Click on Devices → All devices in the left navigation.
Here you see a new device has been created of type type_International2 we have just sent via MQTT Broker.

We can now repeat the last steps by sending the same message with different values on different topics e.g. device/express/berlin_02 with
{
    "line": "Bus-Prag-Leipzig",
    "operator": "EuroBus",
    "customFragment": {
        "customFragmentValue": "Express"
    },
    "capacity": 128,
    "customArray": [
        "ArrayValue1",
        "ArrayValue2"
    ],
    "customType": "type_International"
}
5. Sending Measurements Events Alarms (MEAs)
In 4. we created mappings for our device definitions. Now we could also send telemetric data which is mapped to Cumulocity IoT as Measurements, Events or Alarms. Let’s start with an event. I’ll skip the parts I already have explained in detailed.
Event Mapping
The following event data is sent by busses:
topic: event/berlin_01
{
    "msg_type": "c8y_BusStopEvent",
    "txt": "Bus stopped at petrol station today!",
    "td": "2022-09-08T16:21:53.389+02:00",
    "ts": "1665473038000"
}
We recognize that the device identifier is again part of the topic.
Define topic
We create a new mapping:
- Subscription Topic : event/#
- Template Topic : event/+
- Template Topic Sample : event/berlin_01
- Target API : Event
- Active , Map Device Identifier , Create Non Existing Device : Enabled

Define template
Source Code:
{
    "msg_type": "c8y_BusStopEvent",
    "txt": "Bus stopped at petrol station today!",
    "td": "2022-09-08T16:21:53.389+02:00",
    "ts": "1665473038000",
    "_TOPIC_LEVEL_": [
       "event",
       "berlin_01"
  ]
}
Substitutions:
00. [* _TOPIC_LEVEL_[1] -> source.id ]
01. [txt -> text]
02. [msg_type -> type]
03. [$now() -> time]
$now() is a JSONata function using the date-time when the event is processed by the mapper. As there is a timestamp ts or even a data td we can also map them. Cumulocity IoT expected always a date-time in the format: yyyy-MM-dd’T’HH:mm:ss.SSSZ. We can use the following function to get that date format from a UNIX time stamp:
$fromMillis(ts)
Click Next.
Test the substitution.
Confirm the mapping.
Send events via MQTT Broker
Go to MQTTx and send on topic event/berlin_01the following payload:
{
    "msg_type": "c8y_BusStopEvent",
    "txt": "Bus stopped at petrol station today!",
    "td": "2022-09-08T16:21:53.389+02:00",
    "ts": "1665473038000"
}

Confirm events are processed
In MQTT Mapping we check the Monitoring again if any error occurred. If not we switch to Device Management and click on our device EuroBus-Bus-Berlin-Rom. In the Events Tab we should find now at least two events.

Measurement Mapping
The following measurement data is sent by busses:
topic: measurement/berlin_01/gasoline
{
    "fuel": 65,
    "ts": "2022-08-05T00:14:49.389+02:00",
    "mea": "c8y_FuelMeasurement"
}
We recognize that the device identifier is again part of the topic.
Define topic
We create a new mapping:
- Subscription Topic : measurement/#
- Template Topic : measurement/+/gasoline
- Template Topic Sample : measurement/berlin_01/gasoline
- Target API : Measurement
- Active , Map Device Identifier , Create Non Existing Device : Enabled

Define template
Source Template:
{
    "fuel": 65,
    "ts": "2022-08-05T00:14:49.389+02:00",
    "mea": "c8y_FuelMeasurement",
    "_TOPIC_LEVEL_": [
       "measurement",
       "berlin_01",
       "gasoline"
  ]
}
Target Template:
{
    "c8y_FuelMeasurement": {
        "L": {
            "value": 110,
            "unit": "L"
        }
    },
    "time": "2022-10-18T00:14:49.389+02:00",
    "source": {
        "id": "909090"
    },
    "type": "c8y_FuelMeasurement"
}
Substitutions:
00. [* _TOPIC_LEVEL_[1] -> source.id ]
01. [fuel -> c8y_FuelMeasurement.L.value]
02. [$now() -> time]
Click Next.
Test the substitution.
Confirm the mapping.
Send measurement via MQTT Broker
Go to MQTTx and send on topic measurement/berlin_01/gasoline the following payload:
{
    "fuel": 40,
    "ts": "2022-08-05T00:14:49.389+02:00",
    "mea": "c8y_FuelMeasurement"
}

Confirm measurements are processed
In MQTT Mapping we check the Monitoring again if any error occurred. If not we switch to Device Management and click on our device EuroBus-Bus-Berlin-Rom. In the Measurements Tab we should find now a series of values.

Alarm Mapping
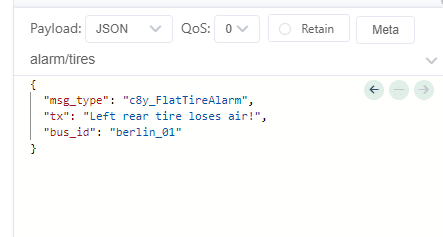
The following alarm data is sent by busses:
topic: alarm/tires
{
  "msg_type": "c8y_FlatTireAlarm",
  "tx": "Left rear tire loses air!",
  "bus_id": "berlin_01"
}
We recognize that the device identifier is now part of the payload.
Define topic
We create a new mapping:
- Subscription Topic : alarm/tires
- Template Topic : alarm/tires
- Template Topic Sample : alarm/tires
- Target API : Alarm
- Active , Map Device Identifier , Create Non Existing Device : Enabled

Define template
Source Template:
{
  "msg_type": "c8y_FlatTireAlarm",
  "tx": "Left rear tire loses air!",
  "bus_id": "berlin_01",
  "_TOPIC_LEVEL_": [
    "alarm",
    "tires"
  ]
}
Substitutions:
00. [* bus_id -> source.id]
01. [msg_type -> type]
02. [tx -> text]
03. [$now() -> time]
Click Next.
Test the substitution.
Confirm the mapping.
Send measurement via MQTT Broker
Go to MQTTx and send on topic alarm/ the following payload:
{
  "msg_type": "c8y_FlatTireAlarm",
  "tx": "Left rear tire loses air!",
  "bus_id": "berlin_01"
}
Confirm alarms are processed
In MQTT Mapping we check the Monitoring again if any error occurred. If not we switch to Device Management and click on our device EuroBus-Bus-Berlin-Rom. In the Alarms Tab we should find 1 alarm with a count of 2 now

Summary & Next Steps
In this article I described how you can connect any device using MQTT to Cumulocity IoT. With the dynamic mqtt mapper you have a flexible way to map any data to the Cumulocity IoT domain model. It bridges the gap between handling proprietary data models and the Cumulocity IoT domain model.
I also showed in a step-by-step approach how you can try out the dynamic mqtt mapper yourself. This is just a starting point! There are much more features which I did not cover in this article. Here are a few noteworthy:
-
Support of FLAT_FILES & GENERIC_BINARY: Flat Payloads like
90oroil,100,1666863595or binary payloads like5a75207370c3a47420303821are mapped to a json you can transform again with JSONata. - Payload Snooping: You can enable snooping at the beginning of the mapping and later on use the snooped messsages as templates in the template editor.
- Mapping Tree overview : In the UI there is a tab called Mapping Tree. It lists the whole tree of mappers you’ve created.
- Logging : In the Microservice Tab you can fully inspect the log file of the dynamic mqtt mapper. In case of any error you can research what happened and either correct you mapping or create an issue at github if a issue with the component itself
- REST API: There is a full REST API for all functions we are using from the UI. You can use it to programmatically manage your mappings within your tenants
If you want to read the full documentation please have a look here:
As this is an open-source project it can be used and extended by yourself. For that we have defined the abstract PayloadProcessor class. For example for JSON the JSONProcessor will implement the PayloadProcessor. For that also other Processors can be easily added like we did for Flatfile or binary payload
Next steps in the projects:
- Support of generic MQTT once available - Support new feature introduced with Cumulocity IoT 10.16
- Support more data formats - Beyond JSON, Protobuf etc.
- Improve Scalability - Make sure the mapper can handle thousands of messages and is able to scale out
- thin-edge.io support - Send mappings to thin-edge devices to be locally executed on a local mapping engine.
- Multi-Tenant Support - Support with one instance of the microservice multiple mappings in multiple tenants.
We are also very happy about feedback and contribution! So if you have a create idea please approach us either here or using the github project!

Top comments (0)