Introduction
Since years Cumulocity IoT is providing a MQTT endpoint dedicated to the Cumulocity Domain Model to connect MQTT devices. But what about devices using a pre-defined topic structure and any custom payload which cannot be modified because they are so called “closed”? Since the latest release of Cumulocity there is a new Service in private-preview - the MQTT Service - which is a full-fledged MQTT Broker without the limitation of pre-defined topic structure and payload. Still, it does not solve the problem to map device data to the Cumulocity Domain Model. Therefor we @Christof_Strack and myself @Stefan_Witschel implemented an open-source tool called Dynamic Mapper which allows you to map any data bi-directional in a zero-code approach.
In the first part of this article I will explain some patterns and concepts behind Device Connectivity and MQTT devices. In the second part I will provide a step-by-step guide how to connect a sample MQTT device and to send telemetry data to Cumulocity IoT.
Let’s go!
MQTT Endpoint
Cumulocity provides an MQTT endpoint that let you connect devices via MQTT but they must support a pre-defined topic structure and the SmartREST data model or Cumulocity domain model via JSON.

This MQTT endpoint concept therefore only works for devices that can be customized or allow an installation of an agent like thin-edge.io but not for devices that are closed and cannot be modified with an additional agent. If you wanted to connect devices with a pre-defined topic structure and payload to Cumulocity you had to use an externally hosted MQTT Broker and add some logic to map it to Cumulocity IoT.
MQTT Service
Since the latest release in Q2 2024, the MQTT Service feature will be available as a private preview, which covers this gap as part of the platform.

Still, it will not cover the map and the transport part of an agent. So this must be covered by a custom component (microservice) which I want to highlight as a potential solution in this article:
Dynamic Mapper
As stated in the chapter before the Dynamic Mapper tries to address the need to dynamically map any topic structure and data payload to the Cumulocity IoT domain model. We implemented it in a modular approach so it can support multiple message brokers and any data format like JSON, Protobuf, Binary, CSV, and many more.
Architecture
To use the dynamic mapper you need to use a message broker either hosted externally or using the MQTT Service hosted by Cumulocity.
The Dynamic MQTT Mapper itself provides two artifacts:
- A microservice which can be uploaded to Cumulocity IoT and
- A frontend as a plugin which can extend existing Applications like the Administration App.

Components
The Dynamic Mapper has multiple components:
- Connector clients - the mapper has a modular connector concept which allows to add multiple connectors for each broker with required properties. Out of the box it supports MQTT , MQTT Service and Kafka. They allow to connect, publish and subscribe to topics.
- Data Mapper - handling of inbound & outbound messages from/to Broker in regards to the Cumulocity IoT Domain Model… Also includes an expression runtime JSONata to execute expressions. Data Mappers again can be separated into Processors. For example, there is a JSONProcessor handling any JSON payload and FlatFileProcessor for processing flat-file payload (e.g. 10,Temperatur,20,°C) and it can be also easily extended with processor extensions.
- C8Y Client - implements part of the Cumulocity IoT REST API to integrate data. Also subscribes on the Notification 2.0 API to receive messages from Cumulocity IoT and forwards it to the data mapper.
- REST Endpoints - custom endpoints that are used by the MQTT frontend plugin or can be used to add mappings programmatically
- Mapper Frontend - A plugin for Cumulocity IoT to provide a UI for Broker Configuration, Data Mapping, Testing, Monitoring, and much more.
Also, the mapper microservice is fully multi-tenant enabled. You can deploy it once in your enterprise tenant and subscribe to subtenants to manage connections and mapping per tenant without using additional resources.
Let’s summarize the key features of the dynamic mapper:
- No-code data mapping capabilities
- Supports multiple types of message brokers like MQTT, MQTT Service or Kafka and can be extended easily.
- Supports multiple broker connections in parallel
- Bi-directional messaging: Broker ↔ Mapper ↔ C8Y
- Multi-data payload support like JSON, Protobuf, CSV, binary, and others
- Fully multi-tenant enabled
- Open-source developed and maintained
- Easy to extend (Broker connectors, payload processors, etc.)
No let’s check how to use it in practice. In the following I will guide you step-by-step to make use of that Dynamic Mapper.
Step-by-step guide
1. Prerequisites
To follow this guide you need the following:
- A Cumulocity IoT Tenant with microservice feature enabled. In trial tenants this feature is disabled. Please get in contact with your sales rep or support to request that feature for your tenant.
- A MQTT Client Tool like MQTTx
- A publicly available MQTT Broker or MQTT Service. You can set up your own one or use existing sandboxes like test.mosquitto.org or others. For this guide, I will use
test.mosquitto.org.
2. Setup & Deployment
1. Download of artifacts
As a next step we gonna download the artifacts of the Dynamic Mapper: Releases · SoftwareAG/cumulocity-dynamic-mapper · GitHub
Make sure to select the latest release. In the assets part of the release you’ll find two zip files:
-
dynamic-mapping-service.zip- This is the microservice of the dynamic mapper. -
dynamic-mapping-ui.zip- This is the frontend plugin of the dynamic mapper.

Download them and store them somewhere on your disk.
2. Upload of artifacts
Now we go the our Cumulocity IoT Tenant and upload both assets.
Microservice
We start with the microservice dynamic-mapping-service.zip.
In the Application Switcher we go to Adminstration. Afterwards we select Ecosystem → Microservices. Now we should see the “Add microservice” button on top right. If this is not the case please check the Prerequisites that the microservice-hosting-feature is assigned to your tenant.

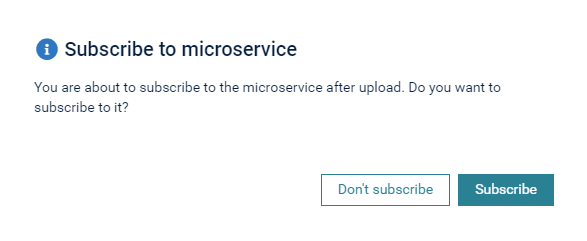
Select the dynamic-mapping-service.zip or drag & drop it in the area of the popup. When asked to subscribe please click the “Subscribe” button.
After a couple of seconds, the microservice should be uploaded and activated. We can check that by selecting Dynamic-mapping-service in the list of microservice and checking the status.

Frontend Plugin
Let’s continue with the frontend plugin (dynamic-mapping-ui.zip).
Now we can navigate to Ecosystem → Applications → Extensions.
Select the Dynamic-mapping-ui plugins or click on Add extension package and upload the dynamic-mapping-ui.zip manually.
You should see the Dynamic-mapping packages in the packages list afterward.

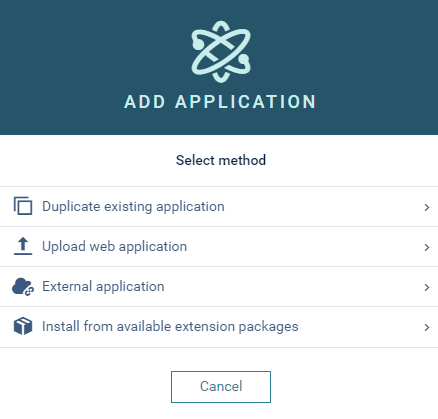
Now we want to assign that plugin to the Administration App. Go to Applications and click on Add application. Click on Duplicate existing application and Administration afterward.
Click on Duplicate

It will take a few seconds and you should see the new custom application Administration in the Application list. Select it by clicking on the name.
Go to the Plugins Tab. In the bottom right you see a button Install plugin. When clicked you see all available plugins in your tenant.
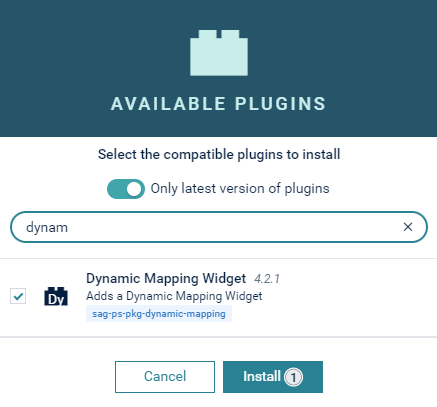
Select Dynamic Mapping Widget and click Install.
Now we need to refresh the page by pressing F5 or click the reload button in the browser.
In the left menu go to Settings. There you should see now Dynamic Mapping which is the plugin we have just installed.

Congratulations you’ve successfully installed both components in your tenant!
3.1 MQTT Service configuration
Please note: MQTT Service is currently in private preview and is only available on request on your tenants. If you haven’t it enabled please proceed with chapter 3.2 MQTT Broker configuration
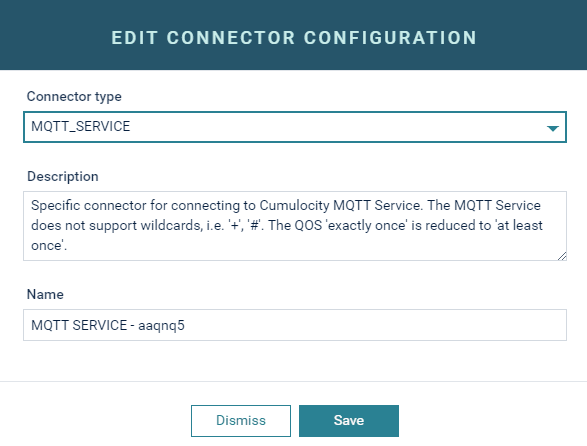
For adding MQTT Service you just need to add a MQTT Connector by clicking on Connector → Add configuration. Select MQTT Service and click Save
Now activate that connector by clicking on the Action Button.

After a few seconds the status should change to ![]()
3.2 MQTT Broker configuration
To add an external MQTT Broker we use the following connection details of a public mosquitto MQTT broker:
Protocol: mqtts:/
MQTT Host: test.mosquitto.org
MQTT Port: 8886
ClientId: dynamic-mapping-client-{{anyNumber}}
Make sure to select mqtts:// as protocol enter the Mqtt Host , Mqtt Port , Client Id and click on Save.

Now activate that connector by clicking on the Action Button.
After a few seconds the status should change to ![]()
4. Create a device mapping
Now let’s assume we have a device, a CCU installed on a bus, that sends some JSON data like this:
topic: device/express/berlin_01
{
    "line": "Bus-Berlin-Rom",
    "operator": "EuroBus",
    "customFragment": {
        "customFragmentValue": "Express"
    },
    "capacity": 64,
    "customArray": [
        "ArrayValue1",
        "ArrayValue2"
    ],
    "customType": "type_International"
}
We go to the Mapping Inbound tab and click on Add mapping. In the next pop-up we select JSON.
Define Topic

-
Subscription Topic :
device/# -
Mapping Topic :
device/+/+ -
Mapping Topic Sample :
device/express/berlin_01 -
Target API :
Inventory. - Map Device Identifier & Update Existing Device : checked
Explanation:
- In Subscription Topic we enter
device/#because we want to subscribe on all devices not only for express busses or the bus berlin_01. This is the topic we subscribe to on the MQTT Broker. - In Mapping Topic
device/+/+is entered. The meaning is that this mapping will handle all messages for exactly 2 levels of sub-topics. As our topic isdevice/express/berlin_01we change that to the valuedevice/+/+ - Mapping Topic Sample We define a concrete sample that is used for the testing. If we wouldn’t provide that testing is not possible.
- In Target API we select Inventory to create a new device in Cumulocity.
- Check Map Device Identifier & Update Existing Device - Map Device Identifier states that we want to correlate a unique ID to an external ID in Cumulocity and Update Existing Device states that it will also update the existing object in Cumulocity when it already exists.
Click on Next.
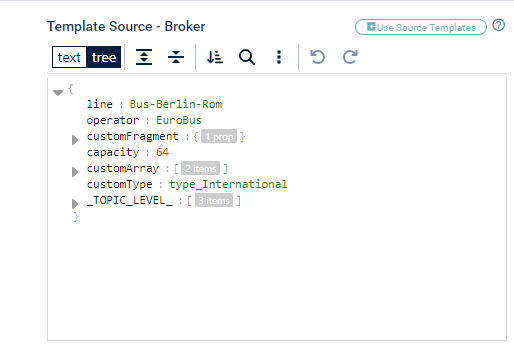
Define template
In the next view you see on the left the source template and on the right the target template. With the below we can manage the mappings.
Let’s start by defining the source template.
Click on Tree in Source and change it to Code. We don’t touch the _TOPIC_LEVEL_ but we add our example payload, copy & paste the following JSON message:
{
    "line": "Bus-Berlin-Rom",
    "operator": "EuroBus",
    "customFragment": {
        "customFragmentValue": "Express"
    },
    "capacity": 64,
    "customArray": [
        "ArrayValue1",
        "ArrayValue2"
    ],
    "customType": "type_International",
    "_TOPIC_LEVEL_": [
       "device",
       "express",
       "berlin_01"
  ]
}
Now change back from Code to Tree.
Let’s start with the important info the device identifier. We know that it is part of the topic _device/express/ berlin_01 _ so we select on the left side berlin_01 and on the right side id and click on + Add substitution to add the substitution.

In Substitutions list we see this afterward:
00. [* _TOPIC_LEVEL_[2] --> id ]
The second mapping will be the customType to type.
Select customType on the left and type on the right. Again click on + Add Substitution.

For the name we use now two properties from the left operator and line to map it to one property of the right name.
This can be done by using an expression language called JSONata. We select operator on the left and name on the right. Next we go to the field Evaluate Expression on Source and add the following:
operator&"-"&line
In the field Result Type you see the preview how the expression result will look like. Click on +Add substitution to add this substitution.

You can click on ? to get more examples for expressions or full spec of the expression language.
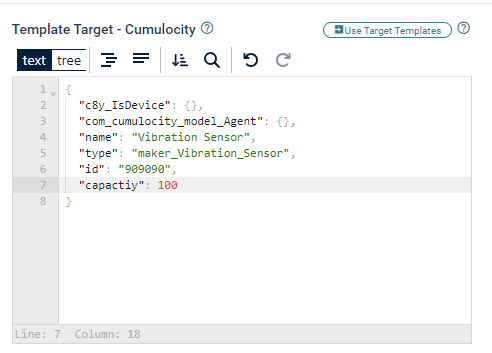
At last, we map the capacity from the left to a new property on the right.
In the Target Tree go with the mouse to the line below “id” and click the arrow down to open the menu. Scroll down an click on +Value
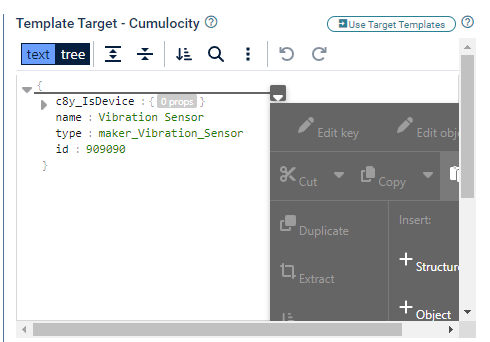
Enter capacity as the field and 100 as the value. The 100 value will be overwritten by the value of the source mapping so it doesn’t matter what we enter here.
Now we have 4 substitutions and we are done with our mapping.
Click on Next
Test mapping
In the next view we can evaluate how our mapping works. First click on Transform Test Message which will execute all substitutions based on provided source data.

With Show Next Test Result we can iterate through all messages if we have an array mapped containing multiple device information. In our case, we just have one message.
Click on Send Test Message. It will run the mapping and send it to Cumulocity IoT. After some time you will see the response of Cumulocity IoT in the Cumulocity Response.
Everything looks good so we Confirm our mapping.
Now in the Mapping list, you should see your mapping. By clicking on the Active Toggle Button you can enable your mapping.
Our mapping is finished and we can continue sending device data to the MQTT Broker.
Send device data
Now let’s simulate that we connect our device to the generic MQTT Broker we have configured earlier.
Start MQTTx client on your desktop. On Connections click on the + to create a new connection.
We provide the following information:
Name: mosquitto_sandbox
Client_ID: (don't touch)
Host: mqtts://test.mosquitto.org
Port: 8886

Click on Connect.
Please note : The mosquitto sandbox will terminate the connection after a few seconds with no activity. So you might have to re-connect.
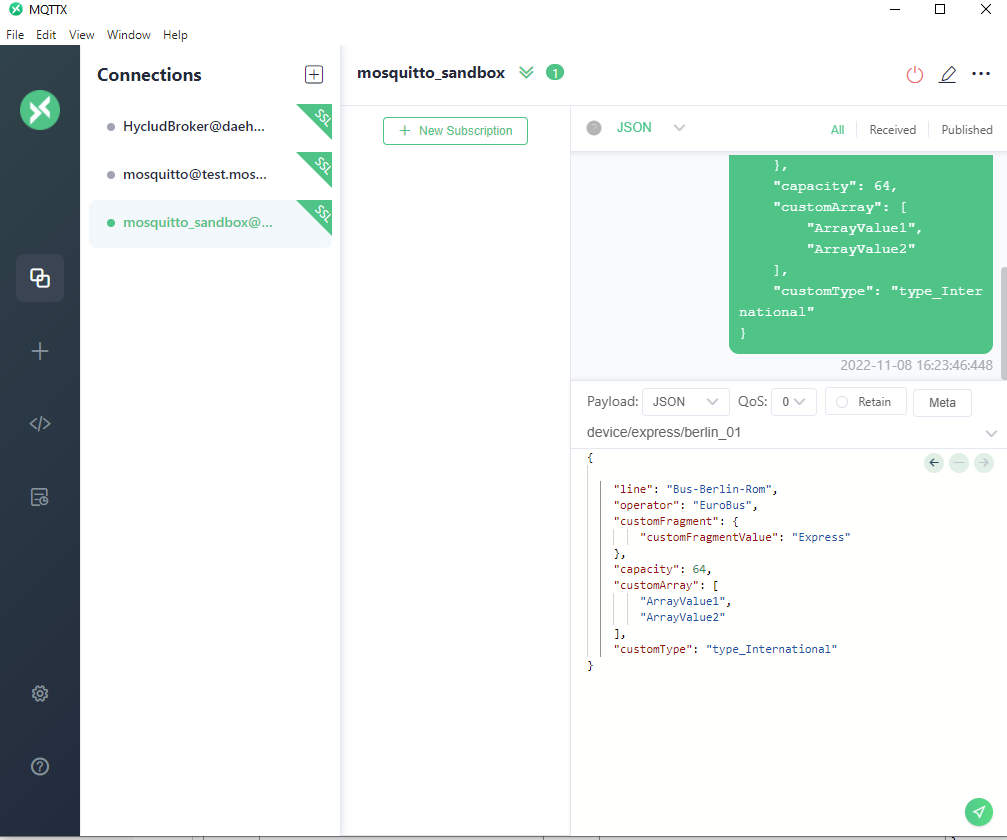
In the bottom right corner change the Payload to JSON. Enter the topic device/express/berlin_01 with the payload:
{
    "line": "Bus-Berlin-Rom",
    "operator": "EuroBus",
    "customFragment": {
        "customFragmentValue": "Express"
    },
    "capacity": 64,
    "customArray": [
        "ArrayValue1",
        "ArrayValue2"
    ],
    "customType": "type_International2"
}
Please recognize that we changed the customType to
type_International2. This will result in an update of the existing Device we have created during Testing.
Click on the bottom right button to send the message.
Confirm Device creation
Let’s check what happened! Go back to the Cumulocity IoT Dynamic Mapping App. Click on Monitoring.
There you should see now an entry:
![]()
This means at least 1 message has been received without error.
Switch the application to Device Management using the Application Switcher in top right corner.
Click on Devices → All devices in the left navigation.
Here you see a new device has been created of type type_International2 we have just sent via MQTT Broker.

We can now repeat the last steps by sending the same message with different values on different topics e.g. device/express/berlin_02 with
{
    "line": "Bus-Prag-Leipzig",
    "operator": "EuroBus",
    "customFragment": {
        "customFragmentValue": "Express"
    },
    "capacity": 128,
    "customArray": [
        "ArrayValue1",
        "ArrayValue2"
    ],
    "customType": "type_International"
}
5. Sending Measurements Events Alarms (MEAs)
Read full topic here to learn how to send Measurements Events Alarms.
If you want to read the full documentation please have a look here:
Is there anything missing? Any connector you want to use or payload format which is currently not supported?
We are very happy about feedback and contribution! So if you have an idea please approach us either here or using the GitHub project!
This article is part of the TECHniques newsletter blog - technical tips and tricks for the Software AG community. Subscribe to receive our quarterly updates or read the latest issue.


Top comments (0)