Cumulocity IoT can integrate with Okta as an identity provider (IDP) using OpenID Connect. The connection can be made with out of the box functionality from both Cumulocity IoT and Okta. This document will guide users through the process of making the initial integration.
Prerequisites
- Cumulocity IoT tenant with access to the Administration application and permissions to modify Authentication settings
- Okta account with permissions to create custom applications and custom authorization servers
Okta Setup
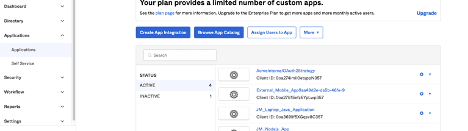
- Log into the Okta console and navigate to the Applications page
- Click “Create App Integration” and choose a Sign-in method of “OIDC-OpenID Connect” and Application type of “Web Application”
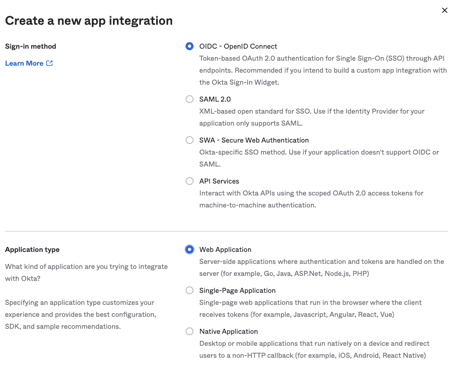
- Fill out the form using the following guidelines: a. App integration name : This can be whatever you want it to be, since it is only referenced in the Okta console b. Grant type : The only boxes checked here should be “Authorization Code” and “Refresh Token” c. Sign-in redirect URIs : Provide the URL that your Cumulocity IoT tenant uses for redirects, which is in the format of /tenant/oauth (e.g., https://tenant123.us.cumulocity.com/tenant/oauth) Note: You can also find the Redirect URI in the Cumulocity IoT tenant’s Single sign-on configuration page d. Controlled Access : Click on the appropriate permissions you wish to give for other Okta users to access this application
- Save the newly created application
- Within the new application:
a. Navigate to the “General” menu and make note of the “Client ID” and “Client Secret”
 b. Navigate to the “Assignments” menu and add any users that you want to be able to log in to Cumulocity IoT using Okta SSO
 - Navigate to “Security → API settings”
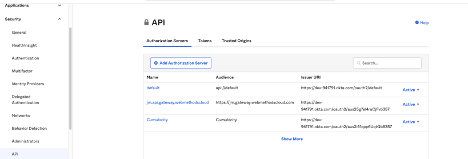
- Click the “Add Authorization Server” button to create a new custom authorization server
- Fill out the “Name”, “Audience”, and “Description” with any names you would like to use and click “Save”
Example:
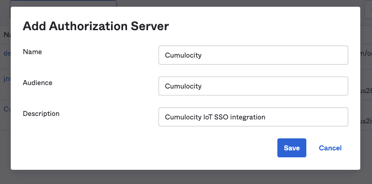 b. Note: Remember the “Audience” value here because you’ll need it later for the Cumulocity IoT setup
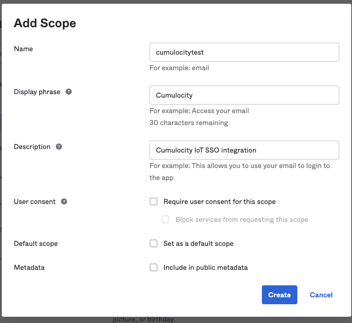
 - Within the new authorization server, navigate to the “Scopes” menu and click “Add Scope”

- Fill out the “Name”, “Display phrase”, and “Description” fields while leaving all checkboxes unchecked and click “Create”
Example:
- Still within the authorization server, navigate to the “Claims” menu
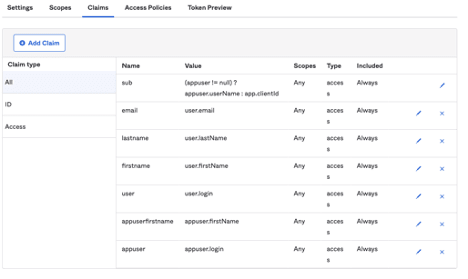
- Use the “Add Claim” to add any of the user information needed from the screenshot above, which will be included in the JSON Web Token (JWT) that is returned to Cumulocity IoT
Example:
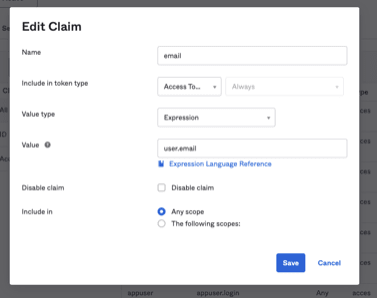 Note: For more user info options to include in these claims, refer to the Okta Expression Language overview documentation
- Save your new claims and, still within the authorization server, navigate back to the “Settings” menu and click on the “Metadata URI” link

- An Okta metadata JSON document will display on the screen, which you should save for later use during the Cumulocity IoT setup
Cumulocity IoT Setup
- Log into your Cumulocity IoT tenant with an admin account, and Navigate to the “Administration” application, and then the “Settings Authentication Single sign-on” screen and choose a template of “Custom”

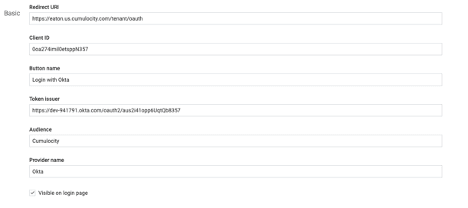
- Scroll down to the “Basic” section and enter the following values in the form
a. Redirect URI : Leave as default value
b. Client ID : Okta application client ID mentioned in step 5a of the Okta setup
c. Button name : The text you want to see on the login screen button (Example: “Login with Okta SSO”)
d. Token issuer : The “token_endpoint” URL listen in the Okta metadata JSON document
e. Audience : Value for audience mentioned in step 8 of the Okta setup
f. Provider Name : Use “Okta”
g. Visible on Login Page : Check this option
Example:
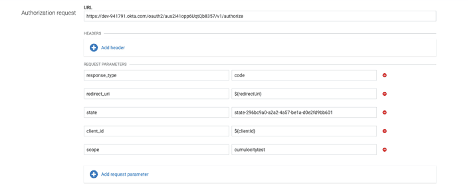
- Scroll up to the “Authorization request” form and enter the following values into the form
a. URL : The “authorization_endpoint” URL from the Okta metadata JSON document
b. Headers : N/A
c. Request Parameters : Add request parameters for the following variables
response_type : code
redirect_uri : ${redirectUri}
state : state-296bc9a0-a2a2-4a57-be1a-d0e2fd9bb601
client_id : ${clientId}
scope : Name of your scope provided in step 10 of Okta setup
Example:
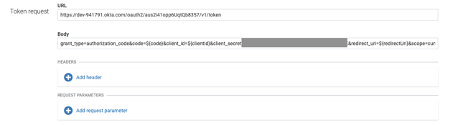
- Scroll down to the “Token request” form and enter the following values into the form
a. URL : The “token_endpoint” URL from the Okta metadata JSON document
b. Body : grant_type=authorization_code&code=${code}&client_id=${clientId}&client_secret=&redirect_uri=${redirectUri}&scope=
Note: Remember to replace the placeholder for client secret and scope in the body value
c. Headers : N/A
d. Request Parameters : N/A
Example:
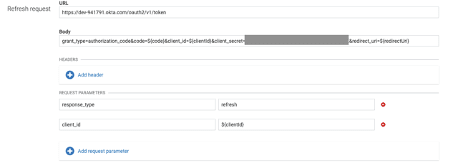
- Scroll down to the “Refresh request” form and enter the following values into the form
a. URL : The “token_endpoint” URL from the Okta metadata JSON document
b. Body : grant_type=authorization_code&code=${code}&client_id=${clientId}&client_secret=&redirect_uri=${redirectUri}
Note: Remember to replace the placeholder for client secret in the body value
c. Headers : N/A
d. Request Parameters : Add request parameters for the following variables
response_type : refresh
client_id : ${clientId}
Example:
- Scroll down to the “Logout request” form and enter the following values into the form
a. URL : The “end_session_endpoint” URL from the Okta metadata JSON document combined with “?redirect_uri=${redirectUri}” (Example: https://dev-941791.okta.com/oauth2/aus2i41opp6UqtQb8357/v1/logout?redirect_uri=${redirectUri})
b. Request Parameters : Add request parameters for the following variables
client_id : ${clientId}
Example:

- Scroll down to the “Access mapping” form and use it to assign values within the JWT returned to Cumulocity IoT to roles within the tenant, which is documented here
Example (Full Admin Access):

- Scroll down to the “User ID” form and uncheck “Use constant value”, and enter in the “JWT field” which JWT key you would like to use to match to the Cumulocity IoT username
Note: “sub” works well as a value in this example, but you can play around with other keys by logging in with the SSO user and checking the audit logs, which shoes the full JWT
Example:

-
Scroll down to the “Logout request” form and enter the following values into the form
a. Verifier : JWKS
b. JWKS URI : The “jwks_uri” URL from the Okta metadata JSON document
Example:

Final Steps
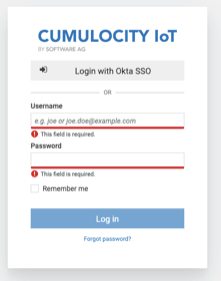
SSO logins should now work for any user setup in the Okta application’s assignment screen (Okta setup step 5b). Your login page should look like the screenshot below, and clicking on the “Login with Okta SSO” button should redirect you to Okta’s authentication screen.
This guide does not cover the many options available in Okta to control authorization with their IDP. For more options, reference the Okta developer guide.


Top comments (0)