Introduction
This article explains about how to implement OAuth 2.0 on API gateway for OKTA authorization server
Audience
It is assumed that readers of this article know how to setup API’s on API gateway.
PreRequisites
• Active tenant subscription on Webmethods.io API Gateway
• Configure the API at API gateway.
• Create Application and associate API with application.
• Refer the link to create API
GitHub - SoftwareAG/webmethods-api-gateway: Repository hosting developer tutorials, code samples, custom policies, CI/CD scripts and more to enable developers develop faster with API Gateway
• Active account for OKTA
Use Case:
• We configured the API on API Gateway. This API checks the availability of bed in hospitals.
• To invoke this API from API Gateway we have implemented the OAuth 2.0 mechanism.
• In our case we our OKTA will be working as authorization server.
What is OAuth 2.0?
OAuth 2.0 is the industry-standard protocol for authorization. OAuth 2.0 focuses on client developer simplicity while providing specific authorization flows for web applications, desktop applications, mobile phones, and living room devices.
The OAuth 2.0 spec has four important roles:
• The “authorization server” — The server that issues the access token. In this case Okta is the authorization server.
• The “resource owner” — Normally your application’s end user that grants permission to access the resource server with an access token
• The “client” — The application that requests the access token from Okta and then passes it to the resource server
• The “resource server” — Accepts the access token and must verify that it’s valid. In this case this is your application
For More info please follow below link:
OAuth 2.0 and OpenID Connect Overview | Okta Developer
API Used for our Use case:
API Name: CheckBedAvailability

Enforce policy
• Open the API CheckBedAvailability.
• Navigate to the policy
• Click on Identify & Access policy.

• Select Identify & Authorize Application.
• Select OAuth2 Token.
• Save the changes.

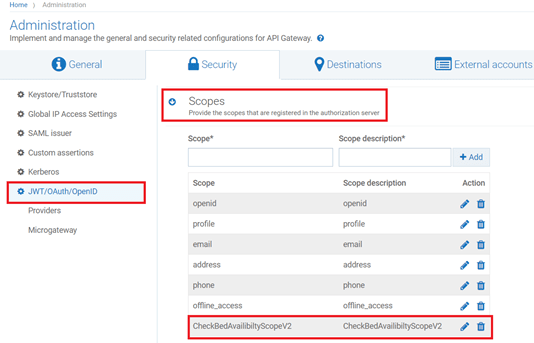
Create Scope in API
- Go to the API in our case it is checkBedAvailablity
- Navigate to scopes with in the API
- Create the scope and map the resource with it
- In our case scope name is CheckBedAvailibiltyScopeV2
- Add resource name is CheckBedAvailability
- Click Save.

Before Configuring the Authorization server, we need to understand couple of terminologies
Introspection: Introspection is the way to authenticate the token. It is sub divided into 2 parts
- Local introspection: Validating the token with in the gateway. This can be done using the JWKS URI or the public certificate of the issuer. For this the token should necessarily be JWT.
- Remote introspection: Validating the token with the authorization server. It has introspection endpoint, which is used to validate the token. Along with that we have client id and client secret which we are used to protect the endpoint, so that anonymous users won’t get access to the resource. Underneath to invoke an endpoint we need a user, Gateway user is the one under which we invoke the endpoint. Dynamic client registration Dynamic client registration is used when you want to create the client automatically in the OAuth2 authorization server when a application is created in API Gateway.
Add Authorization Server
- Click on administration tab
- Navigate to Security tab
- From the left hand tab click on JWT\OAuth\OpenID
- Click on Add authorization server.
- Provide the name as OktaAuthServer
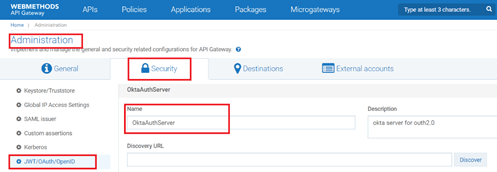
- Provide the Discovery URL and click on Discover.

- This will populate the values on Introspection, Dynamic client registration and in Metadata.
- Add the scope and save it.
Map Scope OAuth Scopes
- Click on map Scope
- Give the authorization server scope , In our case it will be OktaAuthServerScopeMapping

- Give the API scope name In our case it we have given in CheckBedAvailibiltyScopeV2
- Click Save.

Create Application
- Click on create Application and name it as ExtrenalOAuthServerApp_OkTA.
- Select the API which we want to associate with this application. In our case it will checkBedAvailibility API.
- Click on Authentication and then click on Create Strategy
- Select Authentication scheme as OAuth
- Provide the name for the strategy, In our case we have named it as ExtrenalOktaStrategy
- Select the authentication server as OktaAuthServer.
- Enable the generate the credentials
- Select application type as Public
- Application profile as web
- Select Grant Type as “authorization_code”
- Select the scope in our case it will be OAuthCheckBedAvailabilityScope
- Provide the Redirect URI as https://oauth.pstmn.io/v1/callback
- Provide the Scope in our case it will be CheckBedAvailibiltyScopeV2
- Click on Add.
- It will generate the client ID and client credentials, which will be used to generate the access token.

Test Using postman client
- Select Authorization as OAuth 2.0
- Set the below values
Grant Type: Authorization code
Call Back url: https://oauth.pstmn.io/v1/callback
Authorise URL: We can get the from the metadata provided by OKTA
Access Token URL: We can get the from the metadata provided by OKTA
Client ID: We can get the from the metadata provided by OKTA
Client Secret: We can get the from the metadata provided by OKTA
State: Any random alphanumeric value
Client Authentication: Send Client credentials in Body
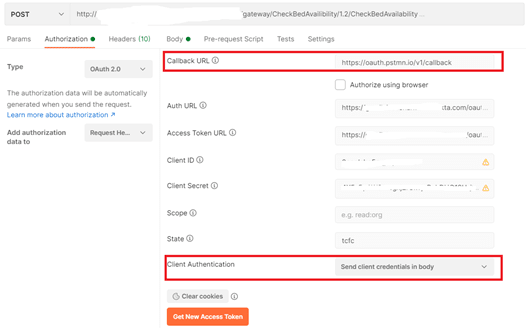
- Click on generate token

- Click on use token
- Submit the request

- Validate the response.


Top comments (0)