Hey my name is Dillan, I decided to start documenting some of my work. You can find this post at my website. This particular post is the first of three seperate articles.
Part One
Lets list out exactly what were going to cover
- [] Build test infrastructure with docker and SeleniumGrid
- [] Build python test suite to run against each container
- [] Configure CentOs server and register gitlab-runner
- [] On push run gitlab ci to build up containers and execute tests,
- [] Build up infrastructure and run tests on Jenkins triggered from gitlab
Why are we using SeleniumGrid & Docker?
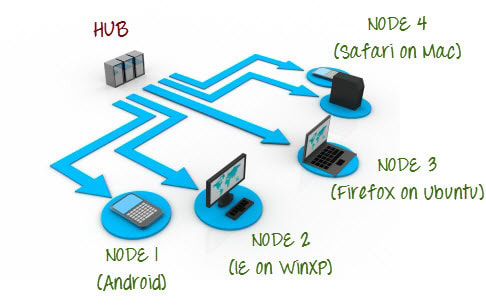
Each container represents a separate browser and operating system. The idea is to have all automated tests centralized in one container. This container will run and execute tests directly against the Hub. The hub is the control center to all the other nodes. When the hub container is triggered, it will run the given tests across each node/container.
This technology can help us consolidate time, compare behavior across multiple browsers & operating systems, and provide a higher level of code coverage for frontend changes. So now how are we going to use it?
Dockerfile
Used to build image for our test container
FROM python:3.6

ADD . /uitests

WORKDIR /uitests

RUN pip install -r requirements.txt

RUN chmod +x wait-for-it.sh
docker-compose.yml
Used to pull down image for each browser and build containers for hub & nodes
We define a network in which we also include the image of our tests from the Dockerfile
version: '2'
services:

  selenium_hub:
    container_name: selenium_hub
    image: selenium/hub
    networks:
      cao_ui_prodchecks: {}
    ports:
      - "4444"

  firefoxnode:
    container_name: firefox_node
    image: selenium/node-firefox
    networks:
      cao_ui_prodchecks: {}
    environment:
      - HUB_PORT_4444_TCP_ADDR=selenium_hub
      - HUB_PORT_4444_TCP_PORT=4444
    depends_on:
      - selenium_hub
    ports:
      - 5554

  chromenode:
    container_name: chrome_node
    image: selenium/node-chrome
    networks:
      cao_ui_prodchecks: {}
    environment:
      - HUB_PORT_4444_TCP_ADDR=selenium_hub
      - HUB_PORT_4444_TCP_PORT=4444
    depends_on:
      - selenium_hub
    ports:
      - 5555

  robottests:
    container_name: robottests
    command: /bin/sleep infinity
    networks:
      cao_ui_prodchecks: {}
    depends_on:
      - selenium_hub
    build: .
    volumes:
      - ./reports:/cao_ui_tests/reports

networks:
  cao_ui_prodchecks:
    driver: bridge
The Dockerfile will copy over all of the folders of the Repository. Click Repository to view the project configuration. I decided to use RobotFramework for a quick example.
Commands
# Build robot tests
docker build -t robottests:1 .

# Launch services
docker-compose up -d

# execute tests
docker-compose exec robottests scripts/wait_for_it.sh -t 15 selenium_hub:4444 -- robot -A run_tests.robot
You should see all services up and running!
Creating network "cao_ui_prodchecks_cao_ui_prodchecks" with driver "bridge"
Creating selenium_hub ... done
Creating robottests ... done
Creating firefox_node ... done
Creating chrome_node ... done
So let's take a look at the services we have up and running.
- The Selenium Hub - controls delivery of test execution to each node
- Firefox Node - test suite executes against firefox browser
- Chrome Node - test suite executes against chrome browser
- Test Container - dockerized automated test suites
Let's execute the test container. Note the command is listed in the dropdown list above ^.
docker exec robottests scripts/wait_for_it.sh -t 15 selenium_hub:4444 -- robot -A run_tests.robot
wait_for_it.sh: waiting 15 seconds for selenium_hub:4444
wait_for_it.sh: selenium_hub:4444 is available after 0 seconds
==============================================================================
UI Prod Tests
==============================================================================
UI Prod Tests.Login Page
==============================================================================
Authentication | PASS |
------------------------------------------------------------------------------
UI Prod Tests.Login Page | PASS |
1 critical test, 1 passed, 0 failed
1 test total, 1 passed, 0 failed
==============================================================================
UI Prod Tests | PASS |
1 critical test, 1 passed, 0 failed
1 test total, 1 passed, 0 failed
==============================================================================
Debug: /cao_ui_tests/reports/debug.logenv
Output: /cao_ui_tests/reports/output.xml
Log: /cao_ui_tests/reports/log.html
Report: /cao_ui_tests/reports/report.html
If you look close you will notice something that I have not mentioned. Before the test suite begins, a shell script executes, with the output
wait_for_it.sh: waiting 15 seconds for selenium_hub:4444
wait_for_it.sh: selenium_hub:4444 is available after 0 seconds
This is a shell script that is vital to execution and is located in the scripts directory of the Repository.
Before executing the Selenium tests, it's necessary to make sure that the test runner can create a Selenium Grid Session with a given webdriver. It means that Selenium Grid or Selenium Chrome Node should be up and ready.
wait-for-it.shscript provides you with an opportunity to wait for the service to be up but not ready
So lets go through the checklist at the beginning of this post and see where we are.
- [X]
Build test infrastructure with docker and SeleniumGrid - [X]
Build python test suite to run against each container - [] Configure CentOs server and register gitlab-runner
- [] On push run gitlab ci to build up containers and execute tests,
- [] Build up infrastructure and run tests on Jenkins triggered from gitlab
In the next post, we will discuss configuring a centOs server to run our CI tests that will build up our infrastructure and run our test suites and code changes in our automated tests. Jenkins will pull from the repository so it is important to make sure we are not adding breaking changes into our codebase.


Top comments (2)
Thanks for sharing. When comes other parts?
Wednesday before 5pm. Part two will tell a story that your working at a company, with a private hosted gitlab and you need to configure a centOs server and register and configure a gitlab runner to execute your builds when you push to the repository.
Will cover: