Introduction
This article will learn how to generate a PDF file quickly using the C# language. We will use the IronPDF C# library to create a new PDF document. We can focus on meaningful work and avoid wasting time on tedious PDF generation tasks with easy-to-use functions. IronPDF .NET library provides such functions.
IronPDF: The C# PDF Library

IronPDF is a .Net library that allows us to read, create and manage PDF documents fast. It has many fascinating tools to do operations on PDF files. IronPDF gives versatile and easy-to-use functions to generate pdf files and manipulate PDFs. IronPDF supports C# and VB.NET languages. It is not an open-source library, but we can use it free for development purposes.
This tutorial will teach how to create PDF files using c# IronPDF library. We will explore the functions of IronPDF in creating PDF files. We will convert HTML to PDF in this article. We will see how to convert HTML string to a PDF file, HTML file to PDF file, and convert URL to PDF.
We will use Visual Studio, C#, and HTML to generate PDF documents. We assume that you know the basics of C# and HTML language to understand the code flow and logic used in the program. We will use Visual Studio to write and compile the code, C# language to build and write the sense of the program, and HTML for the formatting of PDF files. Let's get started with creating a C# program in Visual Studio:
Step 1: Creating C# Project
To create a C# project, Open Visual Studio. I am using Visual Studio 2019. You can use any version of Visual Studio you want, but the latest version is recommended.
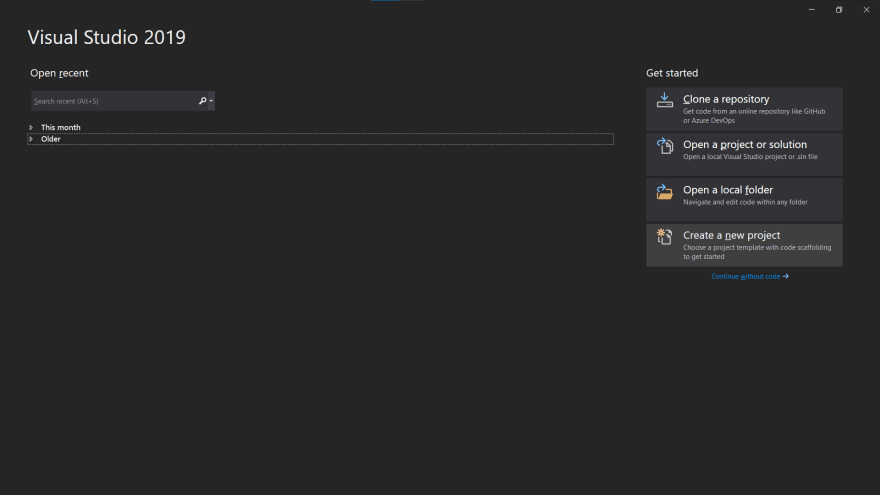
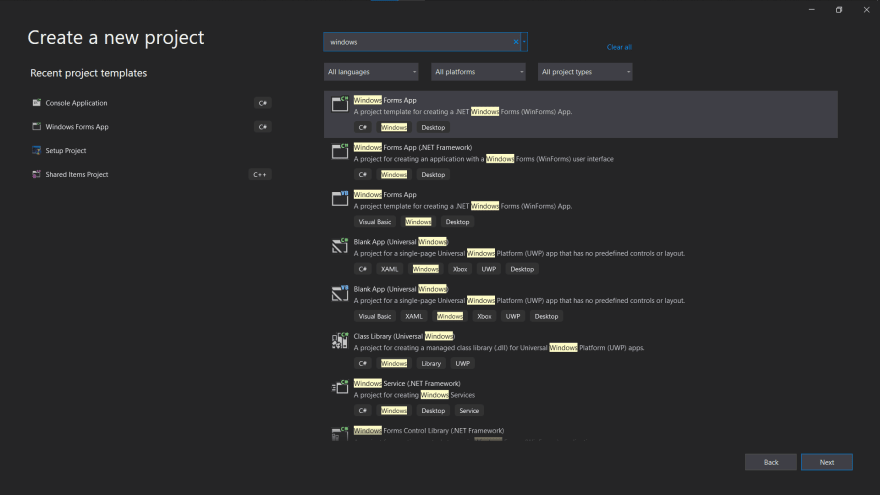
Now, click on the "Create a new project" button from the right sidebar. A new window screen will open to create a new project. Search for "windows" and select "Windows Form App" from search results and then click on the "Next" button.
Now configure your project by entering the Project Name and clicking the "Next" button.

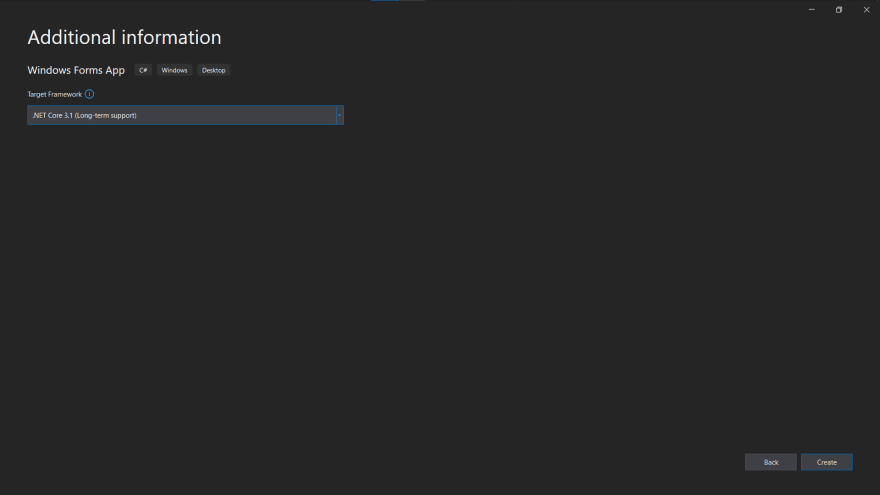
Now select the .NET framework. You can suggest any .NET core framework but not less than 3.1 because 3.1 has extended support. So, recommended .NET core version is 3.1. If you choose the latest one, there will be many issues that many devices don't support the latest frameworks, but every device supports 3.1. After selecting the .NET core framework, click on the "Create" button. A C# windows form project will be created.

A C# project is ready to develop our PDF generating application. Now, it's time to install the IronPDF pdf library.
Step 2: Install IronPDF Library
The primary step is to develop our application is to install the IronPDF library because the IronPDF library is central to the application. We can install it in two ways. The first way is to install it using NuGet Package Manager and the second way is to install it through the NuGet Package manager console. If you have administrative rights to your machine, you can install a PDF library using "Nuget Package Manager."
Method 1: Install IronPDF library using Nuget Package Manager
This method is recommended if you have administrative rights to your machine. Go to the "Nuget Packet Manager" in Visual studio by Pressing Alt + T + N + N, or go to the Tools menu from the top bar and hover on "Nuget Package Manager" from the drop-down and select Manage Nuget Packages for Solution.

The NuGet solution will be open. Select browse, and write IronPDF in the search bar.

Select the first option from search results and click on the Install button. It will start installing the package automatically.
Method 2: Install IronPDF library using Nuget Package Manager Console
You can install the IronPDF library using the console. Go to tools from the main menu to open the console, hover on "Nuget Package manager" in the drop-down menu, and select Packet manager console.

It will open the Nuget package manager console.

Write the following command in the console and hit enter.
PM > Install-Package IronPdf

It will install the IronPDF package automatically.

IronPDF will be added to the dependencies.

Design Frontend
The next part is to design the Frontend. We can create our windows form using the toolbox in Visual Studio on the left side.
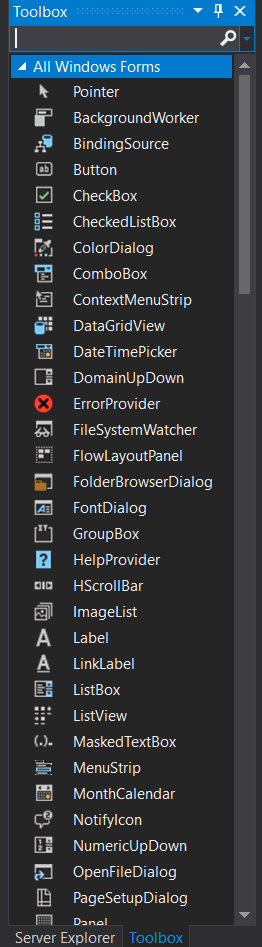
We will use the label, button, TextBox, and a RichTextBox to design our Windows Form. You can find these tools by searching in the toolbox. As we assume that you know the basic knowledge of Visual Studio, you can easily do it by dragging and dropping elements.
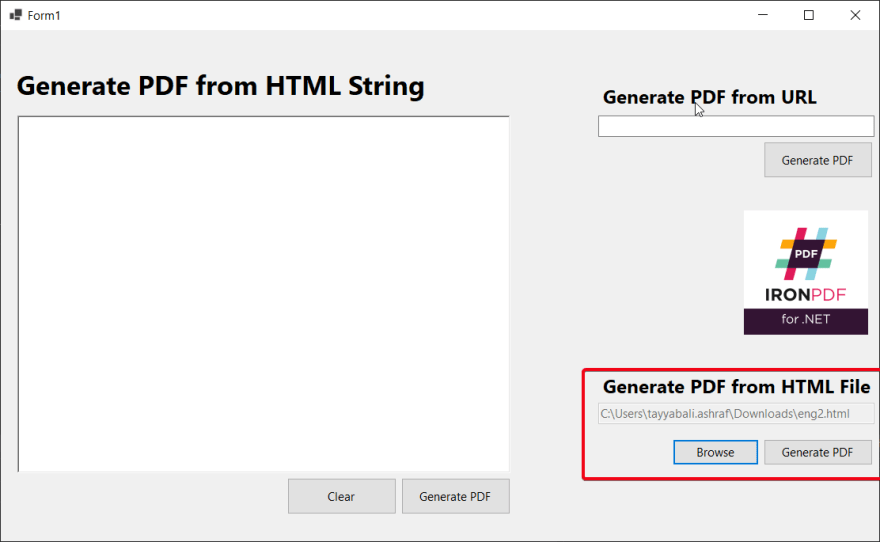
Our windows Form is divided into three sections and will be shown like this:
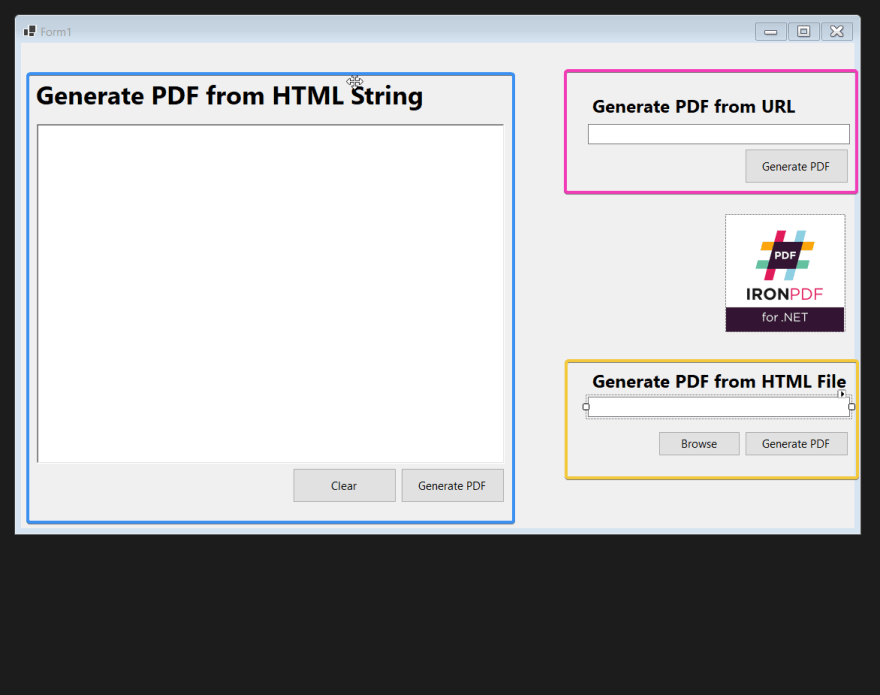
Three sections are mentioned by highlighting the area of each section with different border colors.

We use one RichTextBox, two TextBox, and six buttons.
We will generate PDF by three methods:
- - Generate PDF by HTML String
- - Generate PDF of a URL
- - Generate PDF from an HTML Document
Now our frontend is complete. So, it's time to add backend functionality to make it functional.
Backend Code to create a pdf:
Let's start adding functionality in the first section (HTML String).
Section 1: Generate PDF from HTML String
In this section, we will create PDF from HTML strings. HTML will be used for formatting the PDF file. Section 1 has two buttons: Clear and Generate PDF. The clear button will clear the content in RichTextBox, and Generate PDF button will create the PDF based on content in Text Box. Let's add functionality for both buttons.
1.1: Add functionality of Generate PDF button
Double click on the "Generate PDF" button of section 1. It will open the Form1.cs file, and the following code will appear. We set the name of this button as "btn_generate".

private void btn_generate_Click(object sender, EventArgs e)
First of all, add the IronPDF namespace at the top of the program file.
using IronPDF;
Now add following code inside "btn_generate_Click" function. We will use RenderHtmlAsPdf() to generate PDF from HTML String.
`private void btn_generate_Click(object sender, EventArgs e){
String htmlTemp = txt_htmlstring.Text;
//Chceking If Text in TextBox is empty or not
if(htmlTemp.Trim().Length > 0){
//Initialize Save File Dialog Box
SaveFileDialog file = new SaveFileDialog();
file.DefaultExt = "pdf";
file.Title = "Save Pdf File";
file.DefaultExt = "pdf";
file.FilterIndex = 1;
file.Filter = "Pdf files (.pdf)|.pdf|All files (.)|.";
if (file.ShowDialog() == DialogResult.OK){
string fileName = file.FileName;
//Initalize Generating PDF
var Renderer = new IronPdf.ChromePdfRenderer();
                //Generate PDF from HTML string
                Renderer.RenderHtmlAsPdf(htmlTemp).SaveAs(fileName);
                MessageBox.Show("File Generated and saved succesfully!");

                //Empty TextBox after generating PDF
                txt_htmlstring.Text = String.Empty;
            }
        }
        //If the Text is not greater than 0, PDF will not generate.
        else{
            MessageBox.Show("You can't generate Empty PDF!");
        }
      }`
First of all, this code will check if HTML String is empty or not. If there is no text in RichTextBox, it will give an Error Message that "You can't generate Empty PDF!". Otherwise, it will open a Save Dialog Box to save the PDF file. You will select the path to save the generated PDF file. When you click on the OK button of the Save Dialogue Box, IronPDF will create the PDF of your string and keep it at your selected destination. This code will work as HTML to pdf converter.
1.2: Add Functionality of Clear Button
Now, we will add the code functionality of the "Clear" button. Double click on the "Clear" button, it will add the following code into the code file:
private void btn_clear_Click(object sender, EventArgs e){}
This function will write logic to clear the RichTextBox text when the user clicks on the "Clear" button.
private void btn_clear_Click(object sender, EventArgs e){

  txt_htmlstring.Text = String.Empty;

}
The coding of the first section has been completed. Let's start coding the second section.
Section 2: Generate PDF from URL
Double click on the "Generate PDF" button of section 2. The name of this button in the code is "btn_url." You can change the name of the buttons according to your mind.

It will add the following code into the program file:
private void btn_url_Click(object sender, EventArgs e){}
We will write the logic to generate PDF from a URL in this function. We will use RenderUrlAsPdf() function.
`private void btn_url_Click(object sender, EventArgs e){
String url = txt_url.Text;
        //Chceking If Text in TextBox is empty or not
        if (url.Trim().Length > 0){
            //Initialize Save File Dialog Box
            SaveFileDialog file = new SaveFileDialog();
            file.DefaultExt = "pdf";
            file.Title = "Save Pdf File";
            file.DefaultExt = "pdf";
            file.FilterIndex = 1;
            file.Filter = "Pdf files (*.pdf)|*.pdf|All files (*.*)|*.*";
            if (file.ShowDialog() == DialogResult.OK){
                string fileName = file.FileName;

                //Initalize Generating PDF
                var Renderer = new IronPdf.ChromePdfRenderer();

                //Generate PDF from URL
                Renderer.RenderUrlAsPdf(url).SaveAs(fileName);
                MessageBox.Show("File Generated and saved succesfully!");

                //Empty TextBox after generating PDF
                txt_url.Text = String.Empty;
            }
        }
        //If the Text is not greater than 0, PDF will not generate.
        else{
            MessageBox.Show("Enter URL please!");
        }
    }`
This code will check if there is any URL link; if there is no URL, it will pop up an error message. Otherwise, it will start creating PDFs of the given URL. You will save PDF files into the system using Save Dialogue Box.
The coding of the second section is complete. Now let's move towards the third section.
Section 3: Generate PDF from HTML File:
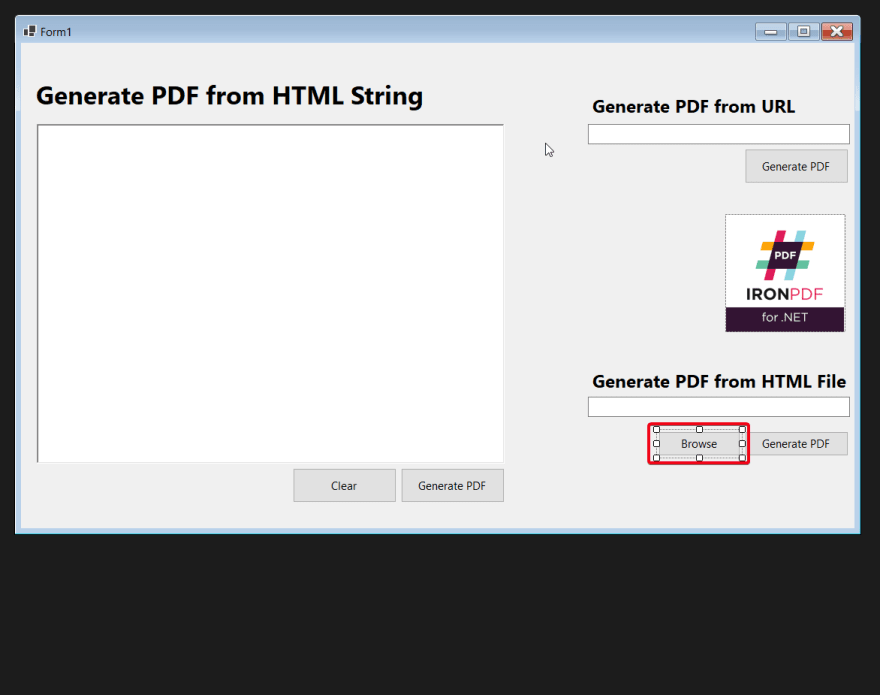
In this section, we will generate PDF from an existing HTML file. This section has two buttons: Browse and Generate PDF. The browse button will select the HTML file we want to convert to PDF, and Generate PDF button will generate the selected file into PDF. Let's add the functionality of the "Browse" button:
3.1: Add functionality of Browse button
The browse button will open an open dialog box and show only .HTML files. When the user selects any file, it will display the chosen file path in the Text box.
Double click on the "Browse" button. It will add the following code in the program source code:
private void btn_browse_Click(object sender, EventArgs e){}
Now add the following code in the btn_browse_Click function:
`private void btn_browse_Click(object sender, EventArgs e)
{
OpenFileDialog file = new OpenFileDialog();
file.Filter = "HTML files (.html)|.html";
        if(file.ShowDialog() == DialogResult.OK)
        {
            txt_file.Text = file.FileName;
        }
    }`
This function will pop up an open file browser window and set the chosen HTML file path to the textbox.
3.2: Add functionality of Generate PDF button
Generate PDF button will generate the PDF of the selected file based on the path in the textbox. Double click on the "Generate PDF" button, it will add the following code in the program source code:
private void btn_file_Click(object sender, EventArgs e){}
We will write the logic of creating a PDF file in this function. Add the following code in the btn_file_Click function:
`private void btn_file_Click(object sender, EventArgs e)
{
if(txt_file.Text.Trim() != "")
{
string selectedFilePath = txt_file.Text;
//Initialize Save File Dialog Box
SaveFileDialog file = new SaveFileDialog();
file.DefaultExt = "pdf";
file.Title = "Save Pdf File";
file.DefaultExt = "pdf";
file.FilterIndex = 1;
file.Filter = "Pdf files (.pdf)|.pdf|All files (.)|.";
if (file.ShowDialog() == DialogResult.OK)
{
string fileName = file.FileName;
                //Initalize Generating PDF
                var Renderer = new IronPdf.ChromePdfRenderer();

                //Generate PDF from URL
                Renderer.RenderHTMLFileAsPdf(selectedFilePath).SaveAs(fileName);
                MessageBox.Show("File Generated and saved succesfully!");

                //Empty TextBox after generating PDF
                txt_file.Text = String.Empty;
            }
        }
        else
        {
            MessageBox.Show("Please select a HTML file!");
        }
    }`
This function will check if any file is selected or not. If the file is selected then it will start generating PDF otherwise it will prompt an error about selecting an HTML file.
If the file is selected then it will pop up a Save File dialog and you will save the file as a PDF. We use RenderHTMLFIleAsPdf() function to generate PDF file from an HTML file.
Step 2: Run the Project:
Now, our coding has been completed and it's time to run the project. Hit Ctrl+F5, the project will run. I write the following HTML string into the textbox.

When you click on Generate PDF button of section 1. It will open the Save File dialog. Enter the name of the PDF and it will start generating PDF and when it is done, it will show the success message.

Now let's check the output of our program.

Similarly, you can generate PDF from an URL by putting the URL in Section 2 and clicking generate PDF. I use this link to generate PDF.

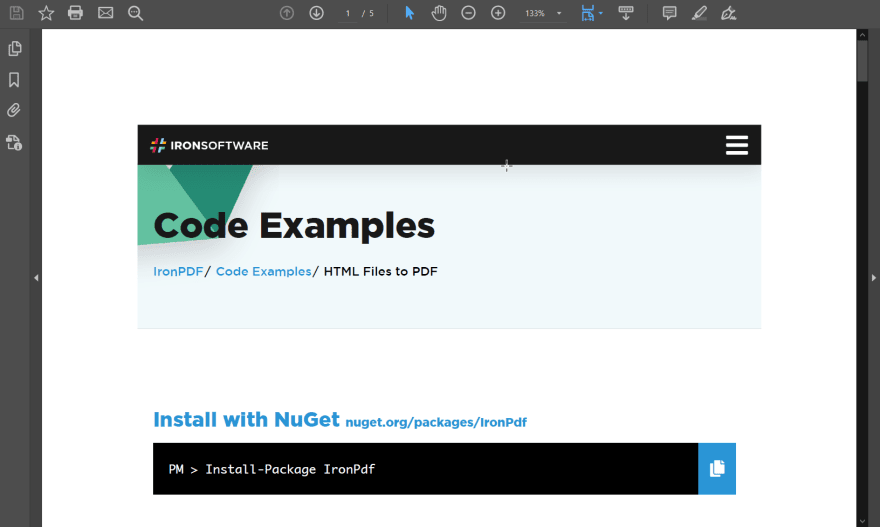
In the same way, you can select an HTML file using the browse button and can generate a PDF of the selected file.
Summary:
In this article, we have seen how much easier we can to generate PDFs using the IronPDF C# library. We explore three different ways of generating PDF with simple and easy-to-understand code boxes. You can download the source code of this project using this link.
Iron Software is not only restricted to PDF files. It offers you a variety of different software like IronXL, IronOCR, IronBARCODE, and IronWebScraper. It has a special offer for you that you can buy these all 5 software for the price of 2. Get more details from this link.
You can download the software product from this link.
If you have any questions, comment down. I will answer them all.


Top comments (1)
Hi, I suggest trying ZetPDF for this!zetpdf.com/