
Follow our step-by-step guide and create your own shop in under 30 minutes
Say you're using the Jamstack to make landing pages and marketing websites for your clients when a new client walks in the door and asks for an online store. There’s no way a Jamstack site could deliver this, right? Wrong!
In fact, when it comes to building an ecommerce site, the Jamstack can’t be beat. In the ecommerce business, conversion-optimization is necessary to succeed, and one of the best ways to increase your conversion rate is to have a website that’s blazing fast and scales along with your product.
In a study run on cart abandonment from Tammy Everts, she found "to maximize conversions, every page of a transaction—from landing page through to order confirmation page—needs to be… less than [two] seconds." Serving every page in under two seconds is a tall order for any database-driven site, but it’s an easy feat for a static site that’s served from a CDN!
What’s more, many ecommerce platforms have their own unique style of data management that’s tied to their proprietary website builders and these sites are much slower than what you’ll get on the Jamstack.
Instead, using a headless CMS that you can tailor to your own needs and deploying it to a global CDN is the best way to get a site that’s fast, stable, and converts well. But how would you provide functionality like a shopping cart, credit card processing, and order handling?
Enter Snipcart, an ecommerce solution for the Jamstack!
Snipcart is well-suited to Jamstack ecommerce because they don’t care what kind of front-end you use or how you manage your inventory. When a user clicks the "Add to Cart" button, the data is passed to Snipcart's JavaScript SDK and the rest is handled by them! They provide a shopping cart and checkout flow; a dashboard for handling orders, abandoned carts, and customer data; and an API for more powerful applications.
Using TakeShape and Snipcart together
In this demo, we'll take a look at using TakeShape's CMS and static site generator to build an ecommerce site, using Snipcart to handle the cart and checkout experience. And we’ll do it all in 30 minutes or less!
Bryan livestreamed his experience connecting TakeShape and Snipcart. See how he figured out how it all fits together!
First, we'll create our ecommerce site by copying TakeShape's "Shape Shop" sample project and installing Snipcart by embedding a script on the page. Then, we’ll modify the "Add to Cart" button to work with Snipcart and update our products in TakeShape with some additional fields. Finally, we’ll test our new site to make sure it’s all working.
Create the TakeShape sample project
If this is your first time using TakeShape, you’ll need to sign up for a free account. Then, create a new project using the Shape Shop template and clone the starter project from GitHub:
git clone https://github.com/takeshape/takeshape-samples.git takeshape-samples && cd takeshape-samples/shape-shop
More detailed instructions, including how to deploy the project to Netlify, are available in this article about getting started with the store template.
Install Snipcart into your project
Once you've got the sample store up and running, it's time to set up a Snipcart account.
After you sign up for a free Snipcart account, you’ll need to include a CSS file, script tag and additional div on any page that can access the cart following their basic installation instructions.

If you want to include a link to the shopping cart in your navigation, this will likely end up being most pages on your site. So we’ll add Snipcart’s code to the default layout of the TakeShape project.
In the Shape Shop project, this is the file layouts/default.html. Snipcart’s CSS file will go in the <head> element after our other CSS links:
<link rel="stylesheet" href="/stylesheets/base.css"/>
<link rel="stylesheet" href="/stylesheets/feature.css"/>
<link rel="stylesheet" href="/stylesheets/footer.css"/>
<link rel="stylesheet" href="/stylesheets/header.css"/>
<link rel="stylesheet" href="/stylesheets/hero.css"/>
<link rel="stylesheet" href="/stylesheets/pagination.css"/>
<link rel="stylesheet" href="/stylesheets/products.css"/>
<link rel="stylesheet" href="/stylesheets/thumb.css"/>
<!-- Snipcart CSS file goes here -->
<link rel="stylesheet" href="https://cdn.snipcart.com/themes/v3.0.11/default/snipcart.css" />
Then, we’ll add Snipcart’s script and additional div right before the </body> tag:
<script src="/javascripts/main.js"></script>
<!-- Snipcart div and JS here -->
<div hidden id="snipcart" data-api-key="{{YOUR-SNIPCART-API-KEY}}"></div>
<script src="https://cdn.snipcart.com/themes/v3.0.11/default/snipcart.js"></script>
</body>
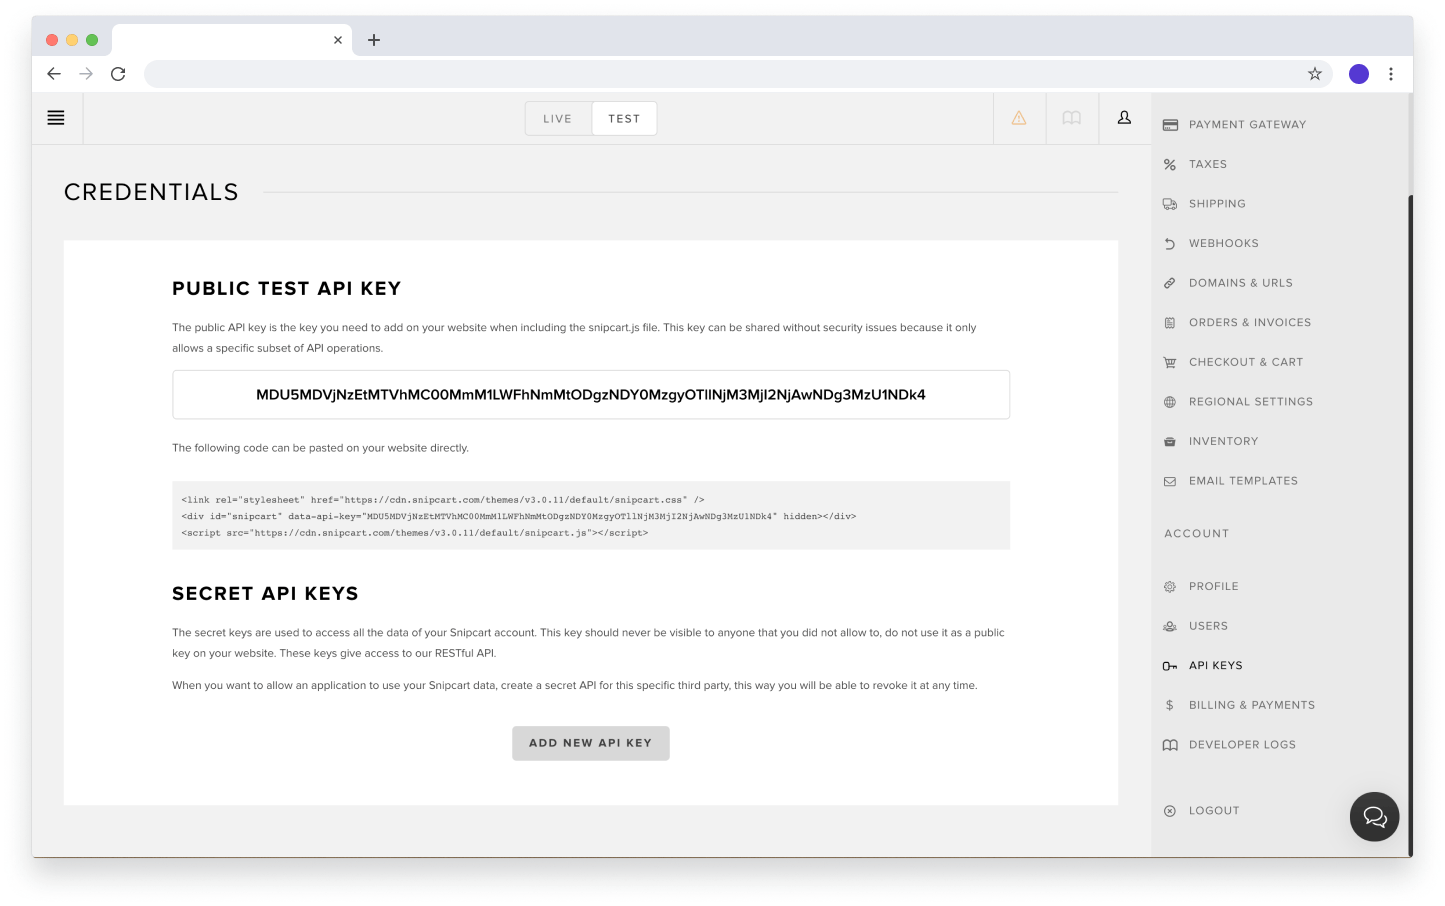
We’ll need to replace {{YOUR-SNIPCART-API-KEY}} with an API key from Snipcart, which can be found under Account → API Keys. We’ll start in “Test” mode, which will allow us to use fake credit card numbers to check the purchase flow later.
](https://media2.dev.to/dynamic/image/width=800%2Cheight=%2Cfit=scale-down%2Cgravity=auto%2Cformat=auto/https%3A%2F%2Fdev-to-uploads.s3.amazonaws.com%2Fi%2F867qq9g5rzw69rl66tu4.png)
Now, we have access to Snipcart's HTML API on any page.
Use Snipcart’s “Add to Cart” buttons
Next, let's modify our pages/product/individual.html template to add Snipcart’s “Add to Cart” button.
Snipcart will expect to find cart buttons on the page as HTML <button> tags instead of <a> tags, so that's our first change. We'll replace the anchor that the Shape Shop comes with.
<button class="button snipcart-add-item">
    Add to cart
</button>
On this button, we have two classes. The button class is for styling and is built into the default CSS for Shape Shop. The snipcart-add-item class is key to telling Snipcart's JavaScript where the product information is and when to add items to the cart.
From here, we'll need to add additional product details to the button via data attributes with various variables from our TakeShape data.
The Shape Shop template comes with a "Product" Content Type that has most of the fields we'll need to make this work. The data is fetched from TakeShape in the data/product.graphql file and provided to the template as the “product” variable.
Here's what our buttons will need to look like with that data added:
<button class="button snipcart-add-item"
   data-item-id="{{ product.name }}"
   data-item-price="{{ product.price }}"
   data-item-url="{{ product | route('product') }}"
   data-item-description="{{ product.description }}"
   data-item-image="{{ product.image.path | image }}"
   data-item-name="{{ product.name }}">
       Add to cart
</button>
Most of that is finding bits of data about the product and putting it into the proper data attribute that Snipcart is looking for. But if you've done ecommerce before, you might notice a couple potential issues with this code.
First, data-item-id is a unique identifier for the product, which probably shouldn't be keyed off just a name string. To fix this, I recommend having unique SKU numbers. Most shops will have this built into their inventory management system. We'll need to add this field to our CMS.
The other potential problem is the price will always be the same. In our data, we already have a "sale price." We should make sure we're always passing Snipcart the correct price, whether an item is on sale or not.
Add a SKU field to your Product in TakeShape
First, we’ll need to go into the project in TakeShape and edit the Product content type to add a new field with a SKU. You could call this "SKU Number" or "ID," whatever your client expects. Be sure to note the name of the field.

Save your change to the content type and then add that new field to the GraphQL query in data/product.graphql:
query {
  getProductList(sort: [{field: "_enabledAt", order: "desc"}]) {
    total
    items {
      _contentTypeName
      _enabledAt
      name
      skuNumber
     ...
    }
  }
}
After that, update the data in the “Add to Cart” button in /pages/product/individual.html. We can add this to our template with a conditional, in case a product doesn't have a SKU:
data-item-id="{{ product.skuNumber if product.skuNumber else product.name }}"
We'll use that same conditional syntax to add a sale price, as well, if one is available:
data-item-price="{{ product.salePrice if product.salePrice else product.price }}"
With these changes, when a user clicks the "Add to Cart" button, they'll be presented with the cart screen from Snipcart with the item they just added.
Test your site
While working locally, we’ll only be able to test the checkout flow until we reach the “Place Order” button. After that, Snipcart won’t be able to crawl the local site to check the product information. This is a security feature to make sure someone doesn’t modify prices in DevTools and buy things for cheap on your site!

To get your site live, use TakeShape’s 1-click Netlify integration to build and deploy it. Snipcart also has a guide for setting up ngrok to make local URLs accessible to their service.
If you’re working on a live site already, you can set up a branch-based URL in Netlify to push your new branch to and view there.
Back in your Snipcart account settings, you'll need to add the domain name for your live shop. In the "Store Configuration" section, navigate to "Domains & URLs" and add in the appropriate information there. Once you publish your site to the live URL, you’ll see that Snipcart adds the products it finds at the domain—based on the data set in the “Add to Cart” button—to the “Products” section of their CMS.

Finally, when completing the checkout flow (live or locally) in test mode, you can provide these fake credit card credentials:
- Credit Card Number:
4242 4242 4242 4242 - Security Code:
123 - Expiration: any future month/year combination.
12/25, for instance. - ZIP code: Any ZIP code
If everything works as expected, you should have completed a test order to your new Jamstack ecommerce site! Congratulations!
Where to go from here
This article has just scratched the surface of what Snipcart and TakeShape can do together. You can create custom product options, manage store emails, and even add cart information into your header! Since you control the data, the site, and everything else, you have the control.

Top comments (1)
Great article Bryan!