
This post was originally written on DevOpStar. Check it out here
StyleGANs have sort of become a little hobby for me as of late. Specifically I find myself drawn into the idea of re-purposing existing work into a packaged solution for people to enjoy. So when I found an implementation of StyleGAN trained on images of Pokemon, I got excited at the possibilities of generating entirely random cards.
Overview
This post is going to cover all the bits of pieces required to generate your very own Pokemon cards using a mixture of StyleGANs and RNNs.
![Images [StyleGAN] - Text [RNN]](https://res.cloudinary.com/practicaldev/image/fetch/s--cfXZSR42--/c_limit%2Cf_auto%2Cfl_progressive%2Cq_auto%2Cw_880/https://dev-to-uploads.s3.amazonaws.com/i/iv15uymnmutzzsw35al0.png)
There are five parts to creating these cards:
- StyleGAN Generate Image of a Pokemon
- RNN Generate Pokemon
- Names
- Moves
- Move Descriptions
- Generate a card image using all this information
In this post we'll go over how to achieve each of these steps and create some of your own cards.
Preparation
In order to get started you will need a couple dependencies on your local computer. One of these is the repository that contains all the code we'll use. You can pull this down using the following command, or simply download a copy from t04glovern/stylegan-pokemon.
git clone https://github.com/t04glovern/stylegan-pokemon.git
Dependencies
I've encapsulated all the dependencies you'll need for this project within an Anaconda environment.
conda env create -f environment.yml
conda activate stylegan-pokemon
cd stylegan
Download Data & Models
Downloading the data (in this case, images of pokemon) is a crucial step if you are looking to build a model from scratch using some image data. In this tutorial I'll be making use of this data and an existing pre-trained model by ahsenk to demonstrate how you can build on top of his work using data. Run the following commands from within the repository you just cloned to download all the files from S3
aws s3 cp s3://devopstar/resources/stylegan-pokemon/network-snapshot-007961.pkl \
network-snapshot-007961.pkl

aws s3 sync s3://devopstar/resources/stylegan-pokemon/kaggle-one-shot-pokemon \
kaggle-one-shot-pokemon
If you don't have the AWS CLI installed you can get the kaggle-one-shot-pokemon dataset from the kaggle page and download the network snapshot from ahsenk's original post available at the following
# Note: updated link to s3 bucket due to dropbox link going down
wget --no-check-certificate --no-proxy 'https://devopstar.s3.amazonaws.com/resources/stylegan-pokemon/network-snapshot-007961.pkl'
There is also a bonus model provided by MichaelFriese10 that you can preemptively download also if you'd like to generate some Pokemon with a more pixel vibe.
# AWS CLI
aws s3 cp s3://devopstar/resources/stylegan-pokemon/MichaelFriese10_pokemon.pkl MichaelFriese10_pokemon.pkl

# Other link
wget https://s3.amazonaws.com/devopstar/resources/stylegan-pokemon/MichaelFriese10_pokemon.pkl
StyleGAN
There are three avenues you can go down here.
- Train your own model
- Run the pre-trained model
- Run Michael's pre-trained model
Train Model
Training a model requires some data to be prepared. to do this simple run the following from within the stylegan directory
mkdir pokemon
python prepare.py
python dataset_tool.py create_from_images datasets/smalls/ ./pokemon/
The process will resize all the images within the pokemon-a dataset and prepare them for training.
Here's where you have to make your first decision, do you want to train from scratch, or just build on-top of the existing network?
Train from Scratch
To train from scratch you will need to edit
-
resume_run_idfield in stylegan/training/training_loop.py to simple beNone -
total_kimgin stylegan/training/training_loop.py to be whatever length you want to train up to.
Run Training
Execute the process of training by running the following from the stylegan directory
python train.py
The process is going to take a while if you do decide to train from scratch. Which ever method you used will output entries in the results directory of the project. Within each of these resulting folders will be a network-final.pkl file that is the model that can be invoked against in the coming steps.
Invoking Model
As with training there are three possible ways you can approach the invocation of the model. If you trained your own model, you will need to point the --model_file parameter in the following command to the location of the model you'd like to build a Pokemon with
python invoke.py \
    --model_file './results/00000-sgan-custom-1gpu/network-final.pkl'
By default the output image will be placed into ../img/pokemon.png in the root of the repository however this can be overridden using the --output_file param. The example below will invoke the network using the originally downloaded pre-trained model and puts it into the stylegan folder under the name test.png
python invoke.py \
    --model_file './network-snapshot-007961.pkl' \
    --output_file './test.png'
The final invocation you can perform is against MichaelFriese10's pre-trained model that he based off Pokemon Pixel art instead.
python invoke.py \
    --model_file './MichaelFriese10_pokemon.pkl'
Below is an example of the three outputs
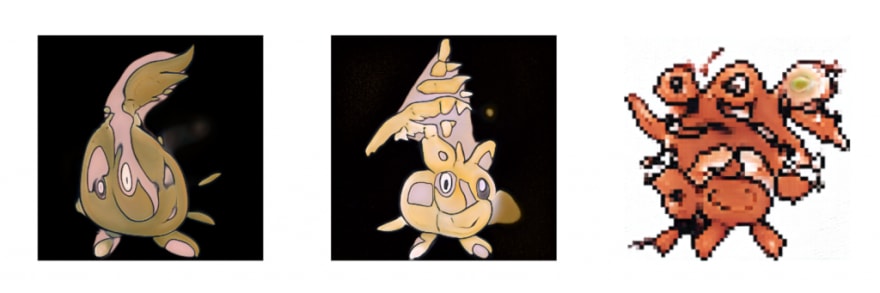
Excellent we know we're able to generate Pokemon images so we can move onto text generation for the Name, Move and Descriptions.
RNN Text Generator
For text generation I made use of a Multi-layer Recurrent Neural Networks (LSTM, RNN) for character-level language models in Python using Tensorflow. This implementation is heavily based on the work done in karpathy/char-rnn. To get started move into the rnn folder.
cd rnn
I've already compiled a dataset for you in three places
- data/pokemon/input.txt - List of all Pokemon thanks to armgilles/pokemon.csv
- data/moves/input.txt - List of all moves from https://pokemondb.net/move/all
- data/desc/input.txt - List of all move descriptors from the same list
RNN Training
Running training over the tree different inputs is the next step. This can be accomplished by running the following three commands. They will output a model for each to a subsequent folder under save.
# Pokemon
python train.py \
    --data_dir=./data/pokemon \
    --save_dir=./save/pokemon \
    --seq_length=12

# Moves
python train.py \
    --data_dir=./data/moves \
    --save_dir=./save/moves \
    --rnn_size=300 \
    --seq_length=12

# Description
python train.py \
    --data_dir=./data/desc \
    --save_dir=./save/desc \
    --seq_length=25
Feel free to play around with the values in seq_length, though note that the ones above I found to work the best.
RNN Invoking
To generate image from the model, run the following commands. Note that the output should place a text file in the samples directory of the project
# Pokemon
python sample.py \
    --save_dir=./save/pokemon \
    --output_dir=../samples/pokemon.txt

# Moves
python sample.py \
    --save_dir=./save/moves \
    --output_dir=../samples/moves.txt

# Description
python sample.py \
    --save_dir=./save/desc \
    --output_dir=../samples/desc.txt \
    -n=1500
Card Creation
The final piece of the puzzle is the actual card creation. This process is handled by a super complex ImageMagick cropping script along with some wonderful card templates by user levelinfinitum. From the root directory of the project one one of the two methods to create a card.
# Define all fields adhoc
./cropper.sh \
    "Pokemon Name" \
    "Pokemon Attack 1" \
    "Pokemon Attack Description 1" \
    "Pokemon Attack 2" \
    "Pokemon Attack Description 2" \
    "img/pokemon1.png"

# Random
./cropper-shuffle.sh \
    "samples/pokemon.txt" \
    "samples/moves.txt" \
    "samples/desc.txt" \
    "img/pokemon1.png"
Below are some example cards I generated with the randomised shuffle


Top comments (0)