Please reach out to me on Twitter @nathangloverAUS if you have follow up questions!
This post was originally written on DevOpStar. Check it out here
Are you a beginner to developing for The Internet of Things? Or perhaps you've been working on embedded systems for a while now but haven't kept up with some of the latest trends. In this post I'm highlighting some things that I feel are worth checking out and investing time in. I'm also going to try to break down some of the invisible barriers people think exist when contemplating building an internet connected project.
The Idea
Before jumping in It's helpful to have a goal in place when learning something new that will help drive an outcome. When dreaming up an idea keep in mind you'll want to keep some of the following things in mind.
Nothing is off the table
Don't limit yourself just because you don't immediately see it being possible. Passion is 90% of the process! If there's a particular thing you are really excited about working on you'll be able to leverage that burning desire to your advantage when learning.
Passion is 90% of the process!

Understand that iterating on your project is going to be key to get to the finish line anyway, so aiming high just means there will be more learning & prototyping along the way. Being upfront with yourself that your first design might not be perfect will help you remain engaged.
Cost
The upfront cost to get started with IoT projects isn't likely to be as high as you might think! We'll go into more detail later in the post, however you'll realize entry level price points are normally under $30 for simple 1 device projects.
Once you get going as well you will begin to accumulate random parts just through recycling.
Uniqueness
Guess what? Someone has almost certainly attempted what you are wanting to do already. This isn't a bad thing though, in fact it'll make your life a whole lot easier! I recommend checking out some of the sites below for ideas
Our Idea
For the purpose of this post, let's pick an hypothetical project idea to work on!
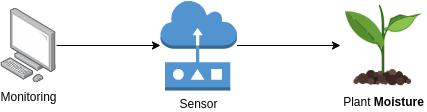
We would like a moisture sensing system that lets us monitor the state of our garden
The overall view of what we want to achieve can be seen below. When you are trying to visualize your idea its helpful to draw a nice high level diagram.
Shopping List
While we're at this stage it's also worth making a list of things you think you might need. Even if your list doesn't make much technical sense it'll give you an idea of what to google for later when shopping for parts.
Don't shy away from also making notes on your list with any questions you might have
- IoT Device (Wireless Required)
- Moisture Sensor
- Cables to connect moisture sensor to device
Revise Project Diagram
Once you have your ideas down on paper it's a great idea to revise your original architecture diagram so it includes any extra ideas that came up.

As you can see I've revised the original idea to now include:
- Needing some kind of Wireless capability (we don't really want to run a cable outside the house).
-
Server to store the data from the moisture sensor.
- Perhaps we won't need this, but I thought it was worth mentioning it now so we don't forget we need some way to store data from the moisture sensor.
- This server could also be what allows us to view the monitoring data.
Parts
With a simple design ready to go we can begin to research the various pieces of our design to flesh out some details.
You'll probably become really overwhelmed at this stage, especially as you come across some new words or terminology. But stick with it, don't try to understand everything all at once
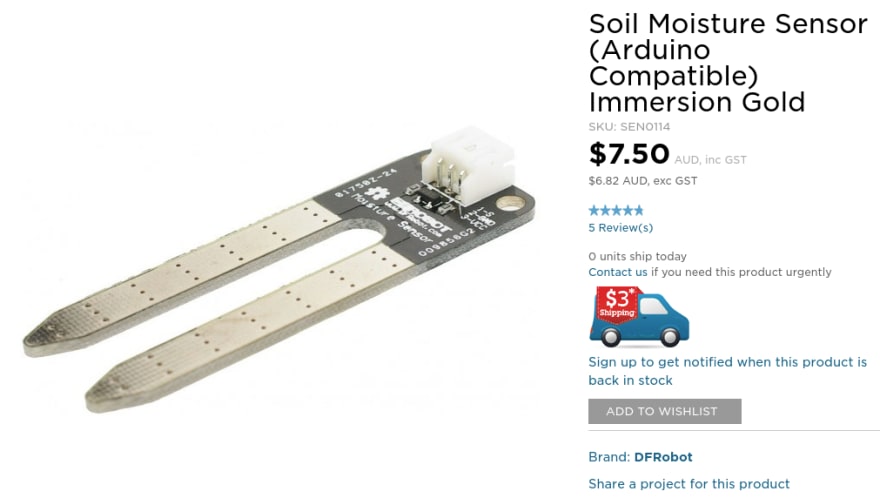
Moisture Sensor
Let's look at the moisture sensor for example. I googled IoT Moisture Sensor and found a local online retailer that sells one.
Scrolling down the page and you'll find that most online retailers do a really good job of pointing you to related products / commonly purchased extras. Although this is mostly just a technique for them to sell more product, it can be super helpful when starting a project to get an idea of what you might need.
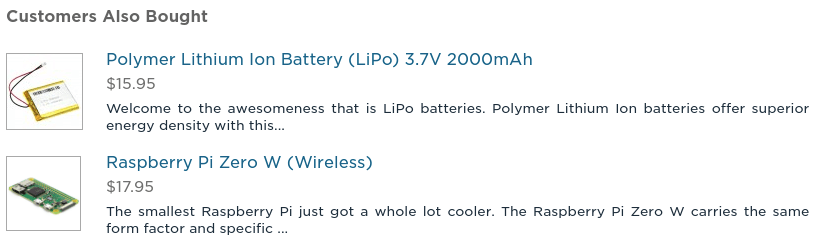
In this case I can see people buy Raspberry Pi Zero W devices and Lithium batteries. This makes sense as we will need a Micro-controller (small IoT computer) and a battery so it can operate without a power-cord.
Micro-controller
The Micro-controller is the brains of the operation! In the previous step we came across the Raspberry Pi Zero W, which is a great board to own if you're a hobbyist in the IoT space due to its versatility.
Sometimes the board you buy won't be the best fit for the final product. Don't worry if you get it wrong the first time, as you can reuse the boards you buy for future projects as well.
For our scenario the choice of Micro-controller could be taken in a number of directions. Below is some of the popular boards people go with along with an average price range for each.
| Device | Cost | Connectivity |
|---|---|---|
| Raspberry Pi Zero W | ~$18 | WiFi / Bluetooth |
| ESP8266 | $5-20 | WiFi |
| ESP32 | $10-30 | WiFi / Bluetooth |
Note: Devices like the Raspberry Pi don't take into account the cost of a MicroSD card
For the protect we're building here I'd decided to pick an ESP8266 as it's cheap and provides us with a WiFi capability
A Word On Prices
Prices on electronics can vary from one extreme to another. Depending on if you are buying locally, or from china directly you'll see a massive difference in cost (and occasionally quality). Below are some of the re-sellers I typically use; keep in mind that you get what you pay for. Also the shipping time on products from china can be literal months.
- Banggood
- Gearbest
- AliExpress - RobotDyn
- AliExpress - ChanZon
- AliExpress - YF
- adafruit
- SparkFun Electronics
Code
If you're already a developer then you'll already know how much easier life can be when you have the best tools are your disposal. The IoT / Micro-controller world is similar however isn't as evolved.
Don't worry though, you won't have to write raw C++ or deal with allocating memory (much if at all). In fact there are projects that exist with the pure function of porting languages like Python and Node over to the Micro-controller landscape.
Mongoose OS
Mongoose OS runs on-top of your base Micro-controller and handles all the hard stuff for you.

It will run on-top of boards like the ESP8266 we've chosen and makes deploying, monitoring and connecting to the cloud super easy. For hobby projects like the one we're building it's a fantastic option! The downside is when you go to use it in a commercial setting there are associated costs at a per device level.
PlatformIO
PlatformIO is a very well established tool chain for developing on embedded devices. It serves itself as an IDE extension for popular editors like VSCode and enables developers to write the same code and deploy it to different architectures seamlessly.
PlatformIO also provides a nice interface into community build libraries and supports well over 750 boards. Everything is also managed via a platformio.ini file in the root of a project that defines the board types and libraries that will be needed to build and deploy
[env:uno]
platform = atmelavr
board = uno
framework = arduino

lib_deps =
  FastLED@3.2.0
Not only that but with support for build systems like TravisCI you can also so basic continuous integration testing
language: python
python:
  - "2.7"

sudo: false
cache:
  directories:
    - "~/.platformio"

install:
  - pip install -U platformio

script:
  - platformio run
If you would like to see how PlatformIO can be used with a basic project, checkout t04glovern/office-christmas-lights
Circuit Design
When you get the designing the circuit, don't shy away from taking designs from the internet.
The first place to look for examples of how to use your sensor is to check the vendor the product page of the vendor you bought it from. They usually have links to code and circuit examples along with their sensors.
If you just google your part name along with circuit example or code example I promise you'll find something relevant to helping you. However if you do need to design a circuit yourself, I recommend checking out the Fritzing project catalog and then use Fritzing to design.

A Word on Electronics
I polled a group of people for reasons why they find it difficult to get into IoT projects and noticed that the main reason was a lack of electronics skills.

For most hobbyist projects you will find that the actual electronics knowledge required is extremely low and pretty much boils down to understanding what a couple types of components do and where to use them.

- Resistor - Reduce current flow, usually put in front of sensitive components to ensure a specific current requirement is met.
- Capacitor - stores energy, can be used to level out the flow of electricity.
- Power and Ground - the source and sink of electricity to your circuits.
But What if I mess up
The tolerance on electrical components is usually high enough that if you use the wrong voltage or supply the wrong current (within reason) things will be okay.
A general rule of thumb is if you are connecting something for the first time, feeling components that are warm to the touch could be a good indicator that something is wired backwards or wrong.
Note: Please don't go sticking your fingers on components over 5 volts. This idea above is based on experiences with IoT projects under 5 volts.
Even if you do blow something up, it's not normally the Micro-controller and instead the components in your circuits. These components are normally very cheap to replace; so I would always recommend ordering more then you need for projects.
Connecting To Cloud
Connecting your IoT project to the cloud can be done in a number of different ways these days. As mentioned before projects like Mongoose OS make it super simple to get data flowing; however its not the only option.
If you're wanting to work directly with your Cloud providers IoT service you usually can just over MQTT and using certificates provided. For an example, I wrote a project called Cloudy Toast which is an Internet connected Toaster using AWS IoT.

For another example there's a post AWS Sumerian Magic Cube where I connect an ESP8266 to AWS IoT. It more or less comes down to sending messages over MQTT which is a Pub/Sub message bus commonly used in the IoT world.
void aws_reconnect()
{
    // Loop until we're reconnected
    while (!client.connected())
    {
        Serial.print("[AWS] Attempting MQTT connection...");
        // Attempt to connect
        if (client.connect(aws_mqtt_client_id))
        {
            Serial.println("[AWS] connected");
            // ... and resubscribe
            client.subscribe(aws_mqtt_thing_topic_sub);
        }
        else
        {
            Serial.print("[AWS] failed, rc=");
            Serial.print(client.state());
            Serial.println(" try again in 5 seconds");
            // Wait 5 seconds before retrying
            working_led();
            delay(5000);
        }
    }
}
Summary
Over the next couple months I will be deep diving into the specifics of each of the sections above in more detail. This post has the difficult purpose of trying to convince you that you are capable of taking on IoT projects.
I know things won't always go right though, so I encourage you to reach out to me on Twitter @nathangloverAUS and ask questions.


Top comments (4)
Congrats, this is a great post.
I would also point out the difference between a microcontroller and a SBC (Single Board Computer), the difference is getting blurrier but still is important from the dev POV.
With something like a Raspberry Pi, BeagleBone or alike, you work like you would with a PC, just with more low level inputs and outputs. You can work with plain Python, Ruby, etc. And even attach a monitor and keyboard/mouse to them; just a low power PC, which also makes them great as micro-servers, as git repos, backup servers, firewalls, proxies, webservers, tiny NAS, etc.
With microcontrollers like the ESP (originally WIFI modules that where a huge overkill, actually more powerful than the Arduinos that used to run them), Atmega 8bit CPU (classic Arduino), STM32, Teensy, etc. Those are different to work with, you program them from another PC, you'll probably will use C/C++. Some boards, mainly ESP 32bit CPUs (that actually use the low power CPU "branch" of ARM) can use a subset of Python with some special libraries, but is not very efficient and libraries in C are more numerous.
Is also good to know that there is no need to panic about C either, you'll not use much of it, not much fanciness raw pointers or complex data structures, because there is no much space and usually programs are more straight forward, just the basic syntax will be enough. And soon you'll realize that you can just do the bare minimum in the controller itself and you'll want to offload quickly the data or any heavy processing to another device (remote server, a more powerful SBC, etc.), as priorities change here to power draw, memory consumption and in general adapt to much lower specs. Makes you appreciate the huge abundance of resources of our day to day devices.
Nice Post.
But my opinion, to Power the raspberry pi with a battery is not the best Option. Onstead using an esp8266 or a wemos d1 mini huzzah. This is less powerconsuming. Support Ing deep sleep to increase the battery time. I think wit a lipo battery you can Power it for a year and with an Solar cell (wird to an cn Solar loader Module) much more:)
Definitely agree! Later on in the post I swap the design to use the ESP8266 for this and other reasons (like not needing Bluetooth)
Yes! Yes, I want to build an IoT device! I just don't know where to start, lol. I basically want to build a device that can turn on and off an actuator, via commands given from my cell phone, from wherever, so long as I have cellular coverage. My problem is I'm not sure what platform to start with. Raspberry Pi with cellular add-on? Or, is there an Arduino with cellular connectivity?