
Pods are ephemeral. And they are meant to be. They can be seamlessly destroyed and replaced if using a Deployment. Or they can be scaled at some point when using Horizontal Pod Autoscaling (HPA).
This means we can’t rely on the Pod IP address to connect with applications running in our containers internally or externally, as the Pod might not be there in the future.
You may have noticed that Kubernetes Pods get assigned an IP address:
stable-kube-state-metrics-758c964b95-6fnbl               1/1     Running   0          3d20h   100.96.2.5      ip-172-20-54-111.ec2.internal   <none>           <none>
stable-prometheus-node-exporter-4brgv                    1/1     Running   0          3d20h   172.20.60.26    ip-172-20-60-26.ec2.internal
This is a unique and internal IP for this particular Pod, but there’s no guarantee that this IP will exist in the future, due to the Pod's nature.
Services
A Kubernetes Service is a mechanism to expose applications both internally and externally.
Every service will create an everlasting IP address that can be used as a connector.
Additionally, it will open a port that will be linked with a targetPort. Some services can create ports in every Node, and even external IPs to create connectors outside the cluster.
With the combination of both IP and Port, we can create a way to uniquely identify an application.
Creating a service
Every service has a selector that filters that will link it with a set of Pods in your cluster.
spec:
  selector:
    app.kubernetes.io/name: myapp
So all Pods with the label myapp will be linked to this service.
There are three port attributes involved in a Service configuration:
  ports:
  - port: 80
    targetPort: 8080
    nodePort: 30036
    protocol: TCP
- port: the new service port that will be created to connect to the application.
- targetPort: application port that we want to target with the services requests.
- nodePort: this is a port in the range of 30000-32767 that will be open in each node. If left empty, Kubernetes selects a free one in that range.
- protocol: TCP is the default one, but you can use others like SCTP or UDP.
You can review services created with:
kubectl get services
kubectl get svc
Types of services
Kubernetes allows the creation of these types of services:
- ClusterIP (default)
- Nodeport
- LoadBalancer
- ExternalName
Let’s see each of them in detail.
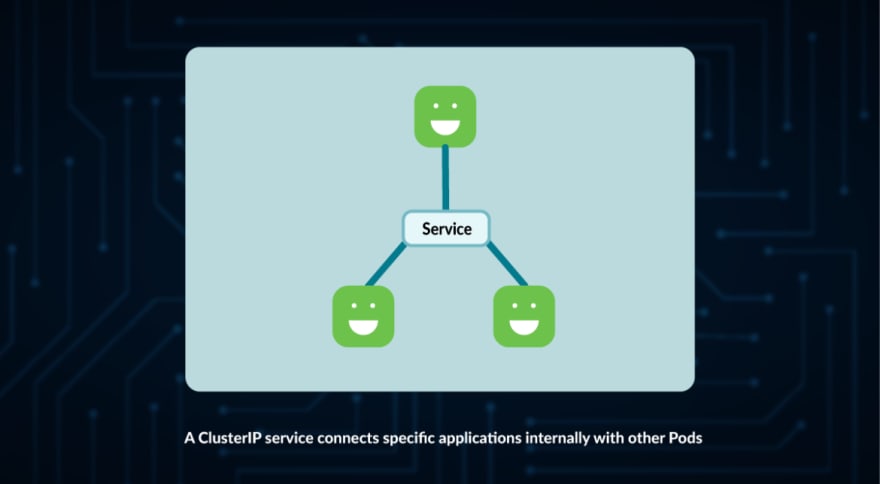
ClusterIP
This is the default type for service in Kubernetes.
As indicated by its name, this is just an address that can be used inside the cluster.
Take, for example, the initial helm installation for Prometheus Stack. It installs Pods, Deployments, and Services for the Prometheus and Grafana ecosystem.
NAME                                      TYPE        CLUSTER-IP      EXTERNAL-IP   PORT(S)                      AGE
alertmanager-operated                     ClusterIP   None            <none>        9093/TCP,9094/TCP,9094/UDP   3m27s
kubernetes                                ClusterIP   100.64.0.1      <none>        443/TCP                      18h
prometheus-operated                       ClusterIP   None            <none>        9090/TCP                     3m27s
stable-grafana                            ClusterIP   100.66.46.251   <none>        80/TCP                       3m29s
stable-kube-prometheus-sta-alertmanager   ClusterIP   100.64.23.19    <none>        9093/TCP                     3m29s
stable-kube-prometheus-sta-operator       ClusterIP   100.69.14.239   <none>        443/TCP                      3m29s
stable-kube-prometheus-sta-prometheus     ClusterIP   100.70.168.92   <none>        9090/TCP                     3m29s
stable-kube-state-metrics                 ClusterIP   100.70.80.72    <none>        8080/TCP                     3m29s
stable-prometheus-node-exporter           ClusterIP   100.68.71.253   <none>        9100/TCP                     3m29s
This creates a connection using an internal Cluster IP address and a Port.
But, what if we need to use this connector from outside the Cluster? This IP is internal and won’t work outside.
This is where the rest of the services come in…
NodePort
A NodePort differs from the ClusterIP in the sense that it exposes a port in each Node.
When a NodePort is created, kube-proxy exposes a port in the range 30000-32767:
apiVersion: v1
kind: Service
metadata:
  name: myservice
spec:
  selector:
    app: myapp
  type: NodePort
  ports:
  - port: 80
    targetPort: 8080
    nodePort: 30036
    protocol: TCP

NodePort is the preferred element for non-HTTP communication.
The problem with using a NodePort is that you still need to access each of the Nodes separately.
So, let’s have a look at the next item on the list…
LoadBalancer
A LoadBalancer is a Kubernetes service that:
- Creates a service like ClusterIP
- Opens a port in every node like NodePort
- Uses a LoadBalancer implementation from your cloud provider (your cloud provider needs to support this for LoadBalancers to work).
apiVersion: v1
kind: Service
metadata:
  name: myservice
spec:
  ports:
  - name: web
    port: 80
  selector:
    app: web
  type: LoadBalancer
my-service                                LoadBalancer   100.71.69.103   <pending>     80:32147/TCP                 12s
my-service                                LoadBalancer   100.71.69.103   a16038a91350f45bebb49af853ab6bd3-2079646983.us-east-1.elb.amazonaws.com   80:32147/TCP                 16m
In this case, Amazon Web Service (AWS) was being used, so an external IP from AWS was created.
Then, if you use kubectl describe my-service, you will find that several new attributes were added:
Name:                     my-service
Namespace:                default
Labels:                   <none>
Annotations:              <none>
Selector:                 app.kubernetes.io/name=pegasus
Type:                     LoadBalancer
IP Family Policy:         SingleStack
IP Families:              IPv4
IP:                       100.71.69.103
IPs:                      100.71.69.103
LoadBalancer Ingress:     a16038a91350f45bebb49af853ab6bd3-2079646983.us-east-1.elb.amazonaws.com
Port:                     <unset>  80/TCP
TargetPort:               9376/TCP
NodePort:                 <unset>  32147/TCP
Endpoints:                <none>
Session Affinity:         None
External Traffic Policy:  Cluster
The main difference with NodePort is that LoadBalancer can be accessed and will try to equally assign requests to Nodes.

ExternalName
The ExternalName service was introduced due to the need of connecting to an element outside of the Kubernetes cluster. Think of it not as a way to connect to an item within your cluster, but as a connector to an external element of the cluster.
This serves two purposes:
- It creates a single endpoint for all communications to that element.
- In case that external service needs to be replaced, it’s easier to switch by just modifying the ExternalName, instead of all connections.
apiVersion: v1
kind: Service
metadata:
  name: myservice
spec:
  ports:
    - name: web
      port: 80
  selector:
    app: web
  type: ExternalName
  externalName: db.myexternalserver.com
Conclusion
Services are a key aspect of Kubernetes, as they provide a way to expose internal endpoints inside and outside of the cluster.
ClusterIP service just creates a connector for in-node communication. Use it only in case you have a specific application that needs to connect with others in your node.
NodePort and LoadBalancer are used for external access to your applications. It’s preferred to use LoadBalancer to equally distribute requests in multi-pod implementations, but note that your vendor should implement load balancing for this to be available.
Apart from these, Kubernetes provides Ingresses, a way to create an HTTP connection with load balancing for external use.
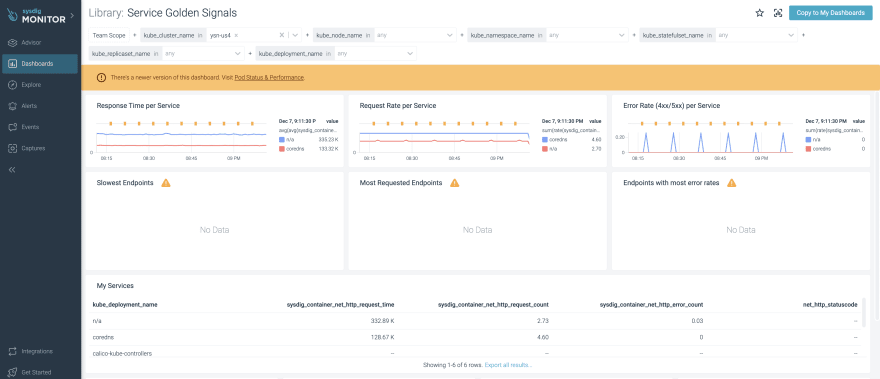
Debug service golden signals with Sysdig Monitor
With Sysdig Monitor, you can quickly debug:
- Error rate
- Saturation
- Traffic
- Latency
And thanks to its Container Observability with eBPF, you can do this without adding any app or code instrumentation. Sysdig Advisor accelerates mean time to resolution (MTTR) with live logs, performance data, and suggested remediation steps. It’s the easy button for Kubernetes troubleshooting!
Sign up now for a free trial of Sysdig Monitor

Latest comments (0)