
In this blog post, we are going through the step-by-step procedure to connect Syncfusion Blazor DataGrid with an MS SQL Server database using Entity Framework Core and perform CRUD operations in a Blazor WebAssembly application.
To demonstrate CRUD operations in the Syncfusion Blazor DataGrid component, we are going to create a simple library book management application. The final code can be found in this GitHub repository.
Prerequisite software
The following software is needed:
- Visual Studio 2019 v16.8.0 Preview 3.0 or later
- .NET SDK 5.0 RC2 or later
- SQL Server 2017
Create the database
First things first, create a Library database and a table named Book to hold a list of books:
- Open SQL Server 2017.
- Create a new database named Library.
- Right-click on the created database and select New Query.
- Use the following SQL query to create a table named Book.
Create Table Book(
  Id BigInt Identity(1,1) Primary Key Not Null,
  Name Varchar(200) Not Null,
  Author Varchar(100) Not Null,
  Quantity int,
  Price int Not Null,
  Available bit)
Now the Book table design will look as follows.

Create a Blazor WebAssembly application
Open Visual Studio 2019 Preview, select Create a New Project , select Blazor App , and then click Next.
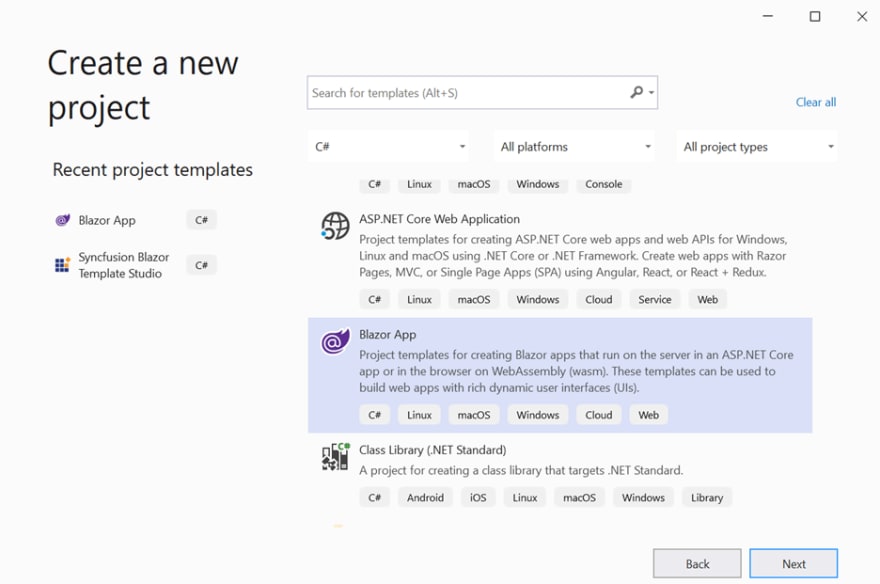
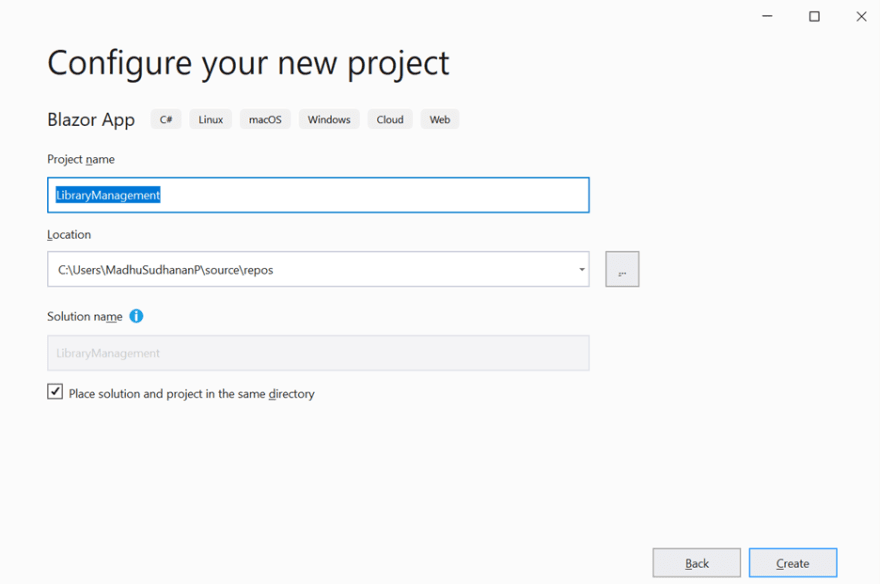
In the next window, provide the project name LibraryManagement and click Create.
Now select the Blazor WebAssembly App project template and select the ASP.NET Core hosted check box. Click Create to create an ASP.NET Core-hosted application.

When exploring the created application, you can see three projects under one solution.
LibraryManagement.Client : Contains page UI components that will be rendered in the browser.
LibraryManagement. Server : Contains the server-side code such as DB-related operations and Web API.
LibraryManagement.Shared: Contains the shared code, such as model classes, that can be accessed by both client and server.
Creating DbContext and model class
Now we are going to scaffold DbContext and model classes from the existing Library database. To perform scaffolding and work with SQL Server database in our application, we need to install the following NuGet packages.
Run the following commands in the Package Manager Console :
- Install-Package Microsoft.EntityFrameworkCore.Tools -Version 3.0.0: This package creates database context and model classes from the database.
- Install-Package Microsoft.EntityFrameworkCore.SqlServer -Version 3.0.0: The database provider that allows Entity Framework Core to work with SQL Server.
Once these packages are installed, we can scaffold DbContext and model classes. Run the following command in the Package Manager Console under the LibraryManagement.Server project.
|
Scaffold-DbContext “Server=localhost;Database=Library;Integrated Security=True” Microsoft.EntityFrameworkCore.SqlServer -OutputDir Models
This scaffolding command contains the following details for creating DbContext and model classes for the existing database and its tables:
- Connection string: Server=localhost;Database=Library;Integrated Security=True
- *Data provider: * EntityFrameworkCore.SqlServer
- Output directory: -OutputDir Models
After running this command, LibraryContext.cs and Book.cs files will be created in the LibraryManagement.Server.Models folder as follows.
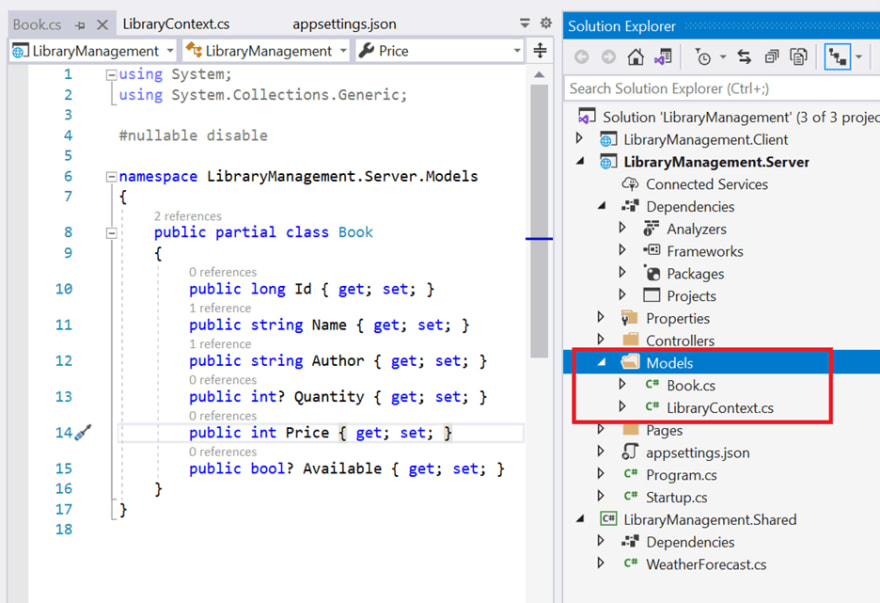
We can see that the LibraryContext.cs file contains the connection string details in the OnConfiguring method.

It is not recommended to have a connection string with sensitive information in the LibaryContext.cs file, so move the connection string to the appsettings.json file.
 Now the DbContext must be configured using a connection string and registered as a scoped service using the AddDbContext method in Startup.cs.

Creating a data access layer
The application is now configured to connect with the Library database using Entity Framework. Now it’s time to consume data from the Library database. To do so, we need a Web API controller to serve data from DbContext to the Blazor application.
As the Blazor WebAssembly application runs in the same security sandbox as JavaScript, direct access to databases is not possible. Therefore, Web API is required to consume data from databases.
To create a Web API controller, right-click on the Controller folder in Server project and select Add -> New Item -> API controller with read/write actions. We are naming this controller BooksController as it returns Book table records. Now replace the Web API controller with the following code, which contains code to handle CRUD operations in the Book table.
using LibraryManagement.Server.Models;
using Microsoft.AspNetCore.Mvc;
using System.Linq;
using LibraryManagement.Shared.Models;
// For more information on enabling Web API for empty projects, visit https://go.microsoft.com/fwlink/?LinkID=397860

namespace LibraryManagement.Server.Controllers
{
    [Route("api/[controller]")]
    [ApiController]
    public class BooksController : ControllerBase
    {
        private LibraryContext _context;
        public BooksController(LibraryContext context)
        {
            _context = context;
        }

        // GET: api/<BooksController>
        [HttpGet]
        public object Get()
        {
            return new { Items = _context.Books, Count = _context.Books.Count() };
        }

        // POST api/<BooksController>
        [HttpPost]
        public void Post([FromBody] Book book)
        {
            _context.Books.Add(book);
            _context.SaveChanges();
        }

        // PUT api/<BooksController>
        [HttpPut]
        public void Put(long id, [FromBody] Book book)
        {
            Book _book = _context.Books.Where(x => x.Id.Equals(book.Id)).FirstOrDefault();
            _book.Name = book.Name;
            _book.Author = book.Author;
            _book.Price = book.Price;
            _book.Quantity = book.Quantity;
            _book.Available = book.Available;
            _context.SaveChanges();
        }

        // DELETE api/<BooksController>
        [HttpDelete("{id}")]
        public void Delete(long id)
        {
            Book _book = _context.Books.Where(x => x.Id.Equals(id)).FirstOrDefault();
            _context.Books.Remove(_book);
            _context.SaveChanges();
        }
    }
}
Add Syncfusion Blazor package
Before adding Syncfusion Blazor components to the application, we need to move the Book.cs file to the LibraryManagement.Shared project, as it is required in both client and server projects.

To add Syncfusion components to the project, right-click on Dependencies and select Manage NuGet Packages.

In the Browse tab, find and install the Syncfusion.Blazor NuGet package.

Open the _Import.razor file and add the following namespaces, which are required to use Syncfusion Blazor components in this application.
@using Syncfusion.Blazor
@using Syncfusion.Blazor.Grids
@using Syncfusion.Blazor.Data
Open the Program.cs file and register the Syncfusion service in the Main method as follows.
using Syncfusion.Blazor;

namespace LibraryManagement.Client
{
    public class Program
    {
        public static async Task Main(string[] args)
        {
            var builder = WebAssemblyHostBuilder.CreateDefault(args);
            builder.RootComponents.Add<App>("#app");

            builder.Services.AddScoped(sp => new HttpClient { BaseAddress = new Uri(builder.HostEnvironment.BaseAddress) });

            builder.Services.AddSyncfusionBlazor();

            await builder.Build().RunAsync();
        }
    }
}
Themes provide life to components. Syncfusion Blazor has different themes:
- Bootstrap4
- Material
- Office 365
- Bootstrap
- High contrast
In this demo application, I will be using the Bootstrap4 theme. To add the theme, open the wwwroot/index.html file and add the following CSS reference code.
<link href="_content/Syncfusion.Blazor/styles/bootstrap4.css" rel="stylesheet" />
Add Syncfusion Blazor DataGrid component
In previous steps, we have successfully configured the Syncfusion Blazor package in the application. Now we can add the grid component to the Index.razor page. TValue in the SfGrid defines the model type the grid is bound to. We are creating a grid from the Book table, so we have used the TValue of Book.
@using LibraryManagement.Shared.Models

<SfGrid TValue="Book"> </SfGrid>
- Grid columns can be defined using the GridColumn component. We are going to create columns using the following code.
@using LibraryManagement.Shared.Models

<SfGrid TValue="Book">
    <GridColumns>
        <GridColumn Field="@nameof(Book.Id)" IsPrimaryKey="true" Visible="false"></GridColumn>
        <GridColumn Field="@nameof(Book.Name)" Width="150"></GridColumn>
        <GridColumn Field="@nameof(Book.Author)" Width="150"></GridColumn>
        <GridColumn Field="@nameof(Book.Quantity)" Width="90" TextAlign="TextAlign.Right"></GridColumn>
        <GridColumn Field="@nameof(Book.Price)" Width="90" Format="C2" TextAlign="TextAlign.Right"></GridColumn>
        <GridColumn Field="@nameof(Book.Available)" DisplayAsCheckBox="true" Width="70"></GridColumn>
    </GridColumns>
</SfGrid>
Let`s look at the properties and their usage:
- Field specifies the column name of the Book table to display in the grid column.
- IsPrimaryKey specifies the given column is a primary key column. Here, the Id column is a primary key column.
- Visible specifies the column visibility. Setting it as false will hide the column on the user end.
- Width specifies the column width.
- Format helps to format numbers, currencies, and dates for a particular culture. Here, we have formatted the *Price * column.
- DisplayAsCheckBox renders check boxes in cells and sets the check state based on the property value. Here, the Available column is rendered as a check box column.
To consume data from Web API, use the SfDataManager component. SfDataManager provides flexible data binding capability to Syncfusion components. It has various built-in adaptors to communicate with different types of data sources.
Here, we are using Web API to provide data, so we choose WebApiAdaptor as the data adaptor for SfDataManager.
csharp

@using LibraryManagement.Shared.Models
html

<SfGrid TValue="Book">

    <SfDataManager Url="/api/Books" Adaptor="Adaptors.WebApiAdaptor"></SfDataManager>

    <GridColumns>

        <GridColumn Field="@nameof(Book.Id)" IsPrimaryKey="true" Visible="false"></GridColumn>

        <GridColumn Field="@nameof(Book.Name)" Width="150"></GridColumn>

        <GridColumn Field="@nameof(Book.Author)" Width="150"></GridColumn>

        <GridColumn Field="@nameof(Book.Quantity)" Width="90" TextAlign="TextAlign.Right"></GridColumn>

        <GridColumn Field="@nameof(Book.Price)" Width="90" Format="C2" TextAlign="TextAlign.Right"></GridColumn>

        <GridColumn Field="@nameof(Book.Available)" DisplayAsCheckBox="true" Width="70"></GridColumn>

    </GridColumns>

</SfGrid>
We can enable editing in the grid component using the GridEditSettings property. DataGrid provides various modes for editing, such as inline/normal, dialog, and batch editing. Here, we are using the inline edit mode and the Toolbar property to show tool bar items to edit.
csharp

@using LibraryManagement.Shared.Models
html

<SfGrid TValue="Book" Toolbar="@(new List<string>() { "Add", "Edit", "Delete", "Update", "Cancel" })">

    <SfDataManager Url="/api/Books" Adaptor="Adaptors.WebApiAdaptor"></SfDataManager>

    <GridEditSettings AllowAdding="true" AllowEditing="true" AllowDeleting="true"></GridEditSettings>

    <GridColumns>

        <GridColumn Field="@nameof(Book.Id)" IsPrimaryKey="true" Visible="false"></GridColumn>

        <GridColumn Field="@nameof(Book.Name)" Width="150"></GridColumn>

        <GridColumn Field="@nameof(Book.Author)" Width="150"></GridColumn>

        <GridColumn Field="@nameof(Book.Quantity)" Width="90" TextAlign="TextAlign.Right"></GridColumn>

        <GridColumn Field="@nameof(Book.Price)" Width="90" Format="C2" TextAlign="TextAlign.Right"></GridColumn>

        <GridColumn Field="@nameof(Book.Available)" DisplayAsCheckBox="true" Width="70"></GridColumn>

    </GridColumns>

</SfGrid>
On running the application, we will see the grid as follows.

Insert a row
To insert a new row, click the Add toolbar button. The new record edit form will look similar to the following screenshot.
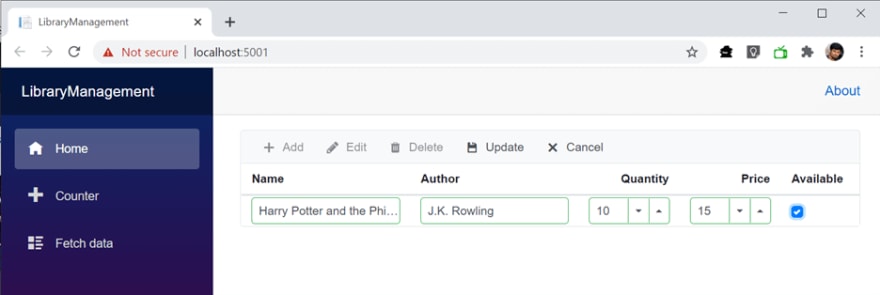
Clicking the Update toolbar button will insert the record in the Book table by calling the POST method of the Web API.

Update a row
To edit a row, select any row and then click the Edit toolbar button. The edit form will look like the following.

Now we change the Quantity column value from 10 to 9 and click the Update toolbar button. We update the record in the Book table by calling the PUT method of the Web API. The resultant grid will look like the following.

Delete a row
To delete a row, select any row and then click the Delete toolbar button. The deleting operation will send a DELETE request to the Web API with the selected record`s primary key value to remove the corresponding record from the Book table.
Enable data validation
It is common to validate user input before saving it to the database. Blazor DataGrid provides a built-in validation system to validate user input. Validation by column can be done using the GridColumn.ValidationRules property.
In the following code:
- We have enabled the required validation for Quantity, so we cannot leave that field empty during add and edit operations.
- Range validation is enabled for the Price column so the price value entered must be between 1 and 1,000.
@using LibraryManagement.Shared.Models

<SfGrid TValue="Book" Toolbar="@(new List<string>() { "Add", "Edit", "Delete", "Update", "Cancel" })">
    <SfDataManager Url="/api/Books" Adaptor="Adaptors.WebApiAdaptor"></SfDataManager>
    <GridEditSettings AllowAdding="true" AllowEditing="true" AllowDeleting="true"></GridEditSettings>
    <GridColumns>
        <GridColumn Field="@nameof(Book.Id)" IsPrimaryKey="true" Visible="false"></GridColumn>
        <GridColumn Field="@nameof(Book.Name)" Width="150"></GridColumn>
        <GridColumn Field="@nameof(Book.Author)" Width="150"></GridColumn>
        <GridColumn Field="@nameof(Book.Quantity)" ValidationRules="@(new ValidationRules(){ Required = true })" Width="90" TextAlign="TextAlign.Right"></GridColumn>
        <GridColumn Field="@nameof(Book.Price)" ValidationRules="@(new ValidationRules(){ Range = new double[]{ 1, 1000 } })" Width="90" Format="C2" TextAlign="TextAlign.Right"></GridColumn>
        <GridColumn Field="@nameof(Book.Available)" DisplayAsCheckBox="true" Width="70"></GridColumn>
    </GridColumns>
</SfGrid>
Now validation error messages will be shown in the grid.

Handling exceptions
Proper error handling helps you catch and react to the errors thrown in an application. Blazor DataGrid provides an action failure event to catch errors and handle them in a graceful way. OnActionFailure event can be used to capture unexpected errors during grid actions and editing operations.
@using LibraryManagement.Shared.Models

<SfGrid TValue="Book" Toolbar="@(new List<string>() { "Add", "Edit", "Delete", "Update", "Cancel" })">
    <SfDataManager Url="/api/Books" Adaptor="Adaptors.WebApiAdaptor"></SfDataManager>
    <GridEditSettings AllowAdding="true" AllowEditing="true" AllowDeleting="true"></GridEditSettings>
    <GridColumns>
        <GridColumn Field="@nameof(Book.Id)" IsPrimaryKey="true" Visible="false"></GridColumn>
        <GridColumn Field="@nameof(Book.Name)" Width="150"></GridColumn>
        <GridColumn Field="@nameof(Book.Author)" Width="150"></GridColumn>
        <GridColumn Field="@nameof(Book.Quantity)" ValidationRules="@(new ValidationRules(){ Required = true })" Width="90" TextAlign="TextAlign.Right"></GridColumn>
        <GridColumn Field="@nameof(Book.Price)" ValidationRules="@(new ValidationRules(){ Range = new double[]{ 1, 1000 } })" Width="90" Format="C2" TextAlign="TextAlign.Right"></GridColumn>
        <GridColumn Field="@nameof(Book.Available)" DisplayAsCheckBox="true" Width="70"></GridColumn>
    </GridColumns>
    <GridEvents TValue="Book" OnActionFailure="Failure"></GridEvents>
</SfGrid>

@code{

    private void Failure(FailureEventArgs e) {
        Console.WriteLine(e.Error.Message);
        Console.WriteLine(e.Error.StackTrace);
    }
}
Conclusion
In this blog, we have learned how to create a Blazor WebAssembly application, include the Blazor DataGrid component, and perform CRUD operations using Entity Framework Core.
Syncfusion provides more than 65 high-performance, lightweight, modular, and responsive Blazor UI controls such as DataGrid, Charts, and Scheduler to ease the work of developers. Check them out!
If you have any questions, please let us know in the comments section below. You can also contact us through our support forum, Direct-Trac, or feedback portal. We are always happy to assist you!


Top comments (0)