
TL;DR:Let’s see how to add a Grid and Chart to the JavaScript Pivot Table’s Field List with a server-side engine. We’ll cover setting up the Web API, connecting the Pivot Field List to the API, and passing input data to render Grid and Chart. This blog also demonstrates how to filter and update the components dynamically based on user interactions for real-time data visualization.
The JavaScript Pivot Field List is a powerful component that works similarly to Microsoft Excel. It allows you to add or remove fields and rearrange them across different axes, such as columns, rows, values, and filters. Sort and filter options can also be dynamically applied at runtime.
In this blog, we’ll see the detailed steps to create a Grid and Chart using the JavaScript Pivot Table’s Field List component with our server-side engine. Here, we won’t use the built-in grid and chart features in the Pivot Table. Instead, we’ll add the Syncfusion JavaScript DataGrid and Charts components to visualize data effectively.
To do so, we need to create a Field List using a server-side engine.
What is a server-side engine?
The server-side engine can directly connect to your data source, collect raw input data, and periodically perform all pivot-oriented calculations internally based on the report provided by the JavaScript Pivot Table through UI interactions. It then transmits only aggregated data for the Pivot Table or Pivot Chart to the client side (browser).
Note:For more details, refer to implementing the server-side engine in the JavaScript Pivot Table documentation.
Steps to build a Pivot Field List in an ASP.NET Core app
Follow these steps to create a Pivot Field List in an ASP.NET Core app:
Step 1: Creating a WebAPI controller
Start by opening Visual Studio and creating an empty ASP.NET Core app. Refer to the following image.

Then, create an empty WebAPI controller and name it as PivotController. Refer to the following image.

Step 2: Install the Syncfusion.Pivot.Engine NuGet package
To use the server-side engine, install the Syncfusion.Pivot.Engine NuGet package from NuGet Gallery, as shown in the following image.

Step 3: Configuring the Web API controller
To render the Pivot Field List, add the following code to the PivotController.cs and Program.csfiles on the server side, respectively.
In the PivotController, we’ll assign empty data to the PivotEngine.Dataproperty in the GetPivotValuesmethod, which contains the fields that will be displayed in the Pivot Field List. We can generate the fields using Collection, JSON, CSV, DataTable,or Dynamicdata sources. Here, we’ve used ExpandoObject (Dynamic) to assign data.
[PivotController.cs]
using Microsoft.AspNetCore.Mvc;
using Newtonsoft.Json;
using Syncfusion.Pivot.Engine;
using System.Diagnostics.Metrics;
using System.Dynamic;

namespace PivotController.Controllers
{
    [Route("api/[controller]")]
    public class PivotController : Controller
    {
        private PivotEngine<ExpandoObject> PivotEngine = new PivotEngine<ExpandoObject>();

        [Route("/api/pivot/post")]
        [HttpPost]
        public async Task<object> Post([FromBody] object args)
        {
            FetchData param = JsonConvert.DeserializeObject<FetchData>(args.ToString());
            if (param.Action == "fetchFieldMembers")
            {
                return await GetMembers(param);
            }
            else
            {
                return await GetPivotValues(param);
            }
        }

        private async Task<object> GetMembers(FetchData param)
        {
            Dictionary<string, object> returnValue = new Dictionary<string, object>();
            if (param.MemberName == "Year")
            {
                returnValue["memberName"] = param.MemberName;
                Dictionary<string, Members> result = new Dictionary<string, Members>();
                result.Add("FY 2005", new Members()
                {
                    Caption = "FY 2005",
                    Name = "FY 2005",
                    IsSelected = true
                });
                result.Add("FY 2006", new Members()
                {
                    Caption = "FY 2006",
                    Name = "FY 2006",
                    IsSelected = true
                });
                result.Add("FY 2007", new Members()
                {
                    Caption = "FY 2007",
                    Name = "FY 2007",
                    IsSelected = false
                });
                result.Add("FY 2008", new Members()
                {
                    Caption = "FY 2008",
                    Name = "FY 2008",
                    IsSelected = false
                });
                returnValue["members"] = JsonConvert.SerializeObject(result);
            }
            return returnValue;
        }

        private async Task<object> GetPivotValues(FetchData param)
        {
            List<ExpandoObject> listData = new List<ExpandoObject>();
            dynamic d = new ExpandoObject();
            d.ProductID = "";
            d.Year = "";
            d.Country = "";
            d.Product = "";
            d.Price = 0;
            d.Sold = 0;
            listData.Add(d);
            PivotEngine.Data = listData;
            EngineProperties engine = await PivotEngine.GetEngine(param);
            Dictionary<string, object> result = PivotEngine.GetSerializedPivotValues();
            result["pivotCount"] = "";
            result["pivotValue"] = "";
            result["data"] = new PivotViewData().GetVirtualData(1000, param);
            return result;
        }

        public class PivotViewData
        {
            public string ProductID { get; set; }
            public string Country { get; set; }
            public string Product { get; set; }
            public double Sold { get; set; }
            public double Price { get; set; }
            public string Year { get; set; }

            public List<PivotViewData> GetVirtualData(int count, FetchData param)
            {
                List<PivotViewData> VirtualData = new List<PivotViewData>();

                for (int i = 1; i <= count; i++)
                {
                    PivotViewData p = new PivotViewData
                    {
                        ProductID = "PRO-" + (count + i),
                        Year = param.Action == "onFilter" ? param.FilterItem.Items[new Random().Next(param.FilterItem.Items.Length)] : (new string[] { "FY 2015", "FY 2016", "FY 2017", "FY 2018", "FY 2019" })[new Random().Next(5)],
                        Country = (new string[] { "Canada", "France", "Australia", "Germany", "France" })[new Random().Next(5)],
                        Product = (new string[] { "Car", "Van", "Bike", "Flight", "Bus" })[new Random().Next(5)],
                        Price = (3.4 * i) + 500,
                        Sold = (i * 15) + 10
                    };
                    VirtualData.Add(p);
                }
                return VirtualData;
            }
        }
    }
}
[Program.cs]
var builder = WebApplication.CreateBuilder(args);
var CustomOrigins = "_customOrigins";

builder.Services.AddControllers();
builder.Services.AddEndpointsApiExplorer();
builder.Services.AddCors(options =>
{
    options.AddPolicy(CustomOrigins,
    builder =>
    {
        builder.AllowAnyOrigin().AllowAnyHeader().AllowAnyMethod();
    });
});

var app = builder.Build();

app.UseHttpsRedirection();

app.UseAuthorization();

app.MapControllers();
app.UseCors(CustomOrigins);
app.Run();
Once the code is updated, run the app in IIS. It will be accessible at https://localhost:44372/api/pivot/post.
Step 4: Connect the JavaScript Pivot Field List with the WebAPI controller
To connect the server-side engine to the JavaScript Pivot Field List, create a simple standalone JavaScript Pivot Field. Map the hosted Web API’s URL, https://localhost:44372/api/pivot/post, to the Pivot Table in the index.jsfile using the url property under dataSourceSettings.
Refer to the following code example.
[pivot.js]
var fieldlistObj = new ej.pivotview.PivotFieldList({
    dataSourceSettings: {
       // Here, we need to use the service URL.
        url: 'https://localhost:44372/api/pivot/post',
        mode: 'Server',
        type: 'JSON',
        allowMemberFilter: true,
        rows: [{ name: 'Year' }],
        values: [{ name: 'Sold', caption: 'Units Sold' }],
        fieldMapping: [
            { name: 'Sold', type: 'Sum' },
            { name: 'Price', type: 'Sum' },
        ],
    },
    renderMode: 'Fixed',
});
fieldlistObj.appendTo('#PivotFieldList');
Once the above code is executed, the Pivot Field List will appear, as shown in the following image.

Step 5: Passing input data to the JavaScript Pivot Field List
Based on the report we bound in the JavaScript Pivot Field List, we can retrieve data from the database and return it to the client.
For example, we used the PivotViewDataclass to create a sample list (Collection) data source and returned it to the client through the GetPivotValues()method.
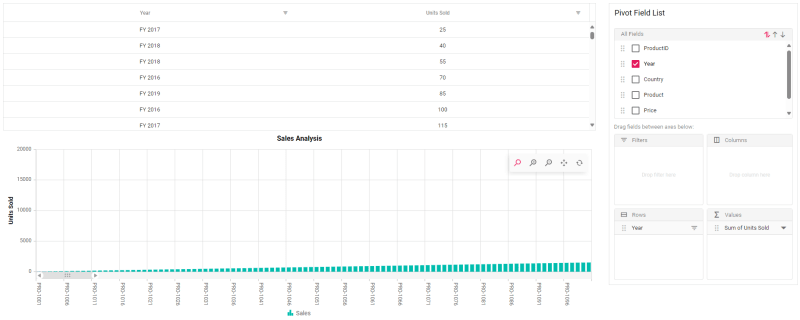
The data can be retrieved by calling the Pivot Field List’s afterServiceInvoke event. Then, the Grid and Chartcomponents can be rendered with the data obtained from that event.
Refer to the following code example to render the DataGrid and Charts components based on the input data in the JavaScript Pivot Field List.
[pivot.js]
var fieldlistObj = new ej.pivotview.PivotFieldList({
    dataSourceSettings: {
        url: 'https://localhost:44372/api/pivot/post',
        mode: 'Server',
        type: 'JSON',
        allowMemberFilter: true,
        rows: [{ name: 'Year' }],
        values: [{ name: 'Sold', caption: 'Units Sold' }],
        fieldMapping: [
            { name: 'Sold', type: 'Sum' },
            { name: 'Price', type: 'Sum' },
        ],
    },
    renderMode: 'Fixed',
    afterServiceInvoke: function (args) {
        if (args.action != "fetchFieldMembers") {
            data = JSON.parse(args.response).data;
            grid.dataSource = data;
            grid.columns = getColumns();
            chart.series[0].dataSource = data;
        }
    }
});
fieldlistObj.appendTo('#PivotFieldList');

var grid = new ej.grids.Grid({
    allowSelection: true,
    allowFiltering: true,
    allowSorting: true,
    filterSettings: { type: 'Menu' },
    selectionSettings: {
        persistSelection: true,
        type: 'Multiple',
        checkboxOnly: true,
    },
    enableHover: false,
    enableHeaderFocus: true,
    height: 250
});
grid.appendTo('#Grid');

var chart = new ej.charts.Chart({
    primaryXAxis: {
        valueType: 'Category',
        labelRotation: 90,
        zoomFactor: 0.1
    },
    chartArea: { border: { width: 0 } },
    primaryYAxis: {
        title: 'Units Sold'
    },
    series: [
        {
            type: 'Column',
            xName: 'productID',
            width: 2,
            yName: 'sold',
            name: 'Sales',
        },
    ],
    zoomSettings: {
        enableScrollbar: true
    },
    title: 'Sales Analysis',
    width: '100%',
    tooltip: { enable: true, shared: true },
    legendSettings: { enableHighlight: true },
});
chart.appendTo('#Chart');

function getColumns() {
    var report = {};
    report[0] = fieldlistObj.dataSourceSettings.rows;
    report[1] = fieldlistObj.dataSourceSettings.columns;
    report[2] = fieldlistObj.dataSourceSettings.values;
    report[3] = fieldlistObj.dataSourceSettings.filters;
    var pos = 0;
    var columns = [];
    while (pos < 4) {
        if (report[pos]) {
            for (var cnt = 0; cnt < report[pos].length; cnt++) {
                var field = report[pos][cnt];
                var column = {
                    field: field.name,
                    headerText: field.caption ? field.caption : field.name,
                    width: 150,
                    textAlign: 'Center',
                };
                columns.push(column);
            }
        }
        pos++;
    }
    return columns;
}
Refer to the following output image.
How does the server-side engine work?
Every action in the JavaScript Pivot Field List, such as adding or removing fields, rearranging them across different axes, including columns, rows, values, and filters, and dynamically sorting and filtering options, sends an updated report to the server at runtime. Based on that, we can retrieve data from the database and return it to the client side, enabling us to refresh both Grid and Chart components with the new data.
Updating the Grid and Chart with filtered data
Let’s walk through how to update the Grid and Chart by filtering the field list. When we click the filter icon in a field to which we’ve bound the data source, the server ( PivotController) receives a request with the action name fetchFieldMembersand the name of the specified field. Based on that, we can use the GetMemebers()method to pass the members to the filter dialog.
Refer to the following code example to know how the server-side engine handles this filtering process.
[PivotController.cs]
using Microsoft.AspNetCore.Mvc;
using Newtonsoft.Json;
using Syncfusion.Pivot.Engine;
using System.Diagnostics.Metrics;
using System.Dynamic;

namespace PivotController.Controllers
{
    [Route("api/[controller]")]
    public class PivotController : Controller
    {
        private PivotEngine<ExpandoObject> PivotEngine = new PivotEngine<ExpandoObject>();

        [Route("/api/pivot/post")]
        [HttpPost]
        public async Task<object> Post([FromBody] object args)
        {
            FetchData param = JsonConvert.DeserializeObject<FetchData>(args.ToString());
            if (param.Action == "fetchFieldMembers")
            {
                return await GetMembers(param);
            }
            else
            {
                return await GetPivotValues(param);
            }
        }

        private async Task<object> GetMembers(FetchData param)
        {
            Dictionary<string, object> returnValue = new Dictionary<string, object>();
            if (param.MemberName == "Year")
            {
                returnValue["memberName"] = param.MemberName;
                Dictionary<string, Members> result = new Dictionary<string, Members>();
                result.Add("FY 2015", new Members()
                {
                    Caption = "FY 2015",
                    Name = "FY 2015",
                    IsSelected = true
                });
                result.Add("FY 2016", new Members()
                {
                    Caption = "FY 2016",
                    Name = "FY 2016",
                    IsSelected = true
                });
                result.Add("FY 2017", new Members()
                {
                    Caption = "FY 2017",
                    Name = "FY 2017",
                    IsSelected = true
                });
                result.Add("FY 2018", new Members()
                {
                    Caption = "FY 2018",
                    Name = "FY 2018",
                    IsSelected = true
                });
                returnValue["members"] = JsonConvert.SerializeObject(result);
            }
            return returnValue;
        }
}
After executing the above code, the members will be displayed in the filter dialog, as shown in the following image.

The members can then be filtered using the filter dialog. The filtered members are sent to the server along with their field names. Based on the filtered members, we can fetch data from the database and return it to the client to refresh the Grid and Chart components.
For example, we have filtered the Yearfield, as shown in the following image.

The filtered members FY 2015and FY 2018will be sent to the server, along with the field name Year. So, we can use that information to filter and retrieve data from the database via the afterServiceInvokeevent, which we can then return to the client to refresh the Grid and Chart components.
Once the filtered data from the database has been assigned to them, the grid and chart will look like this.

GitHub reference
For more details, check out the Adding Grids and Charts in JavaScript Pivot Field List GitHub demo.
Conclusion
Thanks for reading! In this blog, we’ve seen how to add the DataGrid and Charts component to the JavaScript Pivot Table’s Field List to effectively visualize data. This approach can also be used to integrate Syncfusion’s other JavaScript data visualization components. Follow the steps outlined in this blog, and let us know your thoughts in the comments!
For existing customers, the latest version of Essential Studio can be downloaded from the License and Downloads page. If you are new to Syncfusion, try our 30-day free trial to check out the available features.
For any questions, you can contact us through our support forum, support portal, or feedback portal. We are always happy to assist you!

Top comments (0)