The Progressive Web App makes the react web applications feel like mobile-native apps. It features the option to add a web application to the home screen of mobile devices for easy access, and supports full screen for a native application look. PWA supports cache and makes use of cached items to work in slow networks, as well as in offline mode.
In this blog, I am going to create an application which lists the Succinctly series books and allow the users to search for a specific book. I will use create-react-app CLI to create the base application and will configure Syncfusion React UI components to implement this application. To do this, I am going to follow below steps:
- Getting started with create-react-app
- Configuring Syncfusion React UI components in it
- Making it a Progressive Web App
- Launching the application
The final project sample is available in this github repository, to track the progress in each step. You can also follow along with committed details provided at the end of each step.
Getting started with create-react-app
To create the React app, I am using the create-react-app CLI. This has some default settings like Manifest.json and service workers to help me make it a Progressive Web App. Install the create-react-app CLI globally using the following command:
npm i create-react-app -g
You can create the React app in any directory using create-react-app command. Move to the directory in which you want to create the application and run the following command. Here I am naming this app as “pwa-succinctly-books”
Example: create-react-app
create-react-app pwa-succinctly-books
This will create the application. To run the same with default configuration, move to the application directory and use the following command:
cd pwa-succinctly-books

npm start

The React application
Note: You can find information on this step on GitHub: Getting started with create-react-app
Configuring Syncfusion React UI components
With this, I have created the base application and made it run. Hence, I am going to configure the application with Syncfusion React UI components.
Like I said before, the core idea of this application is to populate a list of Syncfusion Succinctly series ebooks that is searchable based on book attributes. In this application, I am going to list the Succinctly series ebooks using Syncfusion Cards, and for searching, I will use Syncfusion TextBox. For this, I am going to install the ej2-react-inputs and ej2-layouts. For the search operation, I am going to use DataManager. To install these Syncfusion components, run the following command:
npm install @syncfusion/ej2-react-inputs @syncfusion/ej2-data @syncfusion/ej2-layouts
Now, every required configuration is done. To start the application, remove some elements from the base application. In App.js, empty the App div element.
 Now, I am going to follow below steps:
- Rendering React components
- Implement search operation
- Styling the application
Rendering React components
We need to render the following elements:
- Header
- Search text box
- List of cards
First, we need input for the search text box and a bootstrap Grid layout for aligning the cards in order. Create a local data source for listing the details of the Succinctly series books and name the file as datasource.js. Export this file to make it available in App.js. Add Syncfusion React TextBox component to render the search textbox. We can now import the TextBox from the ej2-react-inputs package. The App.js will contain the following code after including the required elements:
import {TextBoxComponent} from '@syncfusion/ej2-react-inputs';
class App extends Component {
render() {
return (
<div className="App">
<div className='control-pane'>
<div>
{/* Header HTML element */}
<header className="header">
<h1 className="header__title">Succinctly Series</h1>
</header>
</div>
<div className="main">
<div className="control-section card-control-section tile_layout">
<div className="row filter">
<div className="col-xs-4 col-sm-4 col-lg-4 col-md-4 "></div>
<div className="col-xs-4 col-sm-4 col-lg-4 col-md-4 ">
{/* Searching HTML element */}
<TextBoxComponent id="search_Card" placeholder="Enter text to search" floatLabelType="Auto" />
</div>
<div className="col-xs-4 col-sm-4 col-lg-4 col-md-4  tile_search">
</div></div>
{/* Cards Template holder */}
<div className='row e-card-layout' style={{ textAlign: 'center' }}>
<div className="row">
<div className="row error" style={{ minHeight: '150px' }}>
<div className="e-error-content" style={{ margin: 'auto', fontWeight: 500 }}>No results found. Please try a different search.</div></div>
<div className="col-xs-6 col-sm-6 col-lg-6 col-md-6"><div id='card_sample_1' className='card_sample'></div></div>
<div className="col-xs-6 col-sm-6 col-lg-6 col-md-6"><div id='card_sample_2' className='card_sample'></div></div>
<div className="col-xs-6 col-sm-6 col-lg-6 col-md-6"><div id='card_sample_3' className='card_sample'></div></div>
<div className="col-xs-6 col-sm-6 col-lg-6 col-md-6"><div id='card_sample_4' className='card_sample'></div></div>
<div className="col-xs-6 col-sm-6 col-lg-6 col-md-6"><div id='card_sample_5' className='card_sample'></div></div>
<div className="col-xs-6 col-sm-6 col-lg-6 col-md-6"><div id='card_sample_6' className='card_sample'></div></div>
<div className="col-xs-6 col-sm-6 col-lg-6 col-md-6"><div id='card_sample_7' className='card_sample'></div></div>
<div className="col-xs-6 col-sm-6 col-lg-6 col-md-6"><div id='card_sample_8' className='card_sample'></div></div>
<div className="col-xs-6 col-sm-6 col-lg-6 col-md-6"><div id='card_sample_9' className='card_sample'></div></div>
<div className="col-xs-6 col-sm-6 col-lg-6 col-md-6"><div id='card_sample_10' className='card_sample'></div></div>
<div className="col-xs-6 col-sm-6 col-lg-6 col-md-6"><div id='card_sample_11' className='card_sample'></div></div>
<div className="col-xs-6 col-sm-6 col-lg-6 col-md-6"><div id='card_sample_12' className='card_sample'></div></div>
</div></div></div></div></div>
</div>
);
}
}
Now I am going to render the cards by handling the componentDidMount hook method. Define the Card component, and run the data source against it. This renders each card populated in a bootstrapped grid layout.
import * as ReactDOM from 'react-dom';
import {cardBook} from './datasource';
let cardEle;
/* Funtion for Rendering Cards */
function cardRendering(cardBook) {
let errorContent = document.querySelector('.tile_layout .row.error');
if (cardBook.length > 0) {
errorContent.style.display = 'none';
cardBook.forEach((data, index) => {
cardEle = document.getElementById('card_sample_' + (++index));
if (cardEle) {
ReactDOM.render(<CardRender data={data}/>, cardEle);
}
});
}
else {
errorContent.style.display = 'flex';
}
}

class App extends Component {
componentDidMount() {
cardRendering(cardBook);
}
//render(){..}
}
class CardRender extends React.Component {
constructor() {
super(...arguments);
this.headerTitleSubCheck = this.props.data.header_title.length > 0 || this.props.data.header_subtitle.length > 0;
this.headerCheck = this.props.data.header_title.length > 0 || this.props.data.header_subtitle.length > 0 || this.props.data.header_img.length > 0;
this.bgimageUrl =  this.props.data.cardImage.url ;
}
render() {
return (<div className={this.props.data.isHorizontal ? 'e-card e-card-horizontal' : 'e-card'}>
{this.props.data.cardImage && <div className={"e-card-image "+this.bgimageUrl} > {this.props.data.cardImage.title && <div className='e-card-title'>{this.props.data.cardImage.title}</div>} </div>}
{this.props.data.cardTitle && <div className='e-card-title'>{this.props.data.cardTitle}</div>}
{this.headerCheck && <div className='e-card-header'>
{this.props.data.header_img && <div className={this.props.data.header_img.isRounded ? 'e-card-header-image e-card-corner' : 'e-card-header-image e-card-corner'}></div>}
{this.headerTitleSubCheck && <div className='e-card-header-caption'>
{this.props.data.header_title && <div className='e-card-header-title'>{this.props.data.header_title}</div>}
{this.props.data.header_subtitle && <div className='e-card-sub-title'>{this.props.data.header_subtitle}</div>}
</div>}
</div>}
{this.props.data.cardContent && <div className='e-card-content'>{this.props.data.cardContent}</div>}
{this.props.data.card_action_btn &&
<div className={this.props.data.card_action_btn.isVertical ? 'e-card-actions e-card-vertical' : 'e-card-actions'}>
{this.props.data.card_action_btn.action_btns.map(function (actBtn) {
return actBtn.tag === "a" ? <a key={actBtn.text} href={actBtn.href} target={actBtn.target} className='e-btn e-outline e-primary'> {actBtn.text}</a> : <button key={actBtn.text} className='e-card-btn'>{actBtn.text}</button>;
})}
</div>}
</div>);
}
}
Implement search operation
I have rendered the search text box in the above operation itself, and now I am going to add the functionality to the user interfaces. Handle the input event of the search textbox to create a predicate and parse it with the data source. Destroy all the cards available in the document after the search operation. Then, create new cards for the items available after searching the data source.
import { Query, DataManager, Predicate } from '@syncfusion/ej2-data';
let data = [];
let emptyData = true;
/* Function for Destroying Cards */
function destroyAllCard() {
let cards = document.querySelectorAll('.card-control-section .e-card');
[].slice.call(cards).forEach((el) => {
ReactDOM.unmountComponentAtNode(el.parentElement);
});
}
/* Function for Filtering Cards */
function searchFilter(key) {
let predicate = new Predicate('cardContent', 'Contains', key, true);
predicate = predicate.or('cardImage.title', 'Contains', key, true).or('header_title', 'Contains', key, true).or('header_subtitle', 'Contains', key, true);
data = new DataManager(cardBook).executeLocal(new Query().where(predicate));
destroyAllCard();
cardRendering(data);
}
class App extends Component {
componentDidMount() {
cardRendering(cardBook);
}
filterHandler(e) {
if (e.event.code === 'Tab' || e.event.code === 'Escape' || e.event.code === 'ShiftLeft' || (e.event.code === 'Backspace' && emptyData)) {
return;
}
let inputVal = e.value;
emptyData =inputVal.length === 0 ;
searchFilter(inputVal);
}
render(){
..
/* Filter handler in search text box */
<TextBoxComponent id="search_Card" input={(event) => this.filterHandler(event)} placeholder="Enter text to search" floatLabelType="Auto" />
..}
}
Note: You can find the information about this step on GitHub: Configuring Syncfusion React UI components
Styling the application
The React application requires styling to make it responsive on mobile devices. To do so, I am going to import bootstrap for the grid layout of cards and load material CSS for Syncfusion React UI components in App.js. Also define the styles for card images which are loaded from the SRC folder and handle it using a background image URL.
npm install bootstrap
App.js
import “https://cdn.syncfusion.com/ej2/material.css”;

import “bootstrap/dist/css/bootstrap.min.css”;
Note: You can find the information about this step on GitHub: Application styling
Making it a Progressive Web App
The basic steps to make an application a progressive web app are:
- Configuring Web App Mainfest
- Handling Service Worker
Configuring Web App Manifest
Since I have created this application using create-react-app CLI, the default application manifest will be available in the public folder. This web app manifest is a JSON data containing some basic details about the application. We have more key value pairs in this manifest and will be modifying a few.
short_name / name – You can provide either short_name / name. If you provide both, short_name will be displayed, where the small space is available and name will be used for the app install prompt.
background_color – You can provide this property, which is used on the splash screen when the application is launched on slow networks. Downloading resources will take some time during the application’s initial load.
theme_color – Use this property to set the color of the toolbar in the browser.
icons – These are used for app icons when added from the browser to the home and splash screens.
display – You can set this to ‘standalone’ to make the app look like a native mobile app. The other display options are in the table below.
| Options | Description |
| fullscreen | The application will be loaded without browser UI and will be responsive to entire display area |
| browser | Standard browser look and feel |
| standalone | Like native mobile application |
start_url – This lets the browser display the application start page when it is launched and prevents displaying the URL from which the user pulled the app.
Manifest.json
{

"short_name": "Succinctly Series",

"name": "Succinctly Series",

"icons": [{

"src": "succinctly_series.png",

"sizes": "246x246",

"type": "image/png"

}],

"start_url": "./index.html",

"display": "standalone",

"theme_color": "#000000",

"background_color": "#000000"

}
Handling Service Worker – Offline Caching
Service workers handle the offline experience, and background syncing of data in a web application. This in-turn will provide a better experience, when offline or on a slow network. We have a default service worker JavaScript file named serviceworker.js in the SRC folder, since the application was created using create-react-app.
This script will handle the default caching required for files, so that, we can launch the application even when we are offline. When the application is launched for the first time, the service worker will be registered and cache required files; this will serve till the cache gets cleared. You can learn what the service worker does with the comments provided in the serviceworker.js. Register the service worker in index.js using the code below.
serviceWorker.register();
Note: You can find the information about this step on GitHub: Making a Progressive Web App
Launching application
With this, we have successfully implemented our application and now we need to launch it. To launch the application in development version, use the command below.
npm start
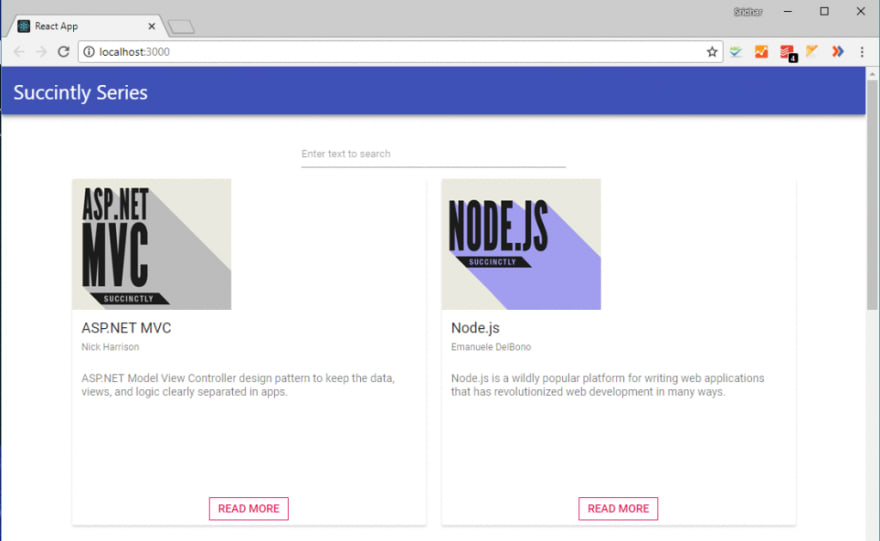
Succinctly series React PWA
To launch the application for production, run the command below.
npm run build
This will generate the build folder in the application for production purpose. Then, we need to launch this application so we can make use of the serve NPM package which is used for serving static applications and single page applications. For which, use the following commands to serve the application:
npm i serve -g

serve -s build
This will launch the application at http://localhost:5000, and you can check the changes with the application manifest and service worker here.
In the Chrome developer tools we have the application tab, in which you can see the manifest and service worker in the left-side of the tree. Once you click on the manifest, in the right-side pane you can check the key value pair configured for the application.
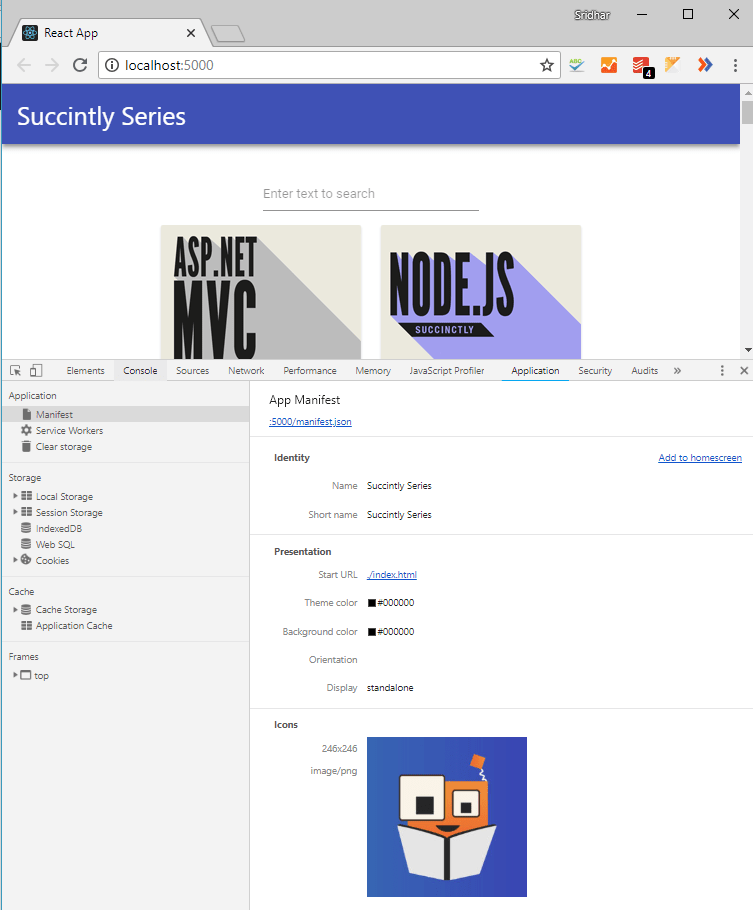
Succinctly series PWA manifest
When you click on the service worker, you will see that, we have options to check the offline status of the application with a checkbox. Before doing that, ensure that the service worker is registered. Refresh the full page and check whether the service worker launches the application properly.

Succinctly series PWA Service Workers
Summary
In this blog, we have gone through the basic steps for creating a Progressive Web App. We walked through using React applications, created an app with create-react-app CLI and Syncfusion React UI components. We can do a lot more with progressive web apps, I am leaving this for you to experiment with.
You can find the application in this Github repository. If you have any questions or need more help, please let us know in the comments section below. You can also contact us through our support forum or Direct-Trac. We are always happy to assist you!
The post Create Progressive Web App with Syncfusion React UI Components appeared first on Syncfusion Blogs.

Top comments (0)