
This article was originally written on Medium
You can easily use ExpressJS and PassportJS to do authentication on Netlify with lambda functions.
TLDR;
For those in a hurry, an online demo is available, and source code of the sample project is available here:
 svengau
/
netlify-authentification-sample
svengau
/
netlify-authentification-sample
Authentication with netlify lambda functions, PassportJS and Express
Example of netlify authentication with Passportjs
This project shows how to use the very popular PassportJS library (normally available under expressjs) with the Netlify platform running under AWS Lambda.
We took the example of Google OAuth, but you can use any PassportJS strategy (Twitter, Facebook, Local, JWT, Github, ...).
You can clone on you local with:
git@github.com:svengau/netlify-authentification-sample.git
Alternatively you can deploy straight to Netlify with this one-click Deploy:

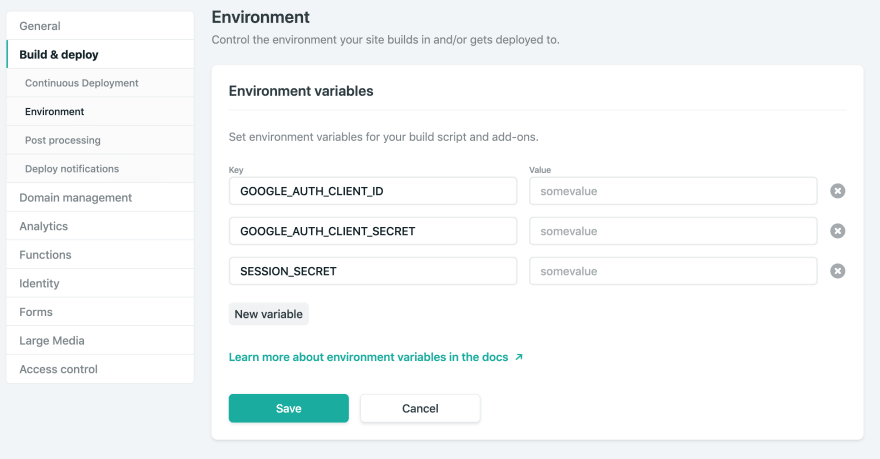
Once deployed, don't forget to configure the 3 following env variables:
- GOOGLE_AUTH_CLIENT_ID: your google client id
- GOOGLE_AUTH_CLIENT_SECRET: your google client secret key
- SESSION_SECRET: a random session secret
Live Demo
You may test out a deployed version of this project here: https://netlify-authentification-sample.netlify.com/
Netlify & the identity module
Netlify is a great product to deploy static apps or even with API (using lambda functions). The service also manages authentication with the identity module: this module may match your requirement, but the free offer has some limitations, and the first paid offer costs $99/month/site! If you have several sites, it can quickly become very expensive.
In the following example, I will show you how to use the very popular PassportJS library to authenticate with Google Auth. With PassportJS, you have more than 500 authentication strategies (Twitter, Facebook, Local, JWT, Github,…) to choose from, for free!
Configuration from scratch
Netlify provides a create-react-app-lambda boilerplate to start an application with create-react-app and lamdba, but we will start from scratch with create-react-app.
So, let’s go! we’ll create a React app, with lambda functions, that will load an express application to be able to use passportJS and Google strategy. No need for a database, we will store everything in cookies thanks to the client-session library.
1. Install the netlify CLI in global mode:
npm install netlify-cli -g
2. Create the React application, with the following dependencies:
npx create-react-app netlify-authentification-sampleyarn add serverless-http passport passport-google-oauth20 lodash client-sessions cookie-parseryarn add -D netlify-lambda npm-run-all http-proxy-middleware env-cmd
3. Add a proxy as described in the facebook doc, to point the url /netlify/functions to our API:
const proxy = require("http-proxy-middleware");module.exports = function setupProxy(app) {
  app.use(
    proxy("/.netlify/functions/", {
     target: "http://localhost:8888/"
    })
  );
};
4. Create the file netlify.toml, to configure the build:
[build]
command = “yarn build”
functions = “build-lambda”
publish = “build”
5. The src/lambda directory (but not the subdirectories) contains all the lambda functions. Create an src/lambda/auth.js function that will support authentication:
import serverless from "serverless-http";
import app from "./lib/express";
exports.handler = serverless(app);
This function will be accessible from /.netlify/functions/auth
6. And configure the express application, with the cookie parser, client session and passport:
app.use(cookieParser());
app.use(
  sessions({
    cookieName: "session",
    secret: process.env.SESSION_SECRET,
    cookie: {
      ephemeral: false,
      secure: false
    }
  })
);
app.use(passport.initialize());
app.use(passport.session());
passport.serializeUser(
  (user, cb) => cb(user ? null : "null user", user)
);
passport.deserializeUser(
  (user, cb) => cb(user ? null : "null user", user)
);
7. Add the PassportJS strategy for Google:
router.use((req, _res, next) => {
  const {
    query: { host }
  } = req;if (!passport._strategy(Strategy.name) && host) {
    console.info(`Init Google Auth strategy on host ${host}`);
    passport.use(
      new Strategy(
        {
          clientID: process.env.GOOGLE_AUTH_CLIENT_ID,
          clientSecret: process.env.GOOGLE_AUTH_CLIENT_SECRET,
          callbackURL: `${host}/.netlify/functions/auth/google/callback`,
          passReqToCallback: true
        },
        async function(req, _token, _tokenSecret, profile, done) {
          console.info("load user profile", profile);
          const user = {
            id: profile.id,
            image: get("photos[0].value")(profile),
            userName: profile.displayName
          };
          req.user = user;
          return done(null, user);
        }
      )
    );
  }
  next();
});
router.get(
  "/google",
  passport.authenticate("google", {
    scope: [
      "[https://www.googleapis.com/auth/userinfo.profile](https://www.googleapis.com/auth/userinfo.profile)",
      "[https://www.googleapis.com/auth/userinfo.email](https://www.googleapis.com/auth/userinfo.email)"
    ]
  })
);
router.get(
  "/google/callback",
  passport.authenticate("google", { failureRedirect: "/" }),
  function callback(req, res) {
    console.info(`login user ${req.user && req.user.id} and redirect`);
    return req.login(req.user, async function callbackLogin(loginErr) {
      if (loginErr) {
        throw loginErr;
      }
      return res.redirect("/");
    });
Note: these settings are sensitive and private, and should not be commuted in git. You will also have to declare them in the netlify interface in the “Build & Deploy > Environment” section.
  }
);
As you can see, the host parameter is sent by the client, because within a lambda function, you can access the host or requested url.
8. Store the private keys in .env file:
GOOGLE_AUTH_CLIENT_ID=<youclientID>.apps.googleusercontent.com
GOOGLE_AUTH_CLIENT_SECRET=<youClientSecretKey>
SESSION_SECRET=<ARandomString>
Note 1: these settings are sensitive and private, and should not be commited in git. You will also have to declare them in the netlify interface in the “Build & Deploy > Environment” section.
Note 2: If you have public settings in your application, you can also declare them only once in
netlify.toml, in the “build.environment” section
And voila ! 🎉
Now, you just have to start your app locally with yarn dev
Deployment on Netlify
Really simple, 2 methods:
- deployment directly from the git repository. For more details, see the netlify documentation
- command line deployment, with:
netlify deploy
once deployed, configure the environment variables in the netlify interface, the same way you’ve done it in .env file:
- GOOGLE_AUTH_CLIENT_ID
- GOOGLE_AUTH_CLIENT_SECRET
- SECRET_SESSION
Conclusion
You can easily use express and PassportJS with Netlify, and it’s a bless 👼. It’s interesting for the following reasons:
- ExpressJS has a very rich ecosystem
- you have an existing project under express and want to make a smooth migration
- you know express well
However, there are some limitations to be taken into account. According to the documentation, all serverless functions are deployed with:
- us-east-1 AWS Lambda region
- 1024MB of memory
- 10 second execution limit
So if you start using express, try to keep your application small (if necessary, you can split it over several endpoints), use a database in the same region as your Netlify application (us-east-1), and no heavy operations that last long.
Finally…
A little self-promotion 😇 does not hurt: At FullStack Rocket, we have developed pre-packaged offers that can be deployed directly on Netlify, for a free hosting cost if you don’t have traffic. Ideal for startups who want to test their concept quickly ! You will earn time and money !
And Happy coding ! 😎


Top comments (0)