The prerequisite of this tut will be Java, some knowledge about Maven and Spring and how to use Spring Tool Suite 4 (or Eclipse).
We will create a REST API using Spring Boot. I will be using Spring Tool Suite 4 and JDK 1.8 for the project. The project can be generated from Spring Initializr website or directly from the STS4, both of which have been mentioned below. The project will use Maven for dependency management.
If you need a custom group name and artifact id go ahead and fill it but it is not mandatory. You can also use what I have used in the images.
For this project, we will only require the web dependency provided by the spring boot starter.
Spring Initializr

Search for the web dependency in the dependency search bar and select it as shown and then click on the Generate the project button. You will get a zip file which you need to extract and import into STS.
STS4
In STS create a Spring Starter Project and fill out the details as you like or you can use the details in the above picture.
Click on next and then search for the dependency named Spring Web, select it and click on finish.
Coding
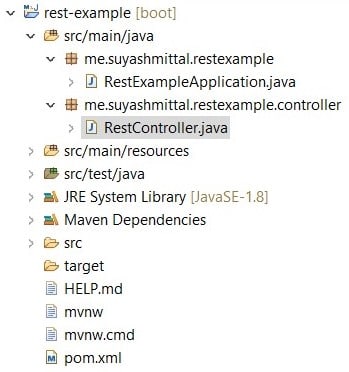
Now that you have everything set up create a package named controller under the base package that the starter gave you and then create a class name RestExampleController in that package. The project structure will look as shown below.
This is the only file that we need to create for handling our request. The final code for the controller class is given below.
package me.suyashmittal.restexample.controller;

import org.springframework.web.bind.annotation.GetMapping;
import org.springframework.web.bind.annotation.PostMapping;
import org.springframework.web.bind.annotation.RequestBody;
import org.springframework.web.bind.annotation.RequestMapping;
import org.springframework.web.bind.annotation.RequestMethod;
import org.springframework.web.bind.annotation.RequestParam;
import org.springframework.web.bind.annotation.RestController;

@RestController
public class RestExampleController {

    @RequestMapping("/")
    public String index(@RequestParam(value="name", defaultValue="anonymous") String name) {
        return "Hello " + name;
    }

    @RequestMapping(value = "/getRequest/{name}", method = RequestMethod.GET)
    public String getIndex(@PathVariable("name") String name) {
        return "Hello " + name;
    }

    @GetMapping("/get")
    public String getRequest() {
        return "Hello from /get";
    }

    @PostMapping("/post")
    public String postRequest(@RequestBody String name) {
        return "Hello " + name;
    }
}
Understanding
@RestController annotation is used to tell the framework that it should be included in the component scan and the return value of each mapping should be directly sent as the response.
@RequestMapping annotation is used to map the request to the mentioned endpoint for example here the endpoints are / and /getRequest. It handles all the types of request which is not ideal in all the scenarios therefore, we can specify the type of request using the method parameter as shown above the 2nd method.
@GetMapping and @PostMapping are special forms of @RequestMapping where the method is already specified which are GET and POST respectively. Spring Boot also provides similar annotations for other Http methods like PUT, DELETE, etc.
@RequestParam is used to fetch the parameters from the url, I have also specified a default value which is not mandatory. For example http://localhost:8080/?name=suyash will result in Hello suyash. You can also set the required parameter to make the param mandatory or vice versa.
@PathVariable is used to extract a part of the url. For example http://localhost:8080/getRequest/suyash will result in Hello suyash.
@RequestBody is used to fetch the body in case of POST and PUT request. By default, the value must be present in the body but it can be made optional using the required parameter. Complex objects can be consumed by building a class.
Running
You can run the project by right click on the project name and then run as the Spring Boot App. By default, the server will start on port 8080 and now you can experiment with the app using any REST client such as Postman.
TIP: You can change the port of the server by defining server.port=9000 (if you want to run on port 9000) property in the application.properties file present in the resources folder.
Note from author
This is my first article, any suggestion, recommendation or correction is heartily welcomed.
If you have any doubts you can comment below, I will try my best to resolve them.


Top comments (0)