What is Aapche Camel?
Camel is an Open Source integration framework that empowers you to quickly and easily integrate various systems consuming or producing data.
In this article, we are going to read data from IbmMq(producer) and send it to rabbitMq (consumer). I am going to run RabbitMq and IbmMq locally using Docker desktop. I will also share the docker command as well to run RabbitMq and IbmMq containers.
Pre-requisites:
- JDK — 17+
- Docker Desktop
Let’s start by executing the docker command assuming you have a docker desktop running on your local machine.
IbmMq
docker command
docker run - env LICENSE=accept - env MQ_QMGR_NAME=QM1 - publish 1414:1414 - publish 9443:9443 - detach ibmcom/mq
Console url : https://localhost:9443/ibmmq/console
UserId/Password : admin/passw0rd
RabbitMq docker command
docker run -it -p 5672:5672 --hostname my-rabbit --name some-rabbit rabbitmq:3
Console Url : http://localhost:15672
UserId/Password : guest/guest
Spring Boot Application
Let’s create a Spring Boot Application
You can create Spring Boot Application from spring initializr.
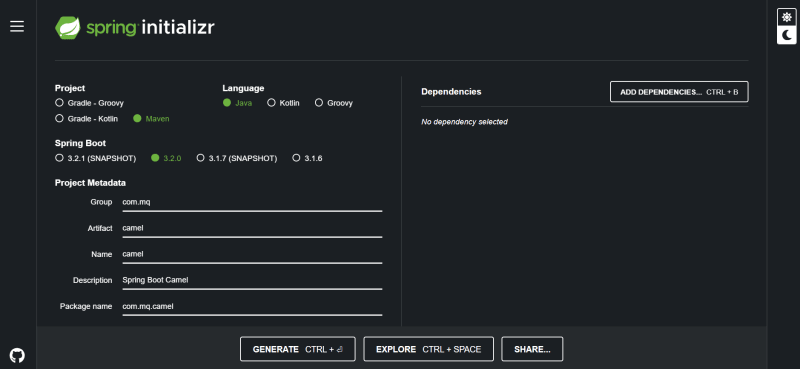
Make sure you select maven, Spring Boot version 3.2.0 and click on Generate.
Once the project is downloaded you can open the project in any IDE of your choice. In my case, I am using Intellij.
Up until now, we have not added any dependency in pom.xml.
Let’s start by adding spring boot dependency in the dependencies section in pom.xml.
        <dependency>
            <groupId>org.springframework.boot</groupId>
            <artifactId>spring-boot-starter</artifactId>
        </dependency>
        <dependency>
            <groupId>org.springframework.boot</groupId>
            <artifactId>spring-boot-starter-web</artifactId>
            <version>3.2.0</version>
        </dependency>
Apache Camel Dependency
         <dependency>
            <groupId>org.apache.camel.springboot</groupId>
            <artifactId>camel-spring-boot-starter</artifactId>
            <version>4.2.0</version>
        </dependency>
        <dependency>
            <groupId>org.springframework.boot</groupId>
            <artifactId>spring-boot-starter-integration</artifactId>
            <version>3.1.3</version>
        </dependency>
RabbitMq Dependency
        <dependency>
            <groupId>org.apache.camel.springboot</groupId>
            <artifactId>camel-spring-rabbitmq-starter</artifactId>
            <version>4.2.0</version>
        </dependency>
IbmMq Dependency
        <dependency>
            <groupId>com.ibm.mq</groupId>
            <artifactId>mq-jms-spring-boot-starter</artifactId>
            <version>3.1.5</version>
        </dependency>
        <dependency>
            <groupId>org.apache.camel</groupId>
            <artifactId>camel-jms</artifactId>
            <version>4.2.0</version>
        </dependency>
All the required dependencies added, let’s add rabbitmq and ibmmq configuration in the application.properties file.
camel.springboot.main-run-controller=true
camel.springboot.name = MyCamel
# RabbitMQ Configuration
spring.rabbitmq.host=localhost
spring.rabbitmq.port=5672
spring.rabbitmq.username=guest
spring.rabbitmq.password=guest
spring.rabbitmq.template.exchange=myqueue
spring.rabbitmq.template.routing-key=mykey

# IBM-MQ Configuration
ibm.mq.queueManager=QM1
ibm.mq.channel=DEV.ADMIN.SVRCONN
ibm.mq.connName=localhost(1414)
ibm.mq.queue=DEV.QUEUE.1
ibm.mq.user=admin
ibm.mq.password=passw0rd
Almost at the last step, create a class which extends RouterBuilder. Override method configure and add routes.
import org.apache.camel.builder.RouteBuilder;
import org.springframework.stereotype.Component;

@Component
public class RouteService extends RouteBuilder {
    @Override
    public void configure() throws Exception {

        // first route
        from("timer:mytimer?period=5000")
                .transform(simple("Random number ${random(0,100)}"))
                .to("jms:DEV.QUEUE.1");

        // second route
        from("jms:queue:DEV.QUEUE.1")
                .log("Message Posted in RabbitMq")
                .to("spring-rabbitmq:librayQueue.exchange?queues=librayQueue");

        // third route
        from("spring-rabbitmq:librayQueue.exchange?queues=librayQueue")
                .log("Data from rabbitmq: ${body}");
    }
}
In the above code, we have added the first route which triggers every 5 seconds and generates a random number between 0 to 100 and inserts that data in IBM MQ.
In the second route, we are reading data from ibmmq which was pushed in route1 and adding that data as it is in rabbitmq.
To verify if data was being posted successfully in rabbitmq we have introduced a third route, which reads data from rabbitmq and logs it.
You can also verify by logging into the rabbitmq console.
Validate:
Run spring boot application using IDE or using maven command mvn spring-boot:run and monitor logs.
repo link: https://gitlab.com/taskar.sushil/apache-camel
Thank you for your attention! Happy Learning!

Top comments (0)