
I recently wanted to connect a new laptop to one of the Azure virtual machines that I use for remote development. I realized this isn't something easy to do within the azure portal and I have limited knowledge in Linux (ubuntu) and SSL. So after I accomplished this I decided to share what I learned.
This blog post isn't just to learn how to connect a local machine to a VM. It will also give you a basic understanding of how to set up an SSH connection
Content:
- What i am using
- 1. Create new VM (Optional)
- 2. Create new ssh keys on new local machine
- 3. Add your public key to your Azure VM
- 4. Get ready for SSH connection
- 5. Actually do the SSH connection
What I am using
- Azure VM (Ubuntu Release 18.XX / bionic)
- Azure cli
- VS code Remote Development extention pack
- Windows 10 local machine
1. Create a new VM (Optional)
If you already have a VM you wish to do this on then you can skip this step.
Create a Linux VM in azure. Choose whichever size you need and in this article, I used Ubuntu Release 18.
// TODO az create VM code with ssh keys. what user does it create?
set a user varable to make it easier later $user = "%myuser%"
// TODO remember the user you created for this VM
2. Create new ssh keys on the new local machine
On windows I used this command
ssh-keygen -t rsaI add the path where to store the keys. i used
C:\Users\UserName\.ssh\my-vs-code-vm-
I then add in my passphrase (this is optional but adds security. If you choose to use it REMEMBER THE PASSPHRASE)
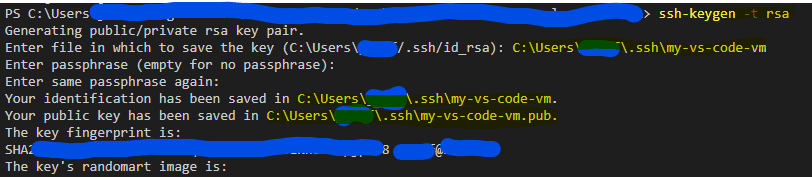
Great now we have our keys.
NOTE: SSH understanding
my-vs-code-vm
- Your new private key
- This stays on your machine and you need to keep it safe
my-vs-code-vm.pub
- Your new public key
- This is going onto your VM so your private key has something to unlock... like the ssh connection we want to establish
3. Add your public key to your Azure VM
Here we will be using the azure cli to add our new public key remotely execute commands remotely on our virtual machine.
Specifically, we will be using the az vm run-command.
- Make sure you logged in
az login. - Make sure you have the right Subscription active.
az account showchange withaz account set -s //*correct subscription guid*// - Get our public key and put it into a variable
$publickey = cat ~/.ssh/my-vs-code-vm.pub
Integrity check!
make sure your $publickey value looks like this:

- now that we have our public key ready let's send it off to our VM.
We need to store our public key in the
authorized_keysfile for the user we will connect to.
az vm run-command invoke --name my-vs-code-vm --resource-group my-dev-vm-rg --command-id RunShellScript --scripts "echo '$publickey' >> /home/$user/.ssh/authorized_keys"
4. Get ready for SSH connection
- We will need the
sshcommand to make the connection to the VM. The easiest way I generate it is from the Azure portal. all you need to do is add you Private Key Path in the Azure UI:
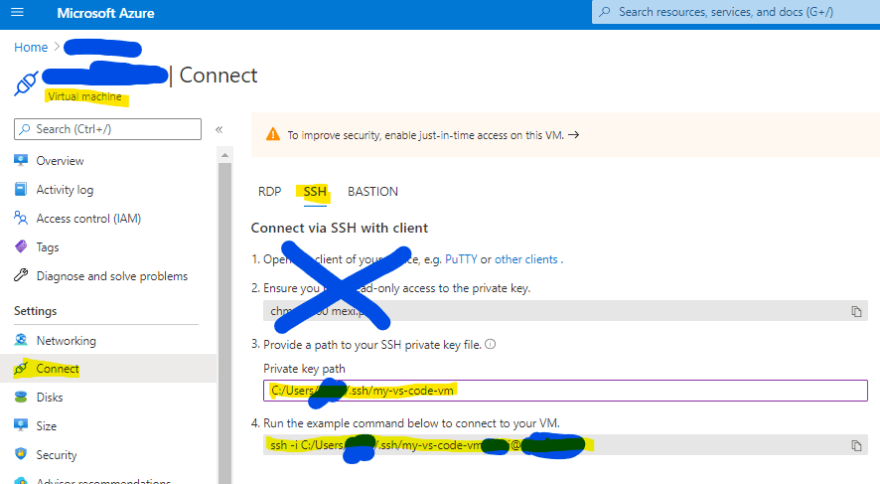
-
Copy the command from 4. Run the example command below to connect to your VM.
- NOTE: you have what you need to just ssh with your local terminal right now but let's keep going.
Now in VS Code open the Command Palette (
Ctrl+Shift+P).Select
Remote-SSH: Add New SSH Host...and paste thesshcommand we got from azure (if you don't see it you need to make sure you have the extension installed/enabled) // TODO make sure the remote extension is linkedNext you will be prompted to `Select SSH configuration file to update'. I use the first option that will store it under my local user

- You will see this pop-up. Select
Open Configand change theHostfrom the ip address to a friendly name likemy-vs-code-vm. I highly recommend doing this!

Config file before:

Config file after:

5. Actually do the SSH connection
Open the VS Code Command Palette again (
Ctrl+Shift+P).Select
Remote-SSH: Connect to Host...this time and select our configmy-vs-code-vmand the rest should be straight forward.

Top comments (0)