
There are two ways how to access the Instagram API:
- Through Instagram’s Basic Display API
- Through Instagram Graph API
Instagram Basic Display API is limited to read-only access to a user’s profile and isn’t intended for user authentication. It’s useful, for example, to get up-to-date information about the user’s profile or display their recent posts. It also works with any Instagram account type: personal and professional.
On the other hand, Instagram Graph API allows you to publish posts, moderate comments, search hashtags, and access insights. However, the Graph API can be used only by “professional” accounts which have been paired with a Facebook page. The authentication flow is handled through Facebook Login, and the user can pick which Facebook pages and Instagram accounts are available to the application.
This article is part of a series about Instagram Graph API. Previously, I covered test account and app setup and finding the correct Instagram account ID. In this part, I will show you how to implement the authentication flow for Instagram Graph API with Facebook Login. I will use Node.js, Express, and Passport with the passport-facebook strategy, but the basic ideas are applicable to any language and framework.
Facebook Login Setup
This tutorial assumes you have a Facebook application set up, and an Instagram business account paired with a Facebook page for testing. If not, check my previous tutorial.
We will need to set up Facebook Login for our testing application.
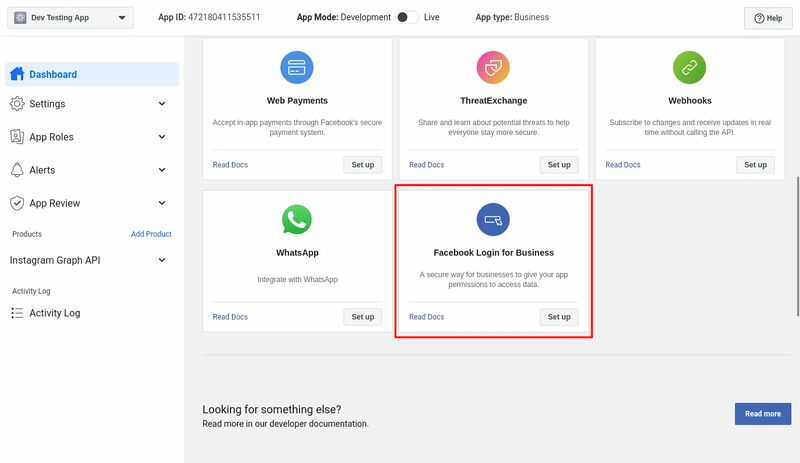
Find your application on the Facebook Developer Portal, and on the Dashboard, set up Facebook Login for Business. If you didn’t select a “Business app type” when creating the application, you may see Facebook Login instead, so choose that – both options will work.
Under Facebook Login Settings, make sure to enable both Client OAuth login and Web OAuth login.

This screen is also where you can add allowed redirect URIs for deployed application. We will run the application only locally, and Facebook allows localhost URLs by default, so there’s no need to add any URL.
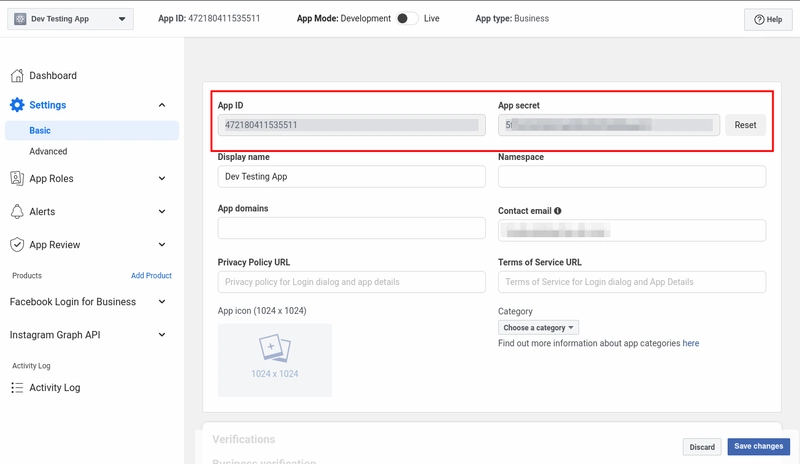
Finally, visit application Settings > Basic, and copy the App ID and App Secret. We will need them for the Passport strategy.
Instagram Graph API authentication flow with Passport
With Facebook Login now set up, we can build an authentication flow. I will use the following npm packages:
- express server
- express-session to handle user data persistence
- passport for authentication
- passport-facebook for handling Facebook Login flow
-
dotenv to read secrets from
.envfile - @superfaceai/one-sdk to get the list of accessible Instagram profiles
Let’s set up the project and install the dependencies:
mkdir instagram-facebook-login-passport
cd instagram-facebook-login-passport
npm install express express-session passport passport-facebook dotenv @superfaceai/one-sdk
Now create a .env file, and paste in the App ID and App Secret values you obtained in Facebook app settings:
BASE_URL=http://localhost:3000
FACEBOOK_CLIENT_ID="App ID from Settings"
FACEBOOK_CLIENT_SECRET="App Secret from Settings"
I have also prepared the BASE_URL variable, since we will be passing the callback URL during the authentication process. Keeping this value configurable makes it easier to take your app to production.
And now, let's create a server.js file with the following content:
const express = require('express');
const session = require('express-session');
const passport = require('passport');
const { Strategy } = require('passport-facebook');
const { SuperfaceClient } = require('@superfaceai/one-sdk');

require('dotenv').config();

const sdk = new SuperfaceClient();

// <1> Serialization and deserialization
passport.serializeUser(function (user, done) {
  done(null, user);
});
passport.deserializeUser(function (obj, done) {
  done(null, obj);
});

// Use the Facebook strategy within Passport
passport.use(
  // <2> Strategy initialization
  new Strategy(
    {
      clientID: process.env.FACEBOOK_CLIENT_ID,
      clientSecret: process.env.FACEBOOK_CLIENT_SECRET,
      callbackURL: `${process.env.BASE_URL}/auth/facebook/callback`,
    },
    // <3> Verify callback
    (accessToken, refreshToken, profile, done) => {
      console.log('Success!', { accessToken, profile });
      return done(null, { profile, accessToken });
    }
  )
);

const app = express();

// <4> Session middleware initialization
app.use(
  session({ secret: 'keyboard cat', resave: false, saveUninitialized: true })
);
app.use(passport.initialize());

// <5> Start authentication flow
app.get(
  '/auth/facebook',
  passport.authenticate('facebook', {
    // <6> Scopes
    scope: ['pages_show_list', 'instagram_basic', 'instagram_content_publish'],
  })
);

// <7> Callback handler
app.get(
  '/auth/facebook/callback',
  passport.authenticate('facebook'),
  async function (req, res, next) {
    try {
      // <8> Obtaining profiles
      const accessToken = req.user.accessToken;
      const sdkProfile = await sdk.getProfile(
        'social-media/publishing-profiles@1.0.1'
      );
      const result = await sdkProfile
        .getUseCase('GetProfilesForPublishing')
        .perform(
          {},
          {
            provider: 'instagram',
            parameters: {
              accessToken,
            },
          }
        );
      const profiles = result.unwrap();

      res.send(
        `
        <h1>Authentication succeeded</h1>
        <h2>User data</h2>
        <pre>${JSON.stringify(req.user, undefined, 2)}</pre>
        <h2>Instagram profiles</h2>
        <pre>${JSON.stringify(profiles, undefined, 2)}</pre>
        `
      );
      next();
    } catch (err) {
      next(err);
    }
  }
);

app.listen(3000, () => {
  console.log(`Listening on ${process.env.BASE_URL}`);
});
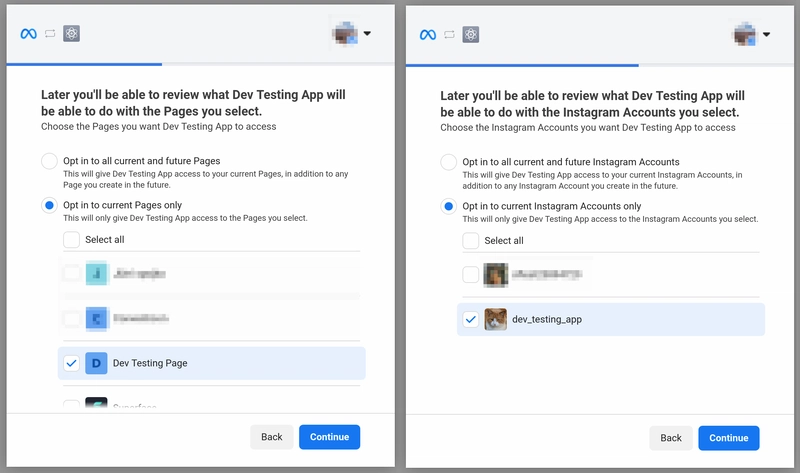
Run the server with npm start and visit http://localhost:3000/auth/facebook. You will be redirected to the Facebook login, where you select the Facebook pages and Instagram profiles the application can have access to. Make sure to select the correct Facebook page with the associated Instagram profile. Otherwise, you won’t be able to access that profile.
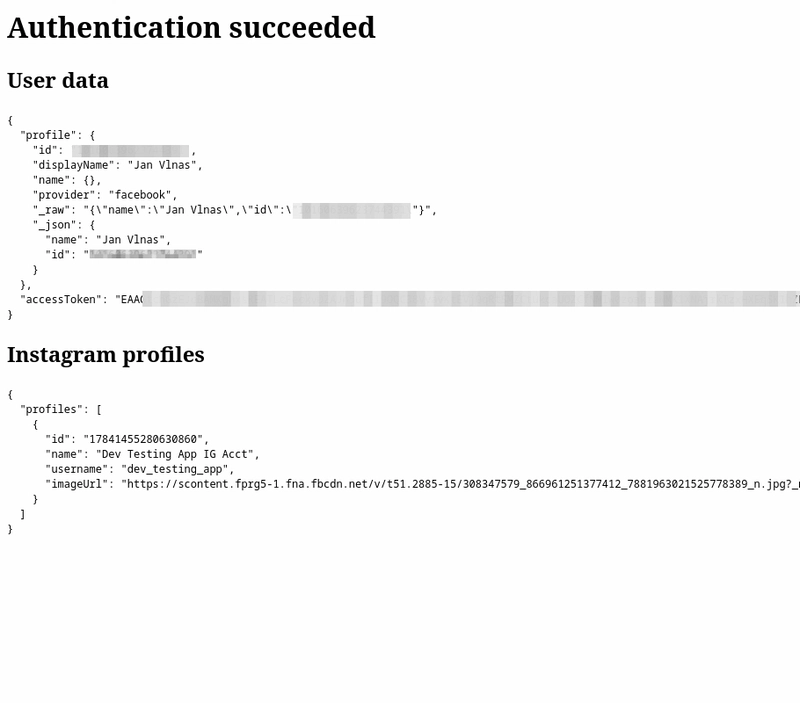
After passing the flow, you should see the basic data about your profile and a list of Instagram profiles you have access to.
Explaining the example code
If you read my tutorial on Twitter OAuth 2.0 authentication, the example will seem very familiar. The most significant difference is the handling of access tokens and additional logic for obtaining Instagram profiles.
I will explain the example in individual parts:
User serialization and deserialization
// <1> Serialization and deserialization
passport.serializeUser(function (user, done) {
  done(null, user);
});
passport.deserializeUser(function (obj, done) {
  done(null, obj);
});
These functions serialize and deserialize the user to and from a session. In our example application, we keep all sessions in memory with no permanent storage, so we just pass the whole user object.
Typically, you will persist the data in a database. In that case, you will store the user ID in the session, and upon deserialization, find the user in your database using the serialized ID, for example:
passport.serializeUser(function (user, done) {
  done(null, user.id);
});
passport.deserializeUser(function (id, done) {
  User.findOrCreate(id).then(user => done(null, user));
});
The deserialized user object is then accessible through the req.user property in middleware functions. You can find more in the Passport documentation on sessions.
Strategy initialization
// Use the Facebook strategy within Passport
passport.use(
  // <2> Strategy initialization
  new Strategy(
    {
      clientID: process.env.FACEBOOK_CLIENT_ID,
      clientSecret: process.env.FACEBOOK_CLIENT_SECRET,
      callbackURL: `${process.env.BASE_URL}/auth/facebook/callback`,
    }
    // ...
  )
);
This code registers the passport-facebook strategy with credentials obtained from the application settings. The callback URL must be absolute, and registered as a valid OAuth redirect URL (except for localhost).
Success callback
passport.use
  new Strategy(
    // ...
        ,
    // <3> Verify callback
    (accessToken, refreshToken, profile, done) => {
      console.log('Success!', { accessToken, profile });
      return done(null, { profile, accessToken });
    }
  )
);
The second argument to the strategy constructor is a verify function, which is called at the end of the successful authorization flow. The user has authorized your application, and you will receive their access token and basic information about their profile (in this case just the ID and full name of the user). Facebook API doesn’t provide refreshToken (you can, instead, turn the access token into a long-lived token), therefore that value will be always empty.
Here, you might want to update or create the user in your database and store the access token, so that you can access the API on behalf of the user. The done callback should receive a user object, which is later available through req.user. To keep things simple, I only passed the access token along with the profile data.
Passport and Session middlewares initialization
// <4> Session middleware initialization
app.use(
  session({ secret: 'keyboard cat', resave: false, saveUninitialized: true })
);
app.use(passport.initialize());
Passport needs to be initialized as middleware as well. And it requires a session middleware for storing state and user data. The most common session middleware is express-session.
By default, express-session stores all data in memory, which is good for testing, but not intended for production: if your server gets restarted, all users will be logged out. There is a wide selection of compatible session stores – pick one which fits with the rest of your stack.
Before you put this code into production, make sure to change the value of secret. This value is used to sign the session cookie. Keeping it easily guessable increases the risk of session hijacking. Check the express-session docs.
Start the authentication flow
Now we are getting to the actual route handlers where the authentication happens.
// <5> Start authentication flow
app.get(
  '/auth/facebook',
  passport.authenticate('facebook', {
    // <6> Scopes
    scope: ['pages_show_list', 'instagram_basic', 'instagram_content_publish'],
  })
);
passport.authenticate creates a middleware for the given strategy. It redirects the user to Facebook with URL parameters, so that Facebook knows what application is the user authorizing and where the user should be then redirected back. The authenticate function accepts a second parameter with additional options, where the most important is scopes.
Authorization scopes (permissions)
passport.authenticate('facebook', {
  // <6> Scopes
  scope: ['pages_show_list', 'instagram_basic', 'instagram_content_publish'],
});
OAuth scopes define what the application is allowed to do on behalf of the user (Facebook calls them “permissions”). The user can then review and approve these permissions.
In this case, we request the following permissions:
-
pages_show_listto list Facebook pages the user manages and allowed for our app -
instagram_basicto read basic information about an Instagram profile -
instagram_content_publishto allow publishing content; this is not needed now, but may be useful in the next tutorial.
You can find additional possible permissions in the Permissions Reference. Keep in mind that if you’d like your application to be publicly accessible, you will have to submit it for an app review, and explain how permissions are used.
Callback handler
// <7> Callback handler
app.get(
  '/auth/facebook/callback',
  passport.authenticate('facebook'),
  async function (req, res, next) {
    // ...
  }
);
This is the final step in the authentication flow. After the user authorized your application, they are redirected to the /auth/twitter/callback route. The passport.authenticate middleware is here again, but this time it checks the query parameters Facebook provided on redirect, and obtains access and refresh tokens.
If the authentication succeeds, the next middleware function is called – typically you will display some success message to the user, or redirect them back to your application. Since the authentication passed, you can now find the user data in the req.user property.
Obtaining Instagram profiles
async function (req, res, next) {
  try {
    // <8> Obtaining profiles
    const accessToken = req.user.accessToken;
    const sdkProfile = await sdk.getProfile(
      'social-media/publishing-profiles@1.0.1'
    );
    const result = await sdkProfile
      .getUseCase('GetProfilesForPublishing')
      .perform(
        {},
        {
          provider: 'instagram',
          parameters: {
            accessToken,
          },
        }
      );
    const profiles = result.unwrap();

    res.send(
      `
      <h1>Authentication succeeded</h1>
      <h2>User data</h2>
      <pre>${JSON.stringify(req.user, undefined, 2)}</pre>
      <h2>Instagram profiles</h2>
      <pre>${JSON.stringify(profiles, undefined, 2)}</pre>
      `
    );
    next();
  } catch (err) {
    next(err);
  }
}
The route handler uses Superface OneSDK to fetch basic data about Instagram profiles we have access to. I use GetProfilesForPublishing for that, which also works with Facebook, LinkedIn, Pinterest, and Twitter. The logic is the same as in the previous Find the right account ID tutorial, except we are passing the access token stored in session from req.user.accessToken (see the code for the Success callback).
Next steps
One issue with the example code is that both the user data and the access token are stored in memory. The user needs to go through the authentication flow every time the server is restarted. For a real-world use, you will need to persist the data using, for example, a configuration file or a database.
In future tutorials, I will look at publishing of images and videos, searching hashtags, and retrieving posts and comments. If you don’t want to miss them, subscribe to our newsletter and follow our blog 👇

Did you run into any problems? I will be happy to help you on our Discord!

Oldest comments (1)
@jnv do you have guide for login graph api explorer using instagram business account? I just want to get the insight/metrics data from the API
Some comments may only be visible to logged-in visitors. Sign in to view all comments. Some comments have been hidden by the post's author - find out more