
github: https://github.com/Sun-June/cosmos-surge
Cosmos Surge is a client tool for Azure Cosmos DB data layer.
Its main purpose is to help developers or data maintenance personnel manage and operate data more conveniently.

How to Use
Option 1: Download the Client:
- Download the client from the provided link.
- Install the client on your system.
- Launch the application and start using it.
Option 2: Run Using Docker:
- Make sure Docker is installed on your system.
- Pull the Cosmos Surge Tool image from Docker Hub.
docker pull sunjune/cosmos-surge:latest
- Run the tool within a Docker container.
docker run --name cosmos-surge -d -p 1212:9999 sunjune/cosmos-surge
- Finally, open your web browser.
Operating Instructions
- First, click on
AddorCreate Linkto add a database link.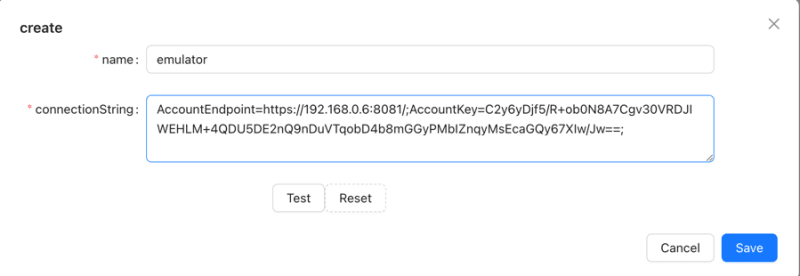
-
nameis the custom name for this link. -
connectionStringis the connection string for your cosmosdb, and the example here is for the local emulator. - You can click
testto verify if the link is valid. - If everything is correct, click
Saveto add it.
- After adding successfully, a menu item will appear on the left, and hovering over it will reveal the following three-level menu:
-

-
TestData2,TestData,BFcorrespond to thedatabase idin cosmos. -
Data1,Data2,Data3underTestDataare thecontainer idin cosmos. -
REFRESHis for refreshing the current menu item. -
EDITis for re-editing the link. -
DELETEis for removing the current link.
-
- Clicking on the third-level menu
Data1will show the following operation interface:
- The tabs in the main interface are the operation panels for the current
container(multiple can be opened at the same time). - The list displays the
partitionclassifications in the current database. You can quickly query by selecting (multi-selectable), and the query results are paginated.
- After clicking the query, the result will be displayed as follows:
-

- In the interface, the upper part is the selected
partitionand related operation buttons. - The middle part is the corresponding query SQL and pagination information.
- The SQL can be edited, and after editing, you can click
queryto execute the query. - The lower part displays the main query content for viewing, modification, and deletion.
-
- After modifying the data, you can click
Update itemsto update: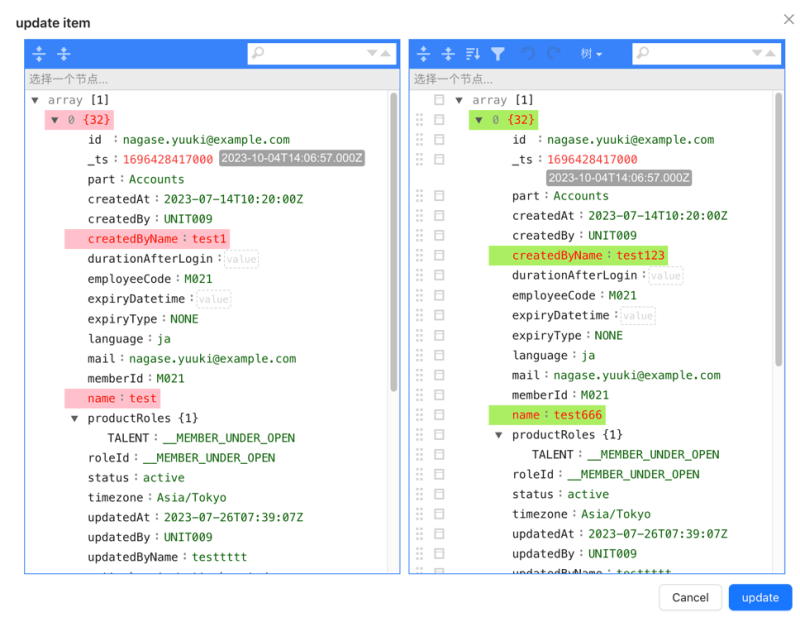
- The update operation, as shown in the figure, will display the comparison of the data to be changed this time.
- After confirming, click
updateto perform the update operation.
- You can also perform deletion operations. After deleting the data, click
Delete itemsto delete:
- The displayed data will be deleted. After confirming, click
deleteto confirm the deletion.
-
Functionsbutton group:-
addallows you to add new data. -
historyallows you to view the operation records. 
- The tabs are types of operations.
- The current page is the update log just performed, and clicking
update details...will show the data at that time. -
exportbutton allows you to import the current query result data into anothercontainer 
-
toIdis the targetcontaineryou selected. -
Handling duplicate datais the way to handle identical data (i.e., data with the same id and partition).-
upsertis for forceful update. -
skipis for skipping without processing.
-
- After confirming, click
Doto start. - The execution interface is as follows:

- The execution interface can be closed.
- It contains various progress information and corresponding SQL statement information.
- There are pause and cancel buttons in the upper right corner.
-
Local Development or Packaging
Local Development
- Start by cloning the project for the view layer as well from this address:cosmos-surge-view .
- First, run the command
npm install. - Then, execute
npm run dev.
- First, run the command
- Clone the current project as well.
- First, run the command
npm install. - Then, execute
npm run start.
- First, run the command
- At this point, you will see Electron starting, and you can proceed with debugging and development.
Local Packaging
- Begin by cloning the project for the view layer as well from this address:cosmos-surge-view .
- First, run the command
npm install. - Then, execute
npm run build. - Prepare the files from the
distdirectory for use in the next steps.
- First, run the command
- Also, clone the current project.
- First, run the command
npm install. - Then, copy the contents of the
distdirectory prepared earlier into thestaticdirectory of the current project. - If the
staticdirectory does not exist, you will need to create it yourself. - Finally, execute the appropriate command based on your platform:
- For Mac:
npm run package:mac. - For Windows:
npm run package:win.
- First, run the command


Top comments (0)