
TLDR
Prior to delving straight into the creation of Python packages, let's first grasp the concept of Modular programming.

Modular programming refers to the process of breaking a large, unwieldy programming task into separate, smaller, more manageable subtasks or modules. Individual modules can then be cobbled together like building blocks to create a larger application.
So, what are the example for modular programing in python?
Functions, modules and packages are all constructs in Python that promote code modularization.
NICE!!
You may already know what is a function in python, but did you get confused thinking what is the difference between module and package in python?
Suppose you have developed a very large application that includes many modules. As the number of modules grows, it becomes difficult to keep track of them all if they are dumped into one location. This is particularly so if they have similar names or functionality. You might wish for a means of grouping and organizing them.
In this case Packages allow for a hierarchical structuring of the module namespace using dot notation.
OK, that great! Let's think we have some modules available; Now let's see how we can create a package out of it!
Python packages are created using python packaging tools like setuptools, Flit, PDM, Poetry etc..

Python setuptools is a widely used tool for packaging Python projects. Today our plan is to create package using setuptools.
Step 1 : Setup your environment
- Upgrade pip tool
python -m pip install --upgrade pip
- Upgrade Build
python -m pip install --upgrade build
This installs following packages in your machine build-0.10.0, packaging-23.1, pyproject_hooks-1.0.0, tomli-2.0.1
Build package is used to build the python package
- Install setuptools
pip install setuptools
you can read about setuptools in the link https://pypi.org/project/setuptools/
- Install twine tool
pip install twine
Step 2 : Create folder structure as shown below

Here I created a master folder call sunish_package under it another folder level src/sunish_package and test
Also you can I created files called LICENSE, ReadME and pyproject.toml
Step 3: Add modules
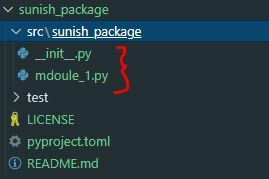
Under the folder src/sunish_package i created two files with name init.py and mdoule_1.py
- init.py is the Package Initialization script, it can be empty
- module_1.py is our module with test code
def test_function():
    print("Hello World")
Step 4: Update pyproject.toml file
In older version of setuptool the user need to create setup.py script in the root location of the package which contains all the configuration for the package, but starting from setuptools version 58.0.0, it introduced support for reading package metadata and build configurations from the pyproject.toml file.
[build-system]
requires = ["setuptools>=61.0"]
build-backend = "setuptools.build_meta"

[project]
name = "sunish_package"
version = "0.0.1"
authors = [
  { name="Example Author", email="author@example.com" },
]
description = "A small example package"
readme = "README.md"
requires-python = ">=3.7"
classifiers = [
    "Programming Language :: Python :: 3",
    "License :: OSI Approved :: MIT License",
    "Operating System :: OS Independent",
]

[project.urls]
"Homepage" = "https://github.com/pypa/sampleproject"
"Bug Tracker" = "https://github.com/pypa/sampleproject/issues"
The important thing to note here is the name of the package, it should be pointing to the same folder name under src. Also you can see under [build-system] title I have filled requires section as setuptools. This indicate the python package need to be build using the setuptools.
Step 5: Update LICESNSE and ReadME.md
ReadME.md
# About Package

This is an example package
LICESNSE
Copyright (c) 2023 Sunish.
I prefer you to use correct License and update ReadME with your package information. Since I am creating a test package, here I am filling it with basic information.
Step 6 : Create Python Package
Go to your root folder and run the below command.
python -m build .

This created two folders called dist and sunish_package.egg-info

Whl file is the file we want, the python packages are packaged in the forrmat called wheels (.whl)

Step 7 : Import and test
Go the dist folder and install the package using pip
pip install .\sunish_package-0.0.1-py3-none-any.whl
you can check the package is listing in the pipe list with below command
pip list -v
Now open a python console and import our new package
from sunish_package import module_1
module_1.test_function()

SUCCESS!! it prints "hello world" as expected.
Step 8 : Push the package to internal artifactory python repository
In order to push the package to our internal artifactory we make use of the tool Twine.
Create the .pypirc file in the dist folder and update the artifactory url , username and password
[distutils]

index-servers = local

[local]

repository: http://localhost:8081/artifactory/api/pypi/pypi

username: <user_name>

password: <password>
Then run the below command to push the package to the artifactory repo
twine upload -r local <PATH_TO_THE_FILES> --config-file ~/.pypirc

Top comments (0)