
Intro
Informative-engaging content is always the No#1 way to ensure that you consistently pull in organic traffic to your website. If you are using a Webflow CMS, and are looking to keep your site updated with a regular batch of informative content, one popular approach is to explore a HTTP RESTful service that keeps updating information at scheduled intervals.
While Webflow offers a great platform to build your site easily in minutes, keeping it updated regularly is a challenge often faced by site owners. To help with this, Byteline offers a No-Code Upsert (Update and Insert) service which you may use to pull data from an external source, and then feed it into your Webflow CMS. It intelligently figures out whether to update or insert a record without requiring any user input. For items requiring an update, it automatically figures out the Item ID. Compare this to a complicated no-code logic required in other no-code platforms to figure out the right Item ID to update. All this, without writing a single line of code!
This article will show you how to use Byteline to insert or update data to your Webflow site in a few simple steps.
Using Byteline for updating Webflow CMS
While you can add and update items to your Webflow site manually, this process is often very tedious and can only apply to use-cases where the volume of data is small. To help with this, Byteline offers a Webflow - Upsert CMS Items service through its platform that lets you update data into a Webflow CMS without any coding knowledge. Byteline gives you a straightforward User Interface that helps you create a direct feed to your Webflow CMS. There are several advantages that come with using the Byteline service, and these include:
- Connect to your Webflow account using OAuth integration, which is intuitively done through the Byteline Console.
- Easily insert the any flow data into your Webflow CMS site.
- No need to write any piece of code whatsoever
- Comes with an easy to use intuitive Graphical User Interface
- Integrates quickly with different components of an automation flow
How to Use Byteline to Update your Webflow CMS
If you are looking to add or update items onto your Webflow CMS, Byteline offers a simple service called Webflow - Upsert CMS Items -- to achieve that you don't need to code or implement logic to figure out which Item ID to update. Byteline figures that all out, so that a user has to do minimal work.
Through its Flow Designer, Byteline allows you to use the Upsert service to implement any logic to manage and update Webflow CMS Items. Like other Byteline flows, this flow can be invoked from a Form Submission, HTTP API call, or Byteline Scheduler. To know more about these services, you may visit the list of Byteline Integrations.
Below is an example flow to add or update Webflow CMS items to manage weather by ZIP codes.

The above flow covers the following:
- The user submits a form on the Webflow Website by entering ZIP code and City.
- The weather information is then retrieved from a third-party website through Byteline’s Simple HTTP service, a feature designed to execute HTTP RESTful calls.
- Byteline then uses the Webflow- Upsert Items service to insert or update items through an easy configuration. To know more, you can check this flow on the Byteline Console (no login required).
Let us understand this process practically and take a look at a reference use case.
Use Case
Weather Updates
For this sample project, a user enters his ZIP Code into a form on the Byteline interface. Byteline then returns the user’s location based on the given ZIP code, and upon user’s confirmation, extracts data from the Visual Crossing (or any URL as per the user’s choice) through its Simple HTTP task. This information can then be inserted or updated to records on Webflow CMS. To create this project, follow the steps outlined below:
- Create a Form in Webflow that will prompt the user for their ZIP Code. This form accepts Zip Code and should return the Location (City and State) to which the ZIP code belongs. The user’s confirmation should be accepted through a Submit button.
- On Webflow, create a collection with the following data fields: ZIP Code, Highs, Lows, Weather Patterns, and Time of Update.
- To turn the form data into this collection, click on Create Live Item. This way, you can point the data obtained by Byteline to your Webflow CMS.
The following steps will configure Byteline to source weather data from the Visual Crossing Service (www.visualcrossing.com) and Upsert (Update and/or Insert) the pulled data on Webflow.
Log in to your Byteline account. If you don’t have one already, then register for a free-tier service here.
Once you are on the Byteline Flow Designer page, click on Add Flow.

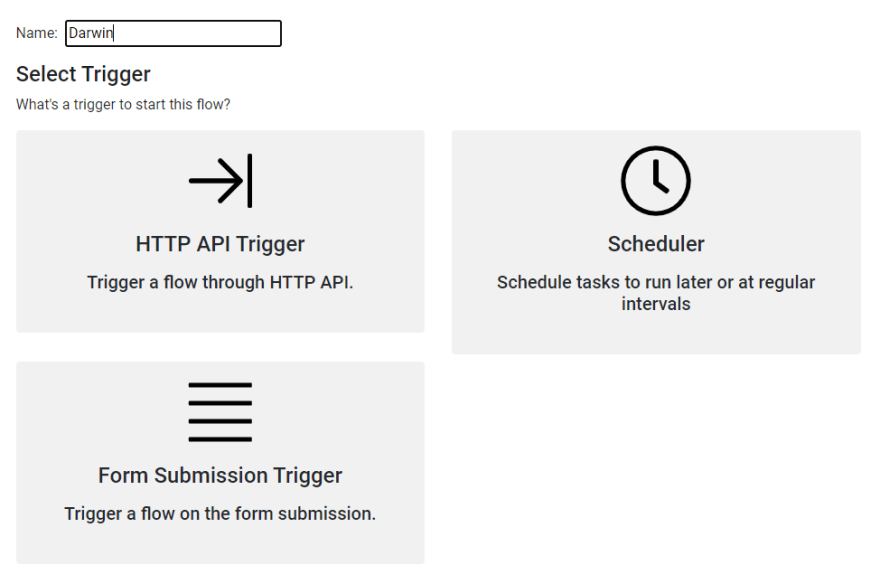
On the Designer Flow section, give the flow a name of your choice (in our case it's named Darwin) and select Form Submission Trigger. You may also choose Scheduler in case you want the flow to run at specific schedules.
Once done, click the edit button of the newly created Form Submission Trigger widget. As shown in the image below, you may set a Redirect URL. Once the form submission is complete, the user will be redirected to this URL.
Also, note the Byteline API URL which you would require later. Click on Save.

To set up the next part of the flow, click on the + button of the Form Submission Trigger widget. This will open a new window where you can choose the Node where you would like to add the scraped data. For this use case, we would select the Simple HTTP Node that will make an outgoing call to write data on the destination Webflow CMS.

Once the Simple HTTP widget is created, click on its Edit button to configure the Node. As shown in the image below, enter the Get URL - this is the source URL from which the data is to be scrapped. In this example, we shall use https://weather.visualcrossing.com. (Please note that this URL is for reference only, and the user can use any site’s URL as per his choice).
Quick Tip: Make sure you point to the exact API endpoint containing the data that you want to extract. Click on Save to continue.

Once you are back on the Flow Designer, click on Deploy. Once deployed, click on the run button on the top right to execute the flow.

This opens a new widget where you can enter the Pin Code and City values, and then click on Run.

Once done, the following page confirms the status of the Flow Run. Please ensure to validate the URL and other details correctly in case the status of Flow Run shows as Failed.

Once the above is flow shows a Success, return back to the Flow Designer and click on the + button of the Simple HTTP Trigger widget to add a new node. We would select the Webflow - Upsert Items as the last node to which the data is to be updated.

Click on the edit button of the Webflow - Upsert Items widget to configure. Note that for this step you would require to sign in to your Webflow CMS. This will essentially authorize the Byteline flow to upsert data into your Webflow CMS. Once you click on Authorize Application (as shown in the image below), ensure that you click on the Refresh button on the Webflow Authentication window to establish the connection.

Once the connection shows as successful, add the Mapped To fields on the right column as shown in the image below. To get details of the variable fields click on the Open Variable Selector button on the top right of the window, and look for the one that you wish to use.

Here is an image of the Variable Selector window which you may use to find the list of all variables. Click on any of them to expand, and then copy it over to the Mapped To fields of the form.

Once you are done with adding all Collection Mapped fields, click on Save to exit. Your Byteline flow is now ready to use and upsert data into your Webflow CMS.
While use-cases may differ, Byteline offers a handy service that pulls data from a specific source of your choice, and then updates the Webflow CMS with it as per a given schedule. Whether you possess technical knowledge or not, Byteline’s Webflow Upsert service doesn’t require you to write a single line of code to configure.
Let us know if you tried Byteline’s Webflow Upsert service, and if you have a use-case to share.
This article was originally published on https://www.byteline.io/blog/updating-a-webflow-cms-using-bytelines-no-code-service and has been authorized by Byteline for a republish.

Top comments (0)