Install DotNetEnv
First, add the DotNetEnv package to your project. Right-click your project, then select NuGet Packages, search for DotNetEnv, and install it
Create a '.env' file
Create a .env file in the root of your project directory. Add your connection string and any other environment-specific settings you need.
Example '.env' :
ConnectionStrings__DBCon=YourSecureConnectionString
Update program.cs to load environment variables from the '.env' file and integrate them to the configuration
Example 'program.cs' :
using DotNetEnv;

// Load .env file
DotNetEnv.Env.Load();

//Configure connection string from environment variable
var connectionString = Environment.GetEnvironmentVariable("ConnectionStrings__DBCon");
if (string.IsNullOrEmpty(connectionString))
{
    throw new Exception("Connection string not found. Ensure the .env file is correctly configured and placed in the root directory.");

//Add connection string to the applications configuration system
builder.Configuration.AddInMemoryCollection(new Dictionary<string, string>
{ {"ConnectionStrings:DBCon", connectionString }
});
Reference Environment Variables in appsettings.json
Modify your appsettings.json to include placeholders for environment variables. These placeholders will be replaced by the values from the .env file when the application runs.
{% raw %}`{
"ConnectionStrings": {
"DBCon": "Environment variable not set"
},
"Logging": {
"LogLevel": {
"Default": "Information",
"Microsoft.AspNetCore": "Warning"
}
},
"AllowedHosts": "*"
}
```
### Configure Environment Variables in Azure
Step 1: Open the Azure Portal
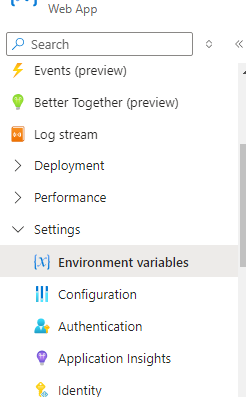
Step 2: In the left-hand menu, select Environment vairables under the Settings section.

Step 3: Add a new setting for each environment variable you need. For example:
Name: ConnectionStrings__DBCon
Value: your-connection-string-here
Then save it.
By configuring environment variables in Azure, you ensure your application is secure, flexible, and maintainable.


Top comments (0)