Learn howto install and run a headless Ghost content management system in the cloud. Deploy Ghost in a Docker container and make it accessible to your teams. This guide focuses on the specifics of a headless configuration and fully prepares you for the awesome Jamstack.

With continuous content publishing, you fully automate your publication workflows, so you don't need to push a Deploy button or run a deploy command. For this to work, you need to set up a continuous deployment pipeline, which builds and releases code automatically, without human intervention.
Building Blocks
The final goal of this automation is that a content change, such as modifying a post, will automatically show up on your CDN deployed site. Before setting up a continuous deployment (CD) pipeline, let's talk about the building blocks involved.

Data Source
Jamify sites currently only use one data source: a headless Ghost CMS. It's important that your Ghost CMS is hosted on a publicly available domain. A local install is not sufficient, because inline images are still served from your CMS.
Jamify is working to lift this requirement, so it will become possible to run your headless Ghost CMS locally or on a private network.
If you want to know how you can run a headless Ghost CMS on your own public cloud server, check out the tutorial on installing a Ghost CMS on Hetzner Cloud.
No matter where you run your CMS, first thing you should do is activate headless mode in Ghost Admin. Switch on the Make this site private option under General Settings:

This is really important, so search engines don't get confused about the official source of you content. If this option is not set correctly, your SEO gets impacted negatively.
Build Process
The build process is the crucial step in the chain. It's responsible for making your site secure and flaring fast by design. It's also the computationally most demanding step and will govern the pipeline propagation time: how fast a content change shows up on the live page.
There are two different kind of changes that require you to re-build your Jamify site: content updates and configuration updates. Content updates are usually more frequent than configuration updates, so the workflow should optimize content updates if possible.
For use in a CD pipeline, the build process must also run on a public server or cloud service. Cost, speed and availability are the main factors that you need to take into account when deciding for a build service.
Static Assets
The outcome of the build process are your static assets, which are typically placed in the public/ folder. In a CD setup, this folder does not reside in your public repository. The build process usually makes a local copy of your repository and places the assets there.
It's worth noting that the notion of static has changed substantially during the last years. That's why Gatsby changed it's wording from a static site builder to building blazing fast websites and apps. Today's static websites are dynamic as apps and if you are using Jamify you have already seen that in action: when integrating a contact page, a commenting system or a table of contents side pane.
Content Delivery Network (CDN)
The last building block is the deploy step, where you copy your static assets over to a CDN provider who then distributes your content and sets your website live. Hosting static assets is much cheaper than hosting dynamic websites, but the most important benefit of a CDN are security and speed.
If you are building sites with Jamify, there is no excuse not to publish a production website to a CDN. Common options are Netlify, AWS, fastly, firebase and google storage.
Wire up the pipeline
Now that you have a good conceptional understanding of the basic building blocks involved, it's time to wire them up with a CD pipeline. In this guide, I'm going to demonstrate one possible workflow that has proven to be robust and cost-efficient.
However, I want to stress that I'm not affiliated with any of the companies mentioned in this guide and I will always try to hint at alternatives.
Jamify wants to enable you to publish flaring fast blogs. We strongly believe that this goal can only be achieved by staying open to all available options.
Setting up a Git repository
The central point where all your wires connect is where your Jamify code resides: a git repository. As the Jamify starter is hosted on Github, the following example is also done with Github. If you prefer Gitlab or Bitbucket, I'm sure it's easy to adapt the steps to these code hubs as well. Gitlab is an interesting option, if you want to self-host your repository.
The Jamify starter has been template enabled which means that you can make a direct copy of the starter into your own Github account.
You can also use a fork instead of a template. We recommend forks if you want to make modifications to the code with the intend to issue PRs and templates if you need a plain copy for setting up CD pipelines.
After you logged on to your Github account simply click on Use this template to start the copying process. For this example, I use jamify-continuous-publishing for the repository name and a text describing the purpose of this repo:
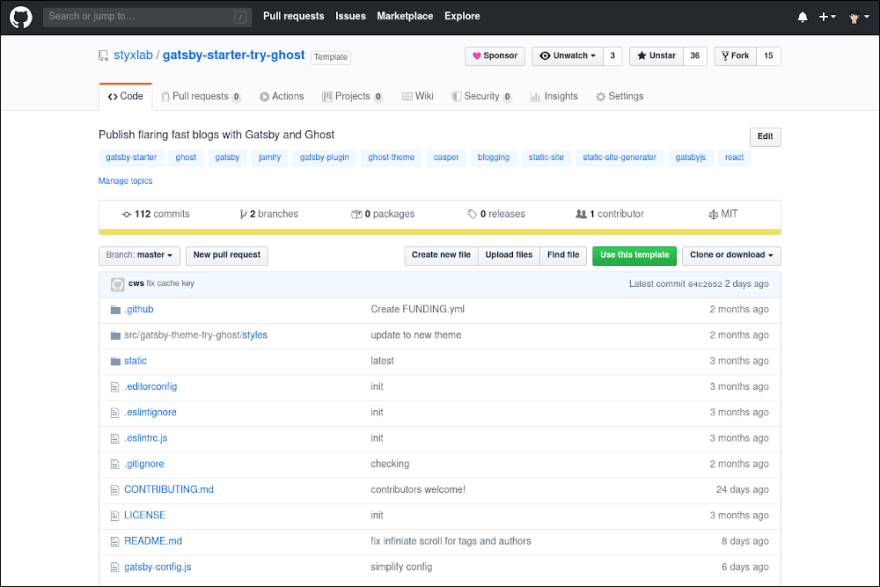

After clicking Create repository from template you should see a new repository with the given name showing up in your Github account.
Setting up the Build process
The build process is most crucial in terms of pipeline speed and also may incur considerable costs as it is an computationally expensive task. If you do not have more than 25 builds a day, the free tiers of Netlify, Github Actions and Gatsby Cloud should all make you happy.
For this tutorial I pick the newcomer Gatsby Cloud, who announced their build service just recently. While their free tier is generous, the first paid plan is starting steeply at $99/month.
Unless you really need their stunning incremental build feature, you are better off with Netlify or Github Actions, provided you hit the 25 build/day mark. Of the three, only Github Actions has a pricing model based on actually used runner minutes, which is favourable in most circumstance, especially with highly varying loads.
Let's start setting up the build process with Gatsby Cloud. Login into your account and click on Create a new site and choose I already have a Gatsby site:


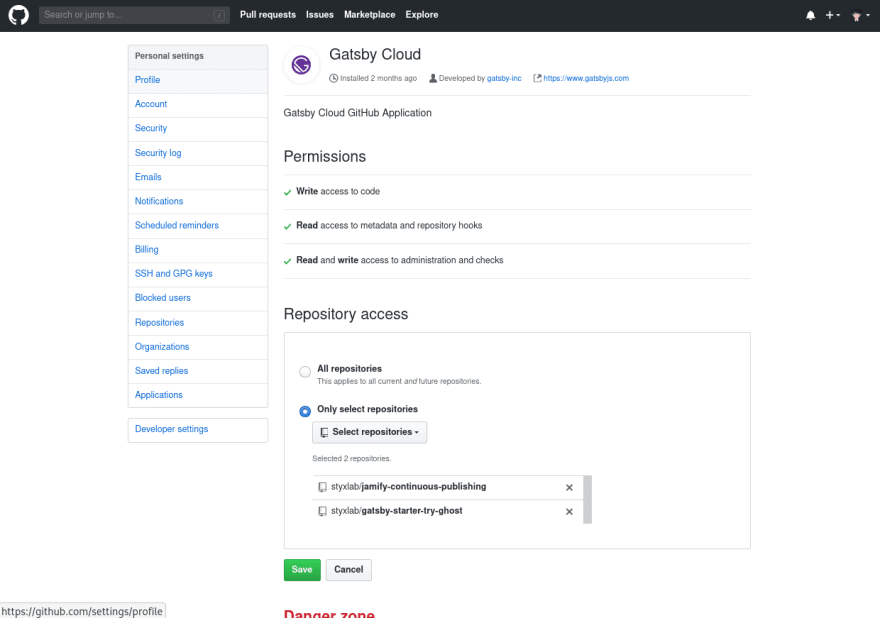
After pressing Next, click on Select an organization which brings you to your Github account. I prefer to give Gatsby only access rights to specific repositories, in this case to jamify-continuous-publishing:

You can leave the default values for branch and base directory. Skip the integration step as it is not needed here.
Be attentive to the setup step. Now you connect your Jamify starter with your own content source. This is the place where you enter your headless Ghost API url and key. A new key can be generated in Ghost Admin under Integrations, by pressing Add custom integration.


In the Getting Started tutorial we used a
.ghost.jsonfile for the Ghost API keys. This was fine for a local repository. When you connect the starter to cloud service, using environment variables is more flexible and secure.
When you press Create site a new build is automatically triggered on Gatsby Cloud.


On build completion you can view your site on the cryptic domain build-*.gtsb.io.
Triggering builds on configuration changes
Due to the connection you made between Gatsby Cloud and your Github repository, a build is already automatically triggered whenever you make configuration changes to your repository code in jamify-continuous-publishing for this example. To see that in action, clone the repository locally:
$ git clone https://github.com/styxlab/jamify-continuous-publishing.git
$ cd jamify-continuous-publishing
Let's make a simple configuration change, by removing dark mode from gatsby-config.js. Comment out all lines that belong to the plugin gatsby-theme-ghost-dark-mode:
// gatsby-config.js
plugins: [
    {
        resolve: `gatsby-theme-try-ghost`,
        options: {
            ghostConfig: ghostConfig,
            siteConfig: siteConfig,
            routes: routesConfig,
        },
    },
    //{
    // resolve: `gatsby-theme-ghost-dark-mode`,
    // options: {
    // // Set to true if you want your theme to default to dark mode (default: false)
    // // Note that this setting has an effect only, if
    // // 1. The user has not changed the dark mode
    // // 2. Dark mode is not reported from OS
    // defaultModeDark: false,
    // // If you want the defaultModeDark setting to take precedence
    // // over the mode reported from OS, set this to true (default: false)
    // overrideOS: false,
    // },
    //},

]
Stage and commit these changes:
[jamify-continuous-publishing]$ git add .
[jamify-continuous-publishing]$ git commit -m "remove dark-mode"
[jamify-continuous-publishing]$ git push
The push immediately triggers a re-build on Gatsby Cloud.
Triggering builds on content changes
To automatically trigger builds on content changes, you need a way to initiate news builds without making code changes to your repository. This can be done with webhooks. A webhook is an endpoint to which you send a POST request. This request triggers an action, in our case a re-build.
Gatsby Cloud provides two webhooks, one for Preview and one for Production. Only the Production build can be connected to a CDN, so we use the Builds Webhook here:

This webhook must be connection with an action in your headless Ghost CMS. In your Ghost Admin panel go to Integrations and click on Add a new custom integration.

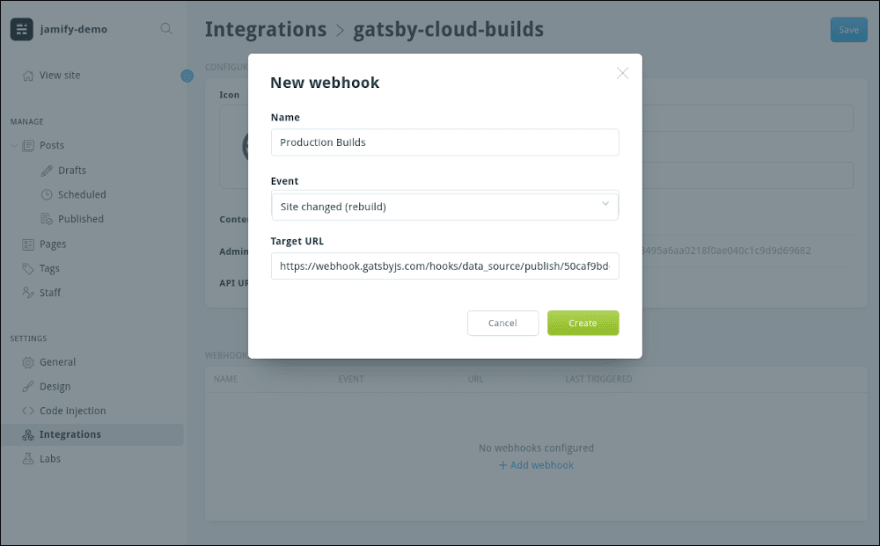
Fill out the the name with gatsby-cloud-builds and give it a description, e.g. Add webhooks for continuous deployment builds. Next, add a new webook with event Site changed (rebuild) and copy/paste the production webhook URL from Gatsby Cloud into the target field. Creating and saving these settings activates this connection between CMS content changes and Gatsby Cloud builds.
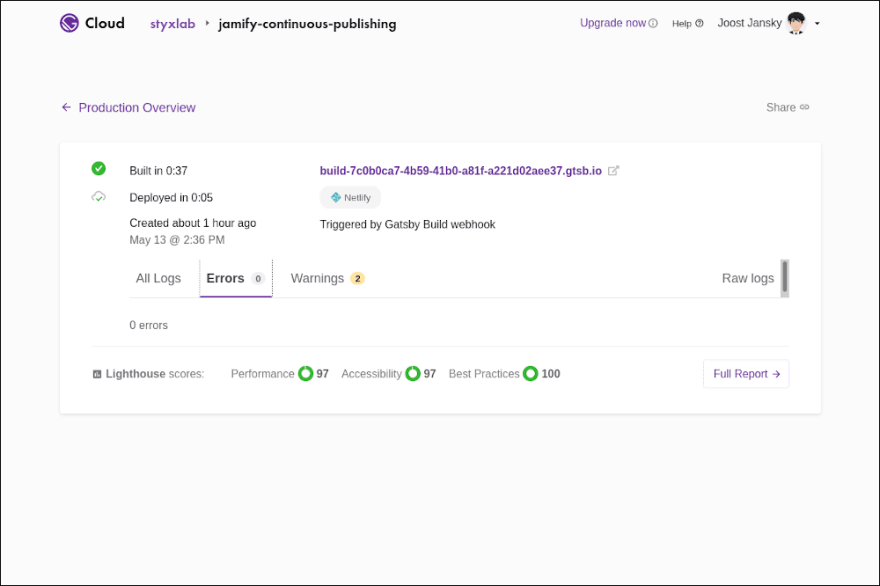
Let's make a content change and see, if a build is automatically triggered. Here I change Gatsby to Gatsby Builds and press Update:
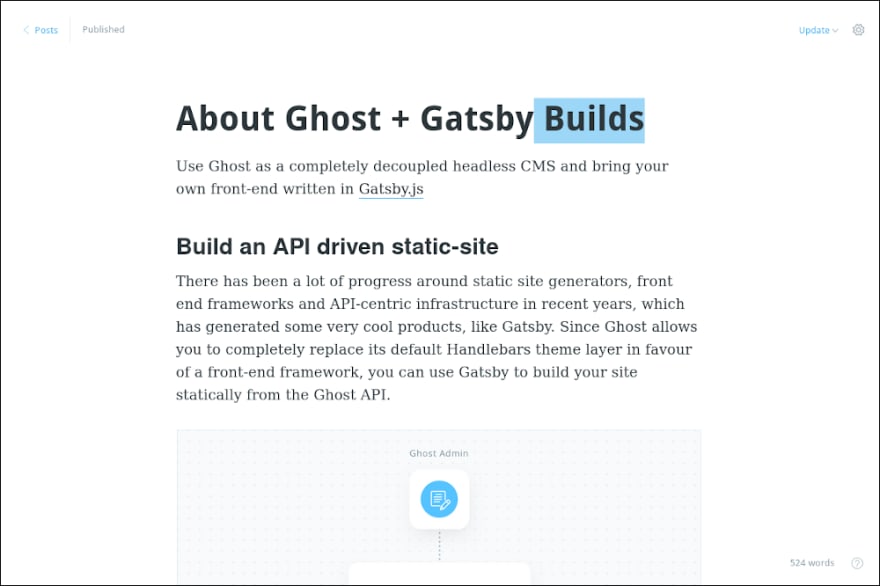

You should see a new build process triggered immediately, with the notification: Triggered by Gatsby Build webhook. Open your site on gtsb.io to verify that the changes show up on your website.

Deploy to CDN
A CDN is a globally distributed group of servers that store static content. As your Jamify site is only static content, your whole site is pushed to the edges of this network. This also means that your entire site can be cached on multiple servers in different locations.
Your visitor's will be served from a CDN server that is closest to them, bouncing to the next server if the closest server is down. By publishing to a CDN you get improved speed, more reliability and built-in security.
Gatsby Cloud lets you connect to seven different CDN providers. Exploring all these possibilities would make another tutorial. Here, I go with Netlify, because they are great on the Jamstack. The connection to Netlify is a four-step process:


The final connection can be seen on Gatsby (green connected badge). On Netlify, you see the new site tagged with Manual deploys as Gatsby Cloud is now taking care of that.


Your site is now on a CDN and can be reached on a netlify domain.
You can assign a new domain name to your site or you can assign an existing domain you host with another provider. Follow the Netlify documentation on custom domains to learn how to do that.
Smoke Test
After setting up the full CD pipeline, reverse the content change that you made earlier and measure the time between hitting the Update button in Ghost Admin until your new site is live on Netlify. Ready, steady, go!


Started at 6:09:52, finished at 6:10:44: less than a minute from content change to CDN live update.
CLI tools missing
I realize this is the tutorial with a lot of figures. I would have preferred to do this on the command line, but with the shown set up this is currently not possible.
Github doesn't provide a CLI tool that works with templates and Gatsby Cloud hasn't published a CLI tool for their cloud service either. Only Netlify has a great CLI tool, but as we are connecting from Gatsby Cloud, it's not needed here.
Summary
Publishing your site to a CDN is great and automating the entire content publishing process is awesome. For this to work, you need to rely on some external providers.
We used services from Hetzner Cloud for CMS hosting, Github for the code repository, Gatsby Cloud for site building and Netlify as CDN provider in order to achieve this goal. Due to the generous free tiers of Github, Gatsby and Netlify, the total cost of this setup is less than $3/month.
With a solid understanding of the building blocks involved, you can exchange any of the above services with alternative service providers. Take this reference set-up as a starting point for your own explorations!
This post was originally published at jamify.org on April 14, 2020.

Top comments (0)