
Originally written by Adam Stempniak and Adrian Dratwicki
If you’re thinking of hosting a website, you typically have two options:
- buy a virtual server and manage it yourself,
- use the services of a hosting company. The latter solution is one of the simplest and most popular when it comes to setting up websites, since it makes them easy to manage and cheap to maintain.
Using a hosting company usually comes down to getting access to an FTP server or panel, where you can upload the files necessary for your site to work. The rest is handled by your hosting service provider.
But what if I told you there was a third way? An even better solution for static websites?
In this article, I’ll show you how to host your website on AWS S3. I’ll also tell you how using AWS S3 benefitted one of our clients.
When should you host your static website on AWS S3?
Not everyone knows Amazon S3 offers a functionality that allows you to host a static website—“static” being the key here. The website should be simple, without much happening on the backend, since server-side scripts like PHP, JSP, or ASP.NET are not supported.
The best use case for this are company or personal sites serving as business cards, where your users will mostly find your contact information.
However, if you’re in need of using a CMS like Wordpress, I suggest you look at companies that provide hosting solutions or use a dedicated service like AWS Lightsail.
What are the benefits of using AWS S3 static website hosting?
There are many reasons why you should host your website on AWS S3.
Among others, it’s because the service:
- manages everything, so there’s no need for you to worry about underlying software like the web server or the operating system in general;
- scales well for temporary high traffic load;
- is cheap (in the Frankfurt region, the cost is $0.00043 per 1,000 GET requests);
- has great integration with CloudFront;
- is simple to operate, allowing you to set up your website in a blink of an eye.
What do you need to host a static website on AWS S3?
You need to meet certain requirements before hosting your website on S3.
Make sure you have the following:
- registered domain (for the purposes of this article, let’s assume you own a domain named “example.com”);
- access to the panel that allows you to manage the DNS records for your domain;
- AWS account;
- basic knowledge of operating the S3 service;
- fully prepared website (I won’t be showing you how to build your own website in this article).
A 4-step guide to AWS S3 static website hosting
I will now walk you through the process of hosting your site on S3.
1. Creating logging buckets
Let’s start by creating a bucket in S3. It will log the requests to your website. This isn’t mandatory, but I think there’s always value in collecting such information.
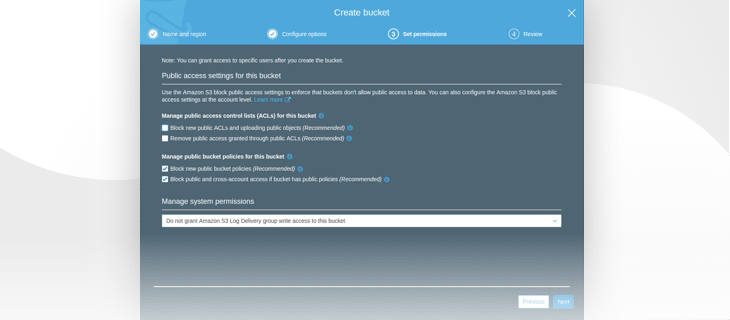
I suggest you call this bucket “example.com-logs.” Configure it by keeping the default settings for all the options, with the exception of “Manage system permissions.” Here, it’s necessary to grant write access to the S3 Log Delivery group.
 Granting write access to the S3 Log Delivery group
If you intend to host more than one website on S3, you’ll be better off using a different, collective name for this bucket. Setting up the right prefixes will minimize the risk of you confusing logs from multiple sites—more on that later.
2. Creating S3 buckets
Moving on, we’ll create 2 buckets in S3. We’ll put the files with your website’s code in one of them.
Your buckets should be named after your domain, so call the 1st one “example.com” and the other one “www.example.com.”
Let’s focus on the 1st bucket now.
 Creating a bucket for your website
When configuring your bucket, I recommend turning on object versioning. It may be useful in case you wish to restore a previous version of an image or an entire website template.
The next move is turning on request logging to your site. Select the bucket you’ve created as the target bucket. The folder where the logs are placed will be the prefix.
If you’re going to be collecting logs from several buckets to this one, I suggest you set the domain name as the prefix. Thanks to this, you’ll know which bucket the logs originate from as you browse through them.
Right now, we’ll just use the logs, since we’re hosting only 1 site.
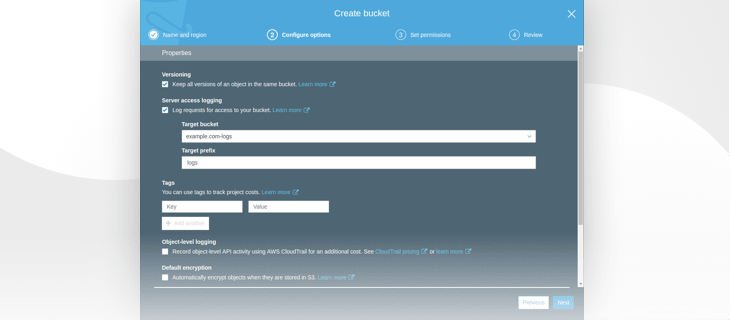 Bucket configuration
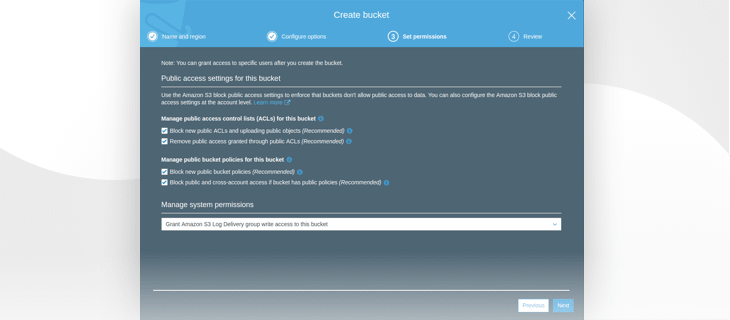
The next step is unlocking public ACLs for objects.
Doing so is crucial, otherwise you won’t be able to publicly share the objects. As a result, displaying your website in the browser will be impossible.
 Unlocking public ACLs
Your 1st bucket is almost ready. Now you can upload the files with your site’s code to it.
As you upload the files, remember to make sure that they’re publicly accessible.
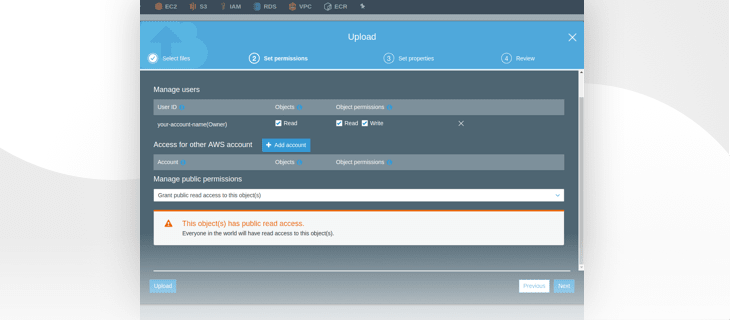 Granting public access to bucket objects
In the following step, you have the option to choose the Storage class. Leave it set to “standard.”
3. Enabling static website hosting
It’s time to enable the hosting service.
Go to your bucket’s Properties. You’ll find the “Static website hosting” tab there.
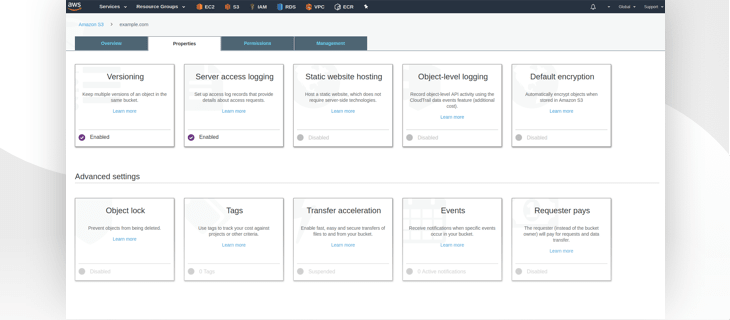 Bucket properties view
By default, the service will be disabled. Enable it.
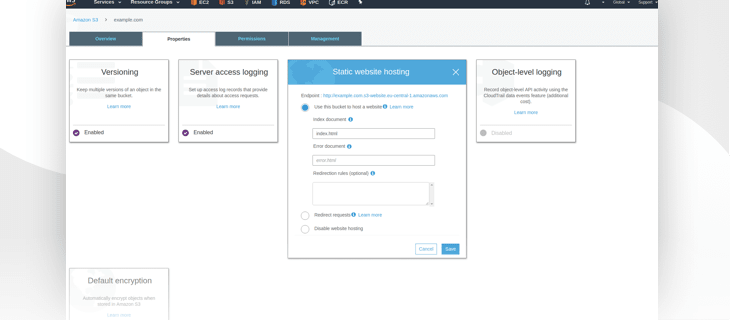 Enabling static website hosting
You need to input the name of your website’s “core” file. Usually, it’s “index.html,” as is the case here.
If you have a file that should be displayed in the event of an error, it should also be defined here—and placed in your bucket beforehand, naturally. However, this only applies to errors belonging to the 4XX group.
Additionally, it’s worth it to save the endpoint displayed above at this point.
If you’ve done all of that correctly, your website should display as intended once you enter the endpoint into the browser.
 Checking if our site is accessible
Let’s create the 2nd bucket now: “www.example.com.”
You can leave the entire configuration set to default. What you care about the most here is redirection from “www.example.com” to “example.com.”
Once you create this bucket, go to its Properties and enable Static website hosting, just like before. This time around, though, you should also:
- pick “Redirect requests” from the available options,
- input the “example.com” domain in the “Target bucket or domain” field,
- set “http” as the protocol.
 Setting up redirection for ''www.example.com''
4. Setting up DNS records
Your website should now be online. However, it’s clear you don’t want to use this lengthy URL as the access point to the site.
In order to use the “example.com” domain, log into the panel where you can add new DNS records. In this instance, I use Cloudflare to manage DNS records, but regardless, what you need to do comes down to 2 things:
- Removing existing records that point “example.com” and “www.example.com” to an IP address or other domains
- Adding 2 CNAME records
- “example.com” that will point to our “example.com” bucket endpoint
- “www.example.com” that will point to our “www.example.com” bucket endpoint
 DNS records settings for our website
You should wait a while for the DNS records to propagate. After that, you’ll be able to enter your website from either the “example.com” or “www.example.com” domain.
How one of our clients benefitted from AWS S3
At STX Next, we often use Amazon S3 in our projects for storing static or media files uploaded by the user and generated by the application. Static files are files such as images or CSS/JS files that aren’t generated on the go.
Very often, this is highly sensitive data, like PDFs containing confidential user information. Because S3 supports server/client-side encryption, the service is a really safe solution to store this kind of data.
One of our clients came to us with the intention of moving his entire infrastructure from a different hosting provider to AWS. The client had only one virtual server, where multiple services were installed.
One of these services was NGINX, which distributed the traffic between the application and the main company website. The client’s main site consisted only of some HTML, CSS, and JS files.
Through this website, a potential buyer could find the client’s contact information and learn about their services. In the process of moving the infrastructure to AWS, we decided to separate this website from the application services and move the database to the RDS.
It was the most convenient and secure choice. One instance, one role. If we ever have to move the application to another instance, we won’t have to concern ourselves with additional components like website, database, etc.
To spin up a new instance, we’ll only have to run the script that will automatically install packages required for the application to start running, then simply deploy it to the server. That’s it.
Maintaining an additional EC2 instance for a single website is unnecessary and we don’t expect any heavy traffic to the main website—but if it happens, the AWS will handle it.
As you can see, static website hosting on S3 turned out to be the perfect solution for us, and I believe the same will be true for your business.
Summary
You now know how to create 2 S3 buckets for your website. The 1st bucket you’ve created allows you to store files required to run your website, while the 2nd one serves strictly redirection purposes.
You’ve set up DNS records, so that your visitors can now enter your website through a friendly domain. Your site is available to the world, and you don’t have to worry about underlying servers, software updates, scaling, or costs.
If you’d like to use the HTTPS protocol—which is highly recommended—you should take a look at the CloudFront service. Using Cloudflare gives you the ability to establish a SSL/TLS connection by routing traffic through their servers. However, the traffic is encrypted between the client and the Cloudflare servers. For the full SSL/TLS setup, CloudFront is required.

Top comments (1)
Hey Adam, it's a nice writeup. I used to follow all these steps for hosting simple static sites, later I came across tiiny.host (@rfoot8 )SaaS platform, which literally abstarcted all the hurdles in hosting. Worth trying it out with a trail account.