Angular is a powerful framework. It has observables, it has TypeScript, it has dependency injection. Great! But how do I manage state? We are left to figure this out for ourselves.
There are some great libraries for state management out there, such as NgRx. But these only deal with global state. Things can become messy once we try to glue them to our components.
What I need is state management for components. I want it to connect to global state, and I want it to be easy to use. I don't want it to be cluttered with boilerplate. I want my templates to be synchronous, no async pipes. And I don't want to manage subscriptions.
Many attempts have been made at such solution, but nothing satisfying has emerged to date. If you've entertained these thoughts so far, let's look at some code.
Introducing Angular Effects: Reactive extensions for Angular
@Component({
    selector: "app-root",
    template: `
        <div>Count: {{count}}</div>
    `,
    providers: [Effects],
})
export class AppComponent {
    @Input()
    count: number = 0

    constructor(connect: Connect) {
        connect(this)
    }

    @Effect("count")
    incrementCount(state: State<AppComponent>) {
        return state.count.pipe(
            take(1),
            increment(1),
            repeatInterval(1000)
        )
    }
}
This library is a set of reactive primitives that fills in the missing blanks in Angular's reactive API. It makes it both possible and easy to observe and react to the state of your components. Here's a few highlights:
- You can observe when any property on the component changes
- This lets you write fully reactive applications
- Subscriptions are automatically cleaned up when the component is destroyed
- You can pipe inputs and outputs
- You can extract stateful behaviors into services
- You can ditch async pipes
- You might not need lifecycle hooks
- It works with or without zones
- You can compose all of your observable sources
- You can extend it with adapters
- Change detection "just works", and you can fine tune it
- No components are harmed when using this library (composition over inheritance)
Why you should use Angular Effects
Simpler templates
A large source of complexity in Angular is how async data is handled in templates. Some common problems are:
Default values: Showing default values with async bindings
@Component({
    template: `
        <ng-container *ngIf="count$ | async as count">
            {{ count }}
        </ng-container>
    `
})
export class AppComponent {
    count$ = timer(1000).pipe(
        mapTo(10),
        startWith(0), // default value
    )
}
With Angular Effects component templates are always synchronous.
@Component({
    template: `
        {{ count }}
    `
})
export class AppComponent {
    count = 0

    @Effect("count")
    setCount(state: State<AppComponent>) {
        return timer(1000).pipe(
            mapTo(10)
        )
    }
}
Multiple subscribers: Binding async sources multiple times in different parts of the template
Because every subscriber triggers the entire chain of operations in an observable, we have to be careful not to accidentally trigger certain effects, such as http requests, multiple times.
@Component({
    template: `
        <button *ngIf="count$ | async as count">{{ count }}</button>
        <a *ngIf="count$ | async as count">{{ count }}</a>
    `
})
export class AppComponent {
    count$ = this.http.get("/getCount").pipe(
        startWith(0)
    )

    constructor(private http: HttpClient) {}
}
When this component is rendered, two http calls are made, one for each subscription. This can be mitigated by moving the async pipe to a common ancestor
<ng-container *ngIf="count$ | async as count">
    <button>{{ count }}</button>
    <a>{{ count }}</a>
</ng-container>
Or by using the share operator
export class AppComponent {
    count$ = this.http.get("/getCount").pipe(
        startWith(0),
        share()
    )

    constructor(private http: HttpClient) {}
}
However it's not always possible to do the former, and can be difficult to know where or when to use the latter.
With Angular Effects, we only subscribe once.
@Component({
    template: `
        <button>{{ count }}</button>
        <a>{{ count }}</a>
    `
})
export class AppComponent {
    count = 0

    constructor(private http: HttpClient) {}

    @Effect("count")
    getCount(state: State<AppComponent>) {
        return this.http.get("/getCount")
    }
}
Async composition: Templates with nested async bindings dependent on input values
@Component({
    template: `
        <ng-container *ngIf="author$ | async as author">
            <ng-container *ngIf="author">
                <div *ngFor="let book of books$ | async">
                    <p>Author: {{ author.name }}</p>
                    <p>Book: {{ book.title }}</p>
                </div>
            </ng-container>
        </ng-container>
    `
})
export class AppComponent {
    @Input()
    authorId = 1

    author$ = this.getAuthor()
    books$ = this.getBooks()

    getAuthor() {
        this.author$ = this.http.get(`/author/${this.authorId}`)
    }

    getBooks() {
        this.books$ = this.http.get(`/books?authorId=${this.authorId}`)
    }

    ngOnChanges(changes) {
        if (changes.authorId) {
            this.getAuthor()
            this.getBooks()
        }
    }
}
One problem with this code is that books$ is not fetched until author$ has resolved due to it being nested inside an ngIf in the template. This could be resolved by combining these observables into a single data source, but this can be difficult to manage. We'd like to subscribe to individual data streams separately and without blocking the template.
With Angular Effects we can subscribe to streams in parallel and render them synchronously.
@Component({
    template: `
        <ng-container *ngIf="author">
            <div *ngFor="let book of books">
                Author: {{ author.name }}
                Book: {{ book.title }}
            </div>
        </ng-container>
    `
})
export class AppComponent {
    @Input()
    authorId: number

    author?: Author = undefined

    books: Book[] = []

    @Effect("author")
    getAuthor(state: State<AppComponent>) {
        return state.authorId.pipe(
            switchMap(authorId => this.http.get(`/author/${authorId}`))
        )
    }

    @Effect("books")
    getBooks(state: State<AppComponent>) {
        return state.authorId.pipe(
            switchMap(authorId => this.http.get(`/books?authorId=${authorId}`))
        )
    }
}
You might not need lifecycle hooks
We can observe the state of a component and write effects around them. Here's why you probably don't need lifecycle hooks.
OnInit
Purpose: To allow the initial values of inputs passed in to the component and static queries to be processed before doing any logic with them.
Since we can just observe those values when they change, we can discard this hook.
OnChanges
Purpose: To be notified whenever the inputs of a component change.
Since we can just observe those values when they change, we can discard this hook.
AfterContentInit
Purpose: To wait for content children to be initialized before doing any logic with them.
We can observe both @ContentChild() and @ContentChildren() since they are just properties on the component. We can discard this hook.
AfterViewInit
Purpose: To wait for view children to be initialized before doing any logic with them. Additionally, this is the moment at which the component is fully initialized and DOM manipulation becomes safe to do.
We can observe both @ViewChild() and @ViewChildren() since they are just properties on the component. For imperative DOM manipulation, effects can be deferred until the component has rendered. We can discard this hook.
OnDestroy
Purpose: To clean up variables for garbage collection after the component is destroyed and prevent memory leaks.
Since every effect is a sink for observables, we won't need this hook very often.
Observable host listener and template events
Angular Effects provides an extension of EventEmitter called HostEmitter that should be used as a drop in replacement. HostEmitter makes it possible to observe HostListener, and also makes it easier to work with Angular Effects in general.
For example, here's a button that uses HostListener to observe click events and pass them through if it's not disabled.
@Component({
    selector: "button[ngfx-button]"
})
export class ButtonComponent {
    @Input()
    disabled = false

    @HostListener("click", ["$event"])
    clicked = new HostEmitter<MouseEvent>()

    @Output()
    pressed = new HostEmitter<MouseEvent>()

    @Effect("pressed")
    handleClick(state: State<AppComponent>) {
        return state.clicked.pipe(
            withLatestFrom(state.disabled, (event, disabled) => disabled ? false : event),
            filter(Boolean)
        )
    }
}
Here's a component using the button, observing its events from the template and disabling the button when it is clicked.
@Component({
    template: `
        <button ngfx-button [disabled]="buttonDisabled" (pressed)="buttonPressed($event)">
            Click me
        </button>
    `
})
export class AppComponent {
    buttonDisabled = false
    buttonPressed = new HostEmitter<MouseEvent>()

    @Effect("buttonDisabled")
    disableButton(state: State<AppComponent>) {
        return state.buttonPressed.pipe(
            mapTo(true)
        )
    }
}
Renderless components
Renderless components were popularised by Vue as components without a view. Behavior without a template. We know them as mixins. But it isn't easy to use mixins in Angular. Angular Material shows us just how many hoops we have to jump through.
Angular Effects finally makes this possible, and easy. It makes it possible by extracting all stateful behavior from a component, into an injectable service.
Let's see how it makes it easy.
@Component({
    selector: "button[ngfx-button]"
})
export class ButtonComponent {
    @Input()
    disabled = false

    @HostListener("click", ["$event"])
    clicked = new HostEmitter<MouseEvent>()

    @Output()
    pressed = new HostEmitter<MouseEvent>()

    @Effect("pressed")
    handleClick(state: State<AppComponent>) {
        return state.clicked.pipe(
            withLatestFrom(state.disabled, (event, disabled) => disabled ? false : event),
            filter(Boolean)
        )
    }
}
We can extract the effect into a service. We'll also tweak things a bit to get rid of the HostListener.
interface ButtonLike {
    disabled: boolean
    pressed: HostEmitter<MouseEvent>
}

function registerOnClick(elementRef, renderer) {
    return function(handler) {
        return renderer.listen(elementRef.nativeElement, "click", handler)
    }
}

@Injectable()
export class Button {
    constructor(private elementRef: ElementRef, private renderer: Renderer2) {}

    @Effect("pressed")
    handleClick(state: State<ButtonLike>) {
        return fromEventPattern(registerOnClick(this.elementRef, this.renderer)).pipe(
            withLatestFrom(state.disabled, (event, disabled) => disabled ? false : event),
            filter(Boolean)
        )
    }
}
This is our renderless button. All the consumer has to do to use it is implement the interface, provide the token and write the template.
@Component({
    selector: "button[ngfx-button]",
    providers: [Effects, Button]
})
export class ButtonComponent implements ButtonLike {
    @Input()
    disabled = false

    @Output()
    pressed = new HostEmitter<MouseEvent>()

    constructor(connect: Connect) {
        connect(this)
    }
}
Previous examples have omitted the wiring necessary to make effects run. To explain it here briefly, each component needs to provide Effects at a minimum, and then call connect() in the constructor after properties have been initialized. Add more effects by adding them to providers.
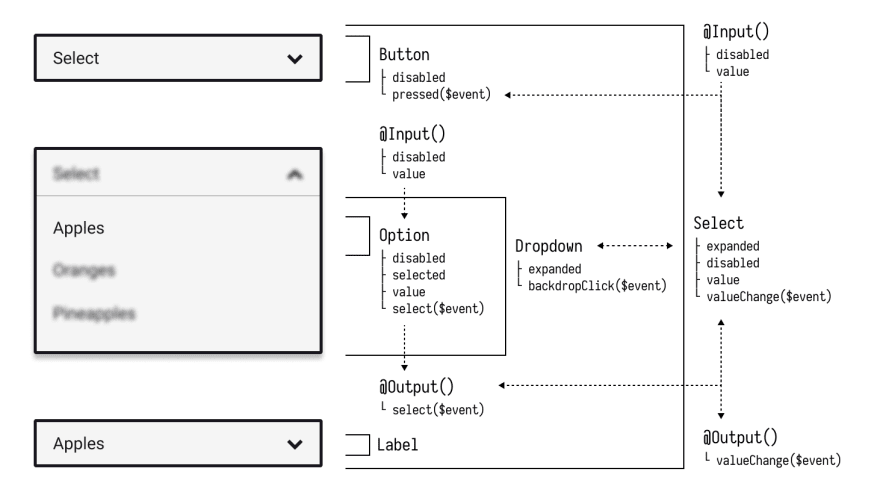
Now we have a reusable Button "trait" that can be used to build different types of buttons, or composed with other effects to do something more interesting. For example, a select component could be composed out of Button, Select, Option and Dropdown traits.
Reactive applications
We have only scratched the surface of what can be done with Angular Effects. In future installments I will take you through a deep dive of the API, how it works, and more examples on how it can be used to make better reactive applications using Angular.
You can get started with Angular Effects today to make your applications more reactive. Feedback welcome. With Angular Effects we can write truly reactive applications from top to bottom.
Thanks for reading!
npm install ng-effects
Acknowledgements
I couldn't have made this library without the excellent research and demos presented by Michael Hladky and others in this RFC.
Further Reading
Next in this series
- Part I: Introducing Angular Effects (You are here)
- Part II: Getting started with Angular Effects
- Part III: Thinking reactive with Angular Effects
- Part IV: Extending Angular Effects with effect adapters
- Part V: Exploring the Angular Effects API
- Part VI: Deep dive into Angular Effects


Top comments (4)
This might be the next big thing in angular.
This looks really neat. Excited to take it for a spin.
This is probably the coolest thing I have seen in Angular!
This is really cool but is ng-effects still a thing? Or has it died? Seems like the repository is in the "Public archive" state. Is the project abandoned? If so, why?
Is it even worth considering it when implementing an app from scratch today (late 2022)?