
In this article, we will look into the relational fields in Strapi to see how we can utilize them to establish relationships in our models
The tech on focus here is Strapi.
What is Strapi?
Strapi is an open-source Node.js headless CMS (Content Management System) based on Nodejs used to develop APIs(RESTful and GraphQL APIs) and build the APIs content. The APIs in Strapi is built in the form of collections or single types.
A collection in Strapi will create and expose the endpoints on all the HTTP verbs. For example, if we have a blog collection. Strapi will create the following endpoints based on the collection:
-
blogGET: This will get all the blog entries in the endpoint. -
blogPOST: This will create a new blog post in the endpoint. -
blog/:idGET: This will return the blog post with the id:id. -
blog/:idDELETE: This will delete a blog post with the id:idfrom the endpoint.
So, Strapi creates all those APIs for us. We can then add content to the collection via the admin panel or the Strapi API.
Internally, Strapi is powered by Koajs, and its default database is SQLite, where it persists the content we add to the collections and single-types. We have learned a bit about Strapi. In the next sections, we will learn about relations in database models and establish the relations in Strapi collections.
Relations in Database fields and Strapi
A database contains tables, columns, and records. Now, relationships can be defined in the database tables. In Strapi, we can use relations to create links between our Content Types. This relationship is like a pointer or reference. They point to data in a table that depicts what they contain.
There are types of relationships we can establish in Strapi:
- One-to-one (1:1)
- One-to-Many
- Many-to-Many
- One-Way
- Many-way
- Polymorphic
One-to-One (1:1) In this one-to-one relationship, a column in a table points to only one column in another table.
One-to-One (1:1) In this one-to-one relationship, a column in a table points to only one column in another table.
For example, in a Student table, a studentId column can point to a StudentInfo table.
A column in the StudentInfo table, studentId points back to the Student table.
So here, the Student table is associated with one and only one record in the StudentInfo table.
So we can fetch a student info from the Student table, and we can fetch a student from the StudentInfo table. That's a one-to-one relationship.
One-to-Many This relation involves a table pointing to several or many tables. A column in table A can point to several tables(B, C, D, E), these tables in turn point to table A. Also, each table (A, B, C, D) can hold one or more records of the column in table A.
For example, let's say we have a Company table. This table holds the list of all the companies in a system. Now, we can create an Employee table to hold the name of an employee. Now, we can add a companyId column to the Employee table, and this companyId will point to the Company table.
So, now a Company table can point to many employed records in the Employee table. Also, each record in the Employee table points back to a record in the Company table. The relation here is one-to-many.
The many-to-Many relationship involves a column in a table pointing to many records in another table and a column in another table pointing to many records in the first table.
For example, many doctors can be associated with many hospitals. Now, we have learned the types of relationships, let's see how we can implement them in a Strapi collection.
One-Way This relationship involves a column pointing or linking to another column in a table. The thing here is that the other column does not point back to the "pointing" column. One-way relation is similar to One-to-One relation but differs because the column being "pointed" does not link back to the pointing column.
For example, in a User table, A detailsId column in the User table can point to a Details table. This means that the details of a user are in the detailsId column in the User table and the details are stored in the Details table.
So we see that the User table points to only one table, which is the Details table. The relationship is one-way. There is no column in the Details table that points back to the User table.
Many-way This relation involves a column in a table pointing to many records in another table. The records being pointed to does not point back or link back to the record.
For example, a User table has a column carId that points to a Car table. The carId can point to many records in the Car table but the Car record does not point back to the User table, this relationship is a many-way relationship.
Polymorphic This relationship involves a column in a table that can link to different columns in other tables. In a polymorphic relationship, a model/table can be associated with different models/tables.
In other relationships we have seen, it is mainly between a table and another table, not more than three tables are involved in the relationship. But in a polymorphic relationship, multiple tables are involved.
For example, a Tire table holds can be linked and have links to a Toyota table, Mercedes table, etc. So a Toyota can relate to the same Tire as a Mercedes.
We have seen all the relations we have. The below sections will explain and show how we can set the relations from both the Strapi admin UI and a Strapi project.
Where are relationships set in Strapi?
Relationship links can be set in the Admin panel and manually from the generated Strapi project.
via Strapi Admin panel
Relations can be set in Strapi's Collection types, Single types, and Components. The relation is set when adding fields to our Collection, Single collection, or Component type. The relation field is selected:

Another UI is displayed in the modal:

This is where we set the relations between the current model we are creating and an existing model.
We have two big boxes in the above picture, the left box is the current model we are creating, and the right box is the model the current model will be having relations with. We can click on the dropdown icon to select the model we want to link relations within the right box.
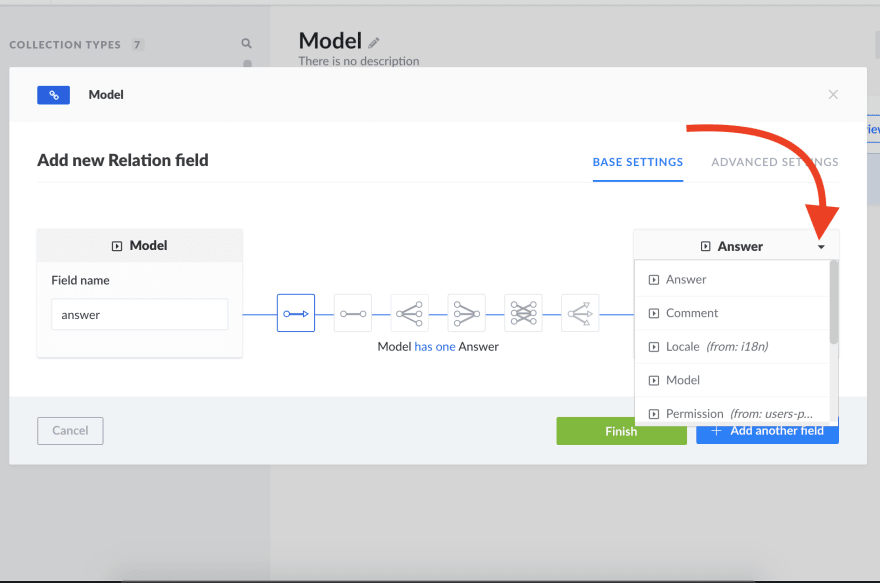
The smaller boxes with icons are the relations we can establish between the two models in the bigger boxes.
Let's look at the smaller boxes starting from the left.

The first box represents the has one relation.
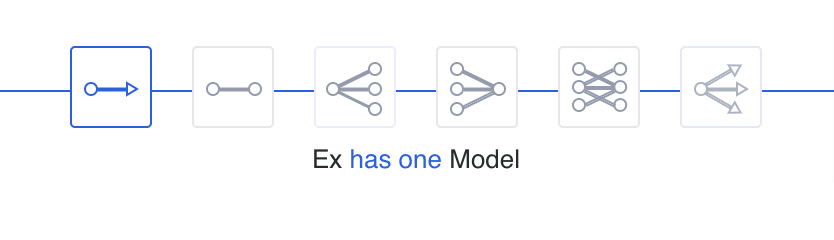
It establishes a one-way relation between content types in Strapi.
The second box is has one and belongs to one.

It links two content types in a one-to-one way relationship.
The third box is belongs to many.

It links two content types in a one-to-many relation. The content type in the left-bigger box will have a field that links to many records in the content type that is in the right-bigger box. The field in the content type in the right-bigger box will have a field that links to a single record in the left-content type.
The fourth box is has many.
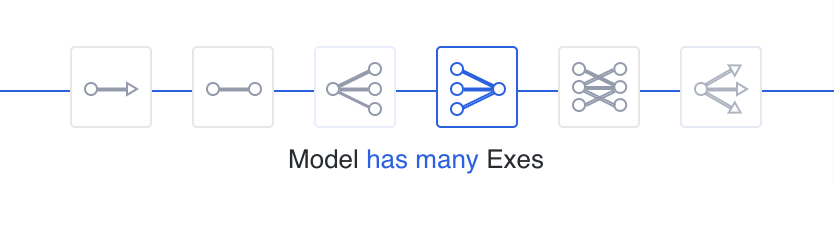
This one links two content types in a many-to-one relation. Here, the content type at the left-bigger box has a field that links to many records to the content type at the right-bigger box. It is the reverse of the belongs to many boxes.
The fifth box is has and belongs to many.

This box links two content types in a many-to-many relationship. Both content types in the bigger boxes will have a field that links many records to each other.
The sixth box is has many.

It links two content types in a many-way relationship. The field on the left content type links to many records in the right content type. The right content type does not link back to the left content type.
via Strapi project
Let's see how we set relations in our content types from our Strapi project. The content types in a Strapi are stored in the api folder in our Strapi project. The relations are set in the ./api/[NAME]/models/[NAME].settings.json file.
Fields are set inside the attributes section. To set a relation field we use some properties like model, collection, etc. Let's see how we set the relations for all the types of relations in Strapi.
One-to-one (1:1)
To set a one-to-one relation between two content types we will use the model and via properties. Let's say we want to set a one-to-one between a Student model and a StudentInfo model, we will open the ./api/student/models/student.settings.json file and add the code:
    {
      "attributes": {
        "studentinfo": {
          "model": "studentinfo",
          "via": "student"
        }
      }
    }
The relation field is studentinfo. The model refers to the content type in Strapi the field is pointing to. It is set to studentinfo so the studentinfo property in the Student content type points to the StudentInfo content type.
The via property is set to student. All these state that the Student model has and belongs to one StudentInfo.
Let's see inside ./api/studentinfo/models/studentinfo.settings.json file
      "attributes": {
        "student": {
          "model": "student",
          "via": "studentinfo"
        }
      }
Here, we have a student relation field. The properties model and via point to student and studentinfo respectively.
These two JSON configs of both Student and StudentInfo models establish a one-to-one relationship between them.
One-to-Many
To set a one-to-many manually, we will use the collection, model, and via properties.
Let's say we have two content types, Employee and Company. The Company has many Employee records, and the Employee record points back to a Company record.
To establish this in the content types, we will go to their model/.settings.json files in our project and set relation fields.
For the Company model, we want an employees relation to point to many Employees. So we will do the below in the /company/model/company.settings.json file.
      "attributes": {
        "employees": {
          "collection": "employee",
          "via": "company"
        }
      }
Also, in /employee/model/employee.settings.json file:
      "attributes": {
        "company": {
          "via": "employees",
          "model": "company"
        }
      }
This sets a one-to-many relationship in the Company model.
Many-to-Many
In setting a many-to-many relation from our Strapi project, we will set the collection and via properties in the relation fields of both content types.
For example, doctors can work in many hospitals and many hospitals can have many doctors. In this case, our Doctor model will be this:
      "attributes": {
        "hospitals": {
          "via": "doctors",
          "collection": "hospital"
        }
      }
The hospital relation field points to many hospitals. The collection property set to hospital tells Strapi that the hospital relation field points to many records in the Hospital model. The via property set to doctors tells Strapi to select the hospitals from the doctors relation field in the Hospital model.
The Hospital model will be this:
/hospital/models/hospital.settings.json:
      "attributes": {
        "doctors": {
          "via": "hospitals",
          "collection": "doctor"
        }
      }
This effectively sets a many-to-many relation between the Doctor and Hospital models.
One-Way
To set this relation from our Strapi project between two models, we will define a relation field in one model's .settings.json file only. The other model will have no relation connecting to other model define in its .settings.json file.
For example, we have two models User and Detail and they have one-way relation. To set this up. We set the below in the User's model file user/models/user.settings.json file:
      "attributes": {
        "detail": {
          "model": "detail"
        }
      }
The detail object right under the attributes key is the relation field. The model set to detail tells Strapi that this field points to one Detail model record.
There will be no relation setting in the Detail model file that will point to the User model. SO in this way, we have set a one-way relation between the User and Detail models in Strapi.
Many-way
This is the same as the one-way relation but this one involves one model pointing to many records in another model, but this another model does not point back.
To set this manually in Strapi, we will set a relation field with the collection property in one model but no relation definition in the other model.
For example, a User has many Cars. The relation is many-way. A user can own many cars. The setting will be this for the User:
user/models/user.settings.json:
      "attributes": {
        "cars": {
          "collection": "car"
        }
      }
The car relation has a collection property that is set to car. This setting tells Strapi that the cars field in the User model points to many Car records.
We will not make a relation in the Car model that will point back to the User model because this is a many-way relation.
Polymorphic
We use the collection, model, and filter keys to set up a polymorphic relationship in Strapi from our .settings.json file.
The collection key will have the value * if we want the model to have many model entries.
The model key also will be set to have the * value if we want the model to have one model entry.
The filter key is useful because it distinguishes between different types of models attached to the field.
We have learned all the relations in Strapi and also learned how to set them up both via the Strapi admin UI panel and from a Strapi project. Now, we show how to use some of the relations in Strapi to build a real-life app.
Setting up Strapi project
We will create a Q/A app just like Quora, and users can ask questions, answer questions, and comment on answers. We will build this app so to demonstrate how we can use Strapi relations to link our models.
This project will be in two parts: the backend and the frontend. Of course, the backend will be built using Strapi, and the frontend will be built using Next.js.
We will create a central folder that will hold our both backend and frontend projects:
mkdir relations
We move into the folder: cd relations.
Create the Strapi project:
yarn create strapi-app qa-app --quickstart
The above command will create a Strapi project in qa-app folder inside the relations folder. Strapi will serve the project on localhost:1337. It will launch the Strapi admin UI panel on localhost:1337/admin.
Fill in your details and click on "LET'S START" button.
We will begin to build our collections but first, let's draw our models.
Models
We will have three models for our Q/A app. We will have Question, Answer and Comment.
Our Question model will be this:
    Question {
        qText
        user
    }
-
qText: This will hold the question. -
user: This holds the name of the user.
The Answer model will be this:
    Answer {
        aText
        question
        user
    }
-
aText: This holds the answer text. -
question: This holds the reference to the question. -
user: The user that answered.
The Comment model will look like this:
    Comment {
        cText
        answer
        user
    }
-
cText: This will hold the comment text on the answer. -
answer: This is the reference to the answer. -
user: The user that commented.
We have seen how our collection will look like, now let's build our collections. These models have relationships that connect them. Let's see them below.
One-to-Many
The Question model and the Answer model have a one-to-many relationship. A Question will have many Answers.
Now, we will build a Question collection in Strapi, and also we will create the Answer collection and there we will establish the relation between them.
Now, on the http://localhost:1337/admin/ page click on the Create First Content Type button, a modal will appear.
We will create the **Question** collection.
- Type
questionin theDisplay namefield. - Click on the text field.
- Type
qTextin theNamefield. - Select
Long Textin the below radio button. - Click on
+ Add another field. - Select
text. - Type in
user. - Click on
Finish. - Next, click on the
Savebutton on the top-right of the page.
Next, we will create the **Answer** collection
- Click on the
+ Create new collection typelink, a modal will show up, type inanswer. Click on the+ Add another fieldbutton. - Select
textand type inuser. - Select
relationfield. - On the right box, press on the dropdown element and select
Question. - Click on the fourth small box, counting from left. The box establishes a one-to-many relationship between the
Questioncollection and theAnswercollection. - Click on the
Finishbutton. - Next, click on the
Savebutton on the top-right of the page.
One-to-one
The Comment model and the Answer model have a one-to-one relationship. A comment has one answer.
We will create the Comment collection.
- Click on the
+ Create new collection typelink, a modal will show up, type incomment. Click on the+ Add another fieldbutton. - Select
textfield. - type in
cTextand click on the+ Add another fieldbutton. - Select
relationfield. - On the big box on the right, click on the dropdown element and select
Answer. - Select the first small box, counting from the left. This box establishes the one-to-one relationship between the
Commentand theAnswer. - Click on the
Finishbutton. - Next, click on the
Savebutton on the top-right of the page.
We are done building our collections and establishing their relationships. Now, let's build the front end.
Building the Q/A app
Our app will have two pages: the index and the question view page.
-
/index: This page will display all questions in the app. -
/questions/:id: This page is a dynamic page. It will display the details of a specific question. The details displayed are the answers to the question and the comments are replies to the answers.
Our app will look like this:
Viewing all questions

Adding new question

Answering a question

Commenting on an answer

Deleting a question

Viewing all answers and comments


We will start by scaffolding a Nextjs app. We will scaffold the Nextjs app inside the relations folder, so run the below command:
yarn create next-app qa-front
Now, we move into the directory: cd qa-front.
We will need the following dependencies:
-
axios: We will need this for making HTTP calls to our Strapi collection endpoints. -
quill: An editor we will use for answering questions in our app.
We will install axios via NPM:
yarn add axios
We install and use quill via CDN. Open the _app.js file and add the following code to it:
    import "../styles/globals.css";
    import Head from "next/head";

    function MyApp({ Component, pageProps }) {
      return (
        <>
          <Head>
            <script src="https://cdn.quilljs.com/1.3.6/quill.min.js"></script>

            <link
              href="https://cdn.quilljs.com/1.3.6/quill.snow.css"
              rel="stylesheet"
            />
            <link
              href="https://cdn.quilljs.com/1.3.6/quill.bubble.css"
              rel="stylesheet"
            />
          </Head>
          <Component {...pageProps} />
        </>
      );
    }

    export default MyApp;
We added the CDN scripts and style files of the quill editor to the Head tags of the MyApp component.
Creating Pages
First, we will create a Header component, this component will render our header so it appears in our app.
Run the below command to generate the Header files:
    mkdir components components/Header
    touch components/Header/index.js components/Header/Header.module.css
Now, we open the Header/index.js and paste the below code to it:
    import { header, headerName } from "./Header.module.css";

    export default function Header() {
      return (
        <section className={header}>
          <div className={headerName}>Q/A App</div>
        </section>
      );
    }
This component just renders the text Q/A App in the header section of our app.
Now, to make the component appear application-wide in our app we will go the the MyApp component in _app.js file and render the component.
    import "../styles/globals.css";
    import Header from "../components/Header";
    import Head from "next/head";

    function MyApp({ Component, pageProps }) {
      return (
        <>
          <Head>...</Head>
          <Header />
          <Component {...pageProps} />
        </>
      );
    }

    export default MyApp;
With this, our Header component will be rendered on all pages in our application.
Let's create our page components.
The index.js page will be loaded when the index route / is navigated to.
So, open the index.js file and paste the below code to it:
    import Head from "next/head";
    import styles from "../styles/Home.module.css";
    import QuestionCard from "../components/QuestionCard";
    import { useEffect, useState } from "react";
    import axios from "axios";
    import AddQuestionDialog from "../components/AddQuestionDialog";

    export default function Home() {
      const [questions, setQuestions] = useState([]);
      const [showAddQuestionModal, setShowAddQuestionModal] = useState(false);

      useEffect(async () => {
        const data = await axios.get("http://localhost:1337/questions");
        setQuestions(data?.data);
      }, []);

      return (
        <div className={styles.container}>
          <Head>
            <title>Q/A App</title>
            <link rel="icon" href="/favicon.ico" />
          </Head>

          <main className={styles.main}>
            <div className={styles.breadcrumb}>
              <div>
                <span style={{ margin: "1px" }}>
                  <button
                    style={{
                      backgroundColor: "rgba(185, 43, 39, 1)",
                      border: "1px solid rgba(101, 20, 18, 1)",
                    }}
                    onClick={() => setShowAddQuestionModal(true)}
                  >
                    Add Question
                  </button>
                </span>
              </div>
            </div>

            <div className={styles.questioncontainerr}>
              <div>
                {questions
                  ?.sort((a, b) => b.created_at.localeCompare(a.created_at))
                  .map((question, i) => (
                    <QuestionCard key={i} question={question} />
                  ))}
              </div>
            </div>
            {showAddQuestionModal ? (
              <AddQuestionDialog
                closeModal={() => setShowAddQuestionModal((pV) => !pV)}
              />
            ) : null}
          </main>
        </div>
      );
    }
First, we have two states: questions and showAddQuestionModal. The questions state holds the questions loaded from our Strapi backend. The showAddQuestionModal state is used to toggle the display of the AddQuestionsModal on and off.
We have the useEffect. In the callback of this useEffect, we used the axios module to call the Questions endpoint http://localhost:1337/questions. This endpoint will return all the questions in our backend.
Next, we set the result in the questions state.
In the UI, we have an Add Question button that will set the showAddQuestionModal state to true when clicked. This will make the AddQuestionDialog modal show up.
The questions in the questions state are rendered. Each question in the questions array is rendered by a QuestionCard component. Now, we will create two components: QuestionCard and AddQuestionDialog.
QuestionCard
This presentational component will accept a question object and render a minimal detail of it. Let's create the files and folder.
    mkdir components/QuestionCard
    touch components/QuestionCard/index.js
    touch components/QuestionCard/QuestionCard.module.css
Open the index.js and paste the below code:
    import styles from "./QuestionCard.module.css";
    import Link from "next/link";

    export default function QuestionCard({ question }) {
      const { id, qText, user, answers } = question;

      return (
        <div className={styles.question}>
          <div className={styles.questiondetails}>
            <div
              style={{
                display: "flex",
                alignItems: "center",
              }}
            >
              <span
                style={{
                  display: "block",
                  width: "35px",
                  height: "35px",
                  backgroundColor: "grey",
                  borderRadius: "50%",
                }}
              ></span>
              <span style={{ paddingLeft: "4px" }}>{user}</span>
            </div>
            <Link href={`questions/${id}`}>
              <div className={styles.questionbalance} style={{ cursor: "pointer" }}>
                <h3>{qText}</h3>
              </div>
            </Link>
            <div
              style={{ display: "flex", alignItems: "center", color: "grey" }}
              title="Answers"
            >
              <MsgIcon />
              <span style={{ paddingLeft: "6px" }}>{answers.length}</span>
            </div>
          </div>
        </div>
      );
    }

    export function MsgIcon() {
      return (
        <svg width="24px" height="24px" viewBox="0 0 24 24">
          <g
            id="comment"
            className="icon_svg-stroke icon_svg-fill"
            stroke="#666"
            strokeWidth="1.5"
            fill="none"
            fillRule="evenodd"
          >
            <path d="M12.0711496,18.8605911 C16.1739904,18.8605911 19.5,15.7577921 19.5,11.9302955 C19.5,8.102799 16.1739904,5 12.0711496,5 C7.96830883,5 4.64229922,8.102799 4.64229922,11.9302955 C4.64229922,13.221057 5.02055525,14.429401 5.67929998,15.4641215 C5.99817082,15.9649865 4.1279592,18.5219189 4.56718515,18.9310749 C5.02745574,19.3598348 7.80252458,17.6358115 8.37002246,17.9406001 C9.45969688,18.5258363 10.7235179,18.8605911 12.0711496,18.8605911 Z"></path>
          </g>
        </svg>
      );
    }
We destructured question from the prop args. Next, we destructured the id, qText, user, and answers from the question object. This question object contains the question details. The component then renders these details.
AddQuestionDialog
This component is a modal. New questions are created and added to this system from this component.
Let's create the files:
    mkdir components/AddQuestionDialog
    touch components/AddQuestionDialog/index.js
Open the index.js and paste the below code:
    import { useState } from "react";
    import axios from "axios";

    export default function AddQuestionDialog({ closeModal }) {
      const [disable, setDisable] = useState(false);

      async function addQuestion() {
        setDisable(true);
        const qText = window.question.value;
        const user = window.user.value;

        // add question
        await axios.post("http://localhost:1337/questions", {
          qText,
          user,
        });
        setDisable(false);
        closeModal();
        location.reload();
      }

      return (
        <div className="modal">
          <div className="modal-backdrop" onClick={closeModal}></div>
          <div className="modal-content">
            <div className="modal-header">
              <h3>Add New Question</h3>
              <span
                style={{ padding: "10px", cursor: "pointer" }}
                onClick={closeModal}
              >
                X
              </span>
            </div>
            <div className="modal-body content">
              <div style={{ display: "flex", flexDirection: "column" }}>
                <div className="inputField">
                  <div className="label">
                    <label>User</label>
                  </div>
                  <div>
                    <input id="user" type="text" />
                  </div>
                </div>
                <div className="inputField">
                  <div className="label">
                    <label>Question:</label>
                  </div>
                  <div>
                    <input
                      id="question"
                      type="text"
                      placeholder="Start your question with 'What', 'How', 'Why', etc"
                    />
                  </div>
                </div>
              </div>
            </div>
            <div className="modal-footer">
              <button
                disabled={disable}
                className="btn-danger"
                onClick={closeModal}
              >
                Cancel
              </button>
              <button disabled={disable} className="btn" onClick={addQuestion}>
                Add Question
              </button>
            </div>
          </div>
        </div>
      );
    }
We have a state here disable. This state is used to toggle the disable state of the button in the UI.
Looking at the UI, we have two inputs. The first input holds the name of the user that will ask the question and the second input is where the question will be typed.
The Add Question will call the addQuestion function. This addQuestion function will get the values from the user and question inputs, it will use it to call the http://localhost:1337/questions endpoint.
We passed the question and user texts as payload to the HTTP POST call, this creates the question in the Strapi backend.
Create Question view
This page will display a specified question along with its answers and comments to the answers.
Let's create the files:
    mkdir pages/questions
    touch pages/questions/[id].js
Open [id].js and paste the below code:
    export default function Question() {
      const router = useRouter();
      const {
        query: { id },
      } = router;

      const [question, setQuestion] = useState();
      const [answers, setAnswers] = useState([]);
      const [showAnswerQuestionSection, setAnswerQuestionSection] = useState(false);

      useEffect(async () => {
        if (!id) return;
        const QuestionData = await axios.get(
          "http://localhost:1337/questions/" + id
        );
        var answersData = QuestionData?.data?.answers;
        setQuestion(QuestionData?.data);
        setAnswers(answersData);
      }, [id]);

      async function deleteQuestion() {
        if (confirm("Do you really want to delete this question?")) {
          await axios.delete("http://localhost:1337/questions/" + id);
          router.push("/");
        }
      }

      return (
        <div className={styles.questionviewcontainer}>
          <div className={styles.questionviewmain}>
            <div style={{ width: "100%" }}>
              <div className={styles.questionviewname}>
                <h1>{question?.qText}</h1>
              </div>
              <div className={styles.questionviewminidet}>
                <div style={{ display: "flex" }}>
                  <span>
                    <button
                      onClick={() => setAnswerQuestionSection((pV) => !pV)}
                      className="btn-danger"
                      style={{
                        backgroundColor: "unset",
                        color: "black",
                        border: "unset",
                        display: "flex",
                        alignItems: "center",
                        paddingLeft: "0",
                      }}
                    >
                      <AnswerIcon />
                      <span style={{ paddingLeft: "6px" }}>Answer</span>
                    </button>
                  </span>
                  <span>
                    <button
                      onClick={deleteQuestion}
                      className="btn-danger"
                      style={{
                        backgroundColor: "unset",
                        color: "black",
                        border: "unset",
                        display: "flex",
                        alignItems: "center",
                      }}
                    >
                      <DeleteIcon />
                      <span style={{ paddingLeft: "6px" }}>Delete</span>
                    </button>
                  </span>
                </div>
              </div>
              <div>
                {showAnswerQuestionSection ? (
                  <AnswerQuestionSection question={question} />
                ) : null}
              </div>
              <div className={styles.questionviewtransactionscont}>
                <div className={styles.questionviewtransactions}>
                  <h2>{answers?.length} Answers</h2>
                </div>
                <div
                  className={styles.questionviewtransactionslist}
                  style={{ padding: "unset" }}
                >
                  {!answers || answers?.length <= 0
                    ? "No Answers yet."
                    : answers
                        ?.sort((a, b) => b.created_at.localeCompare(a.created_at))
                        ?.map((answer, i) => <Answer key={i} answer={answer} />)}
                </div>
              </div>
            </div>
          </div>
        </div>
      );
    }
This component gets the id of the question from the router object. This id is used in the useEffect hook callback to call the endpoint "http://localhost:1337/questions/" + id.
This will return the question with its details, the details will be stored in the question state. Then, the answers to the question will be stored in the answers state.
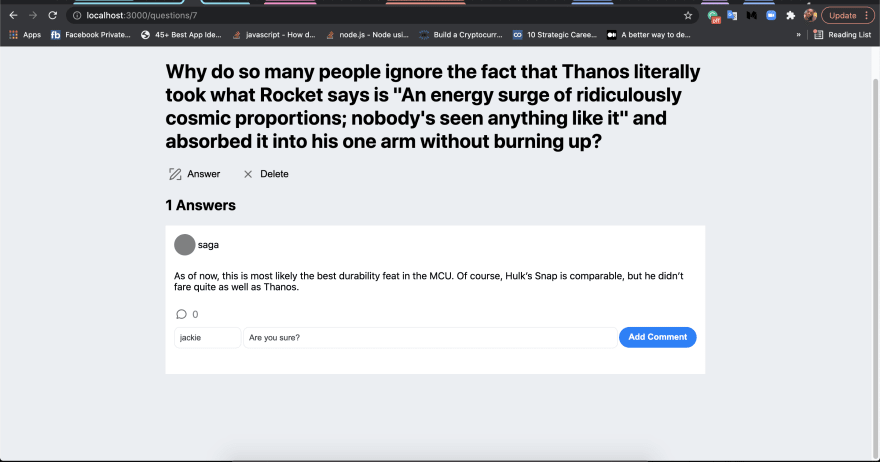
The UI displays the question details and the answers to the question. The comments of the answers are also all displayed.
The deleteQuestion function deletes the question from our Strapi backend. It calls the "http://localhost:1337/questions/" + id endpoint with the id of the question, the HTTP verb is DELETE which will delete the question from the backend.
The AnswerQuestionSection component is where the answer to the question is typed. This component is toggled by the showAnswerQuestionSection state, this state is manipulated by the MsgIcon. Let's see the code for this AnswerQuestionSection component:
    function AnswerQuestionSection({ question }) {
      var options = {
        placeholder: "Write your answer",
        readOnly: false,
        theme: "snow",
      };
      const editorRef = useRef();
      const userRef = useRef();
      const [disable, setDisable] = useState(false);
      const [q, setQuill] = useState();

      useEffect(() => {
        if (q) return;
        const _q = new Quill(editorRef.current, options);
        setQuill(_q);
      }, [q]);

      function answerQuestion() {
        setDisable(true);
        axios.post("http://localhost:1337/answers", {
          aText: q.getText(),
          user: userRef.current.value,
          question: question?.id,
        });
        setDisable(false);
        window.location.reload();
      }

      return (
        <div
          style={{
            marginTop: "16px",
            backgroundColor: "white",
          }}
        >
          <>
            <div>
              <input type="text" placeholder="Enter user here..." ref={userRef} />
            </div>
            <div ref={editorRef} style={{ backgroundColor: "white" }}></div>
            <div
              style={{
                display: "flex",
                justifyContent: "flex-end",
                padding: "14px",
              }}
            >
              <button
                style={{ borderRadius: "14px" }}
                onClick={answerQuestion}
                disabled={disable}
              >
                Post
              </button>
            </div>
          </>
        </div>
      );
    }
This component initializes a Quill editor in the div[name="editor"]. We have an input that collects the name of the user answering the question. The Post button will call the answerQuestion function when clicked. This answerQuestion function will call the endpoint http://localhost:1337/answers. The answer text, user name, and the question id are sent to the endpoint call as payload. The page is reloaded to reflect the new additions.
Let's code the Answer component:
    function Answer({ answer }) {
      const { aText, user, id } = answer;
      const [comments, setComments] = useState([]);
      const [showCommentInput, setShowCommentInput] = useState(false);
      const commentRef = useRef();
      const userRef = useRef();

      useEffect(async () => {
        const data = await axios.get("http://localhost:1337/comments/");
        const _comments = data?.data?.filter(
          (comment) => comment?.answer?.id == id
        );
        setComments(_comments);
      }, []);

      async function addComment() {
        const resultData = await axios.post("http://localhost:1337/comments/", {
          cText: commentRef.current.value,
          user: userRef.current.value,
          answer: id,
        });
        // set the comments to the comments state

        setComments((pV) => [...pV, resultData?.data]);
        userRef.current.value = "";
        commentRef.current.value = "";
        setShowCommentInput(false);
      }

      return (
        <div
          className={styles.question}
          style={{
            borderBottom: "1px solid rgba(234, 238, 243, 1)",
            padding: "14px",
          }}
        >
          <div className={styles.questiondetails}>
            <div
              style={{
                display: "flex",
                alignItems: "center",
              }}
            >
              <span
                style={{
                  display: "block",
                  width: "35px",
                  height: "35px",
                  backgroundColor: "grey",
                  borderRadius: "50%",
                }}
              ></span>
              <span style={{ paddingLeft: "4px" }}>{user}</span>
            </div>
            <div
              className={styles.questionbalance}
              style={{
                cursor: "pointer",
                paddingTop: "24px",
                paddingBottom: "24px",
              }}
            >
              <span>{aText}</span>
            </div>
            <div
              style={{
                display: "flex",
                alignItems: "center",
                color: "grey",
                cursor: "pointer",
              }}
              onClick={() => setShowCommentInput((pV) => !pV)}
            >
              <MsgIcon />
              <span style={{ paddingLeft: "6px" }}>{comments?.length}</span>
            </div>
            <div>
              {showCommentInput ? (
                <div
                  style={{
                    display: "flex",
                    flexDirection: "row",
                    alignItems: "center",
                    marginTop: "9px",
                  }}
                >
                  <input
                    type="text"
                    placeholder="Enter user..."
                    style={{
                      borderRadius: "9px",
                      width: "110px",
                      marginRight: "3px",
                    }}
                    ref={userRef}
                  />
                  <input
                    type="text"
                    placeholder="Add comment..."
                    style={{ borderRadius: "9px" }}
                    ref={commentRef}
                  />
                  <button
                    style={{
                      borderRadius: "19px",
                      fontSize: "14px",
                      fontWeight: "bolder",
                      boxSizing: "content-box",
                    }}
                    onClick={addComment}
                  >
                    <div style={{ display: "flex", whiteSpace: "nowrap" }}>
                      Add Comment
                    </div>
                  </button>
                </div>
              ) : null}
            </div>
            <div
              style={{
                paddingTop: "14px",
                marginLeft: "23px",
                marginBottom: "14px",
              }}
            >
              {comments
                ?.sort((a, b) => b.created_at.localeCompare(a.created_at))
                .map((comment, i) => (
                  <Comment key={i} comment={comment} />
                ))}
            </div>
          </div>
        </div>
      );
    }
This component is passed an answer object in its props object args. It uses the id from the answer object to fetch the comments connected to the answer. The comments are stored in the comments state
We have a showCommentInput state to toggles a UI section. This section is where users can comment on an answer. This section is opened when the MsgIcon beneath each answer is clicked. The comment section has two inputs that hold the commenter's name and the comment text, then the Add Comment button adds the comment to the answer.
This Add Comment button calls the addComment function. This addFunction function makes an HTTP POST call the http://localhost:1337/comments/ endpoint, the comment text, user name, and the answer id is sent also as the POST payload. This activity creates a new comment in our Comment collection.
The comments in the answer are rendered in this component, each comment is handled by the Comment component. Let's code the component:
    function Comment({ comment }) {
      const { user, cText } = comment;
      return (
        <div
          className={styles.question}
          style={{
            backgroundColor: "rgba(234, 238, 243, 1)",
            padding: "14px",
            marginBottom: "4px",
          }}
        >
          <div className={styles.questiondetails}>
            <div
              style={{
                display: "flex",
                alignItems: "center",
              }}
            >
              <span
                style={{
                  display: "block",
                  width: "35px",
                  height: "35px",
                  backgroundColor: "grey",
                  borderRadius: "50%",
                }}
              ></span>
              <span style={{ paddingLeft: "4px" }}>{user}</span>
            </div>
            <div
              className={styles.questionbalance}
              style={{
                cursor: "pointer",
                paddingTop: "14px",
                paddingBottom: "14px",
              }}
            >
              <span>{cText}</span>
            </div>
          </div>
        </div>
      );
    }
This component accepts a comment object in its props arg. This comment object contains the comment of an answer to render. The commenter and the comment text is destructured from the comment object. These are then displayed in the UI.
Test app
Add new question


View a question

Answer a question


Comment on an answer

Delete a question


Source code
Find the source code of the project below:
We covered a lot in this tutorial. We started by introducing relationships in the database and going through the types of relationships one after the other explaining what they are.
Next, we saw how we can set up a Strapi project and how we can establish relations in Strapi collections.
Finally, we built a Q/A app just like Quora to fully demonstrate how relations in Strapi can be used in a real-life app.
This article is a goldmine of Strapi info.

Top comments (1)
Understand your data structure in a blink of an eye ... show you information about the Strapi and Node versions that you're currently using,best tantrik in Meerut