
A/B testing compares two versions of an app's functionalities to determine which performs better. It is commonly used to optimize user experiences, meet user needs, and make data-driven decisions about design and functionality.
In an A/B test, users are separated into two different groups, known as the control group and the treatment group; the control group is shown the original version (A), while the treatment group is shown a modified version (B). These two groups are compared to see which version leads to a better outcome, such as more clicks, purchases, or sign-ups.
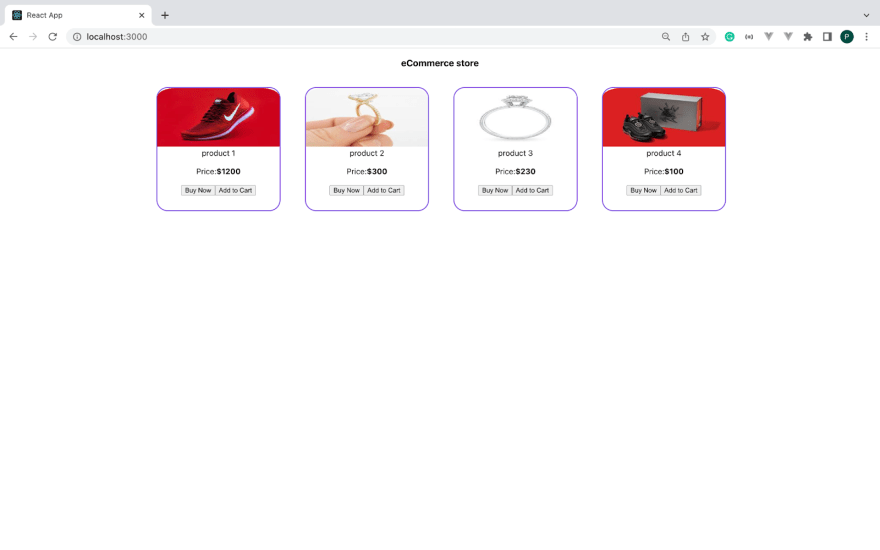
This tutorial will explore using React, Strapi, and Optimizely to build a simple e-commerce web application that implements A/B testing. Here’s a preview of what our final output will look like.
Goals
In this tutorial, you will learn how to:
- Create an e-commerce website with Strapi and React
- configure A/B testing in a react application.
- Perform A/B testing on two buttons using Optimizely.
Prerequisite
As a prerequisite for completing this tutorial, you should meet the following requirements.
- Node.js v14 or v16 installed on your computer.
- You should be familiar with React.
- You will need an Optimizely account.
Benefits of A/B testing
Here are some benefits of conducting A/B testing on applications.
Improved Decision-Making
A/B testing allows businesses to make data-driven decisions about their products rather than relying on assumptions or guesswork. This can lead to more informed and effective decision-making.
Increased Conversions
A/B testing can help businesses increase the number of conversions (such as sales or sign-ups) on their websites or apps by identifying which design elements or features are most effective at encouraging users to take a desired action.
Enhanced User Experience
A/B testing can help businesses understand what their users want and need, allowing them to design more tailored products. This can improve user experience, increasing customer satisfaction and loyalty.
Increased Efficiency
A/B testing can help businesses identify which features or design elements are not adding value, allowing them to streamline their products and save time and resources.
Greater Insights
A/B testing can provide valuable insights into user behaviour and preferences, which can help businesses better understand their customers and make more informed decisions about their products and marketing strategies.
Implementing A/B Testing in an E-commerce App
Let's create a simple e-commerce website using React and Strapi CMS and examine how to run A/B testing on the website.
To begin, we must first set up our website backend. You can install Strapi by running the command below in your terminal:
npm install strapi-app audit-log --quickstart
Once the installation is completed, open http://localhost:1337/admin in your browser and register. You will then be redirected to your dashboard page.
Creating Collection Type
We will use the Strapi content-type builder plugin to define how we want to store records in our Strapi backend. For our application, we only need one collection type(store). This collection type will contain a list of available products and their details.
To create the store collection type, navigate to the Content-type Builder under plugins in the side navigation bar. Next, click Create a new collection type, enter store as the Display name, and click Continue, as shown in the image below.

Next, we must add the necessary fields to the store collection type. Add the following fields to the collection and click on the save button.
productName: (Text - Short Text)
productPrice: (Number - Integer)
productIMG: (Text - Short Text)

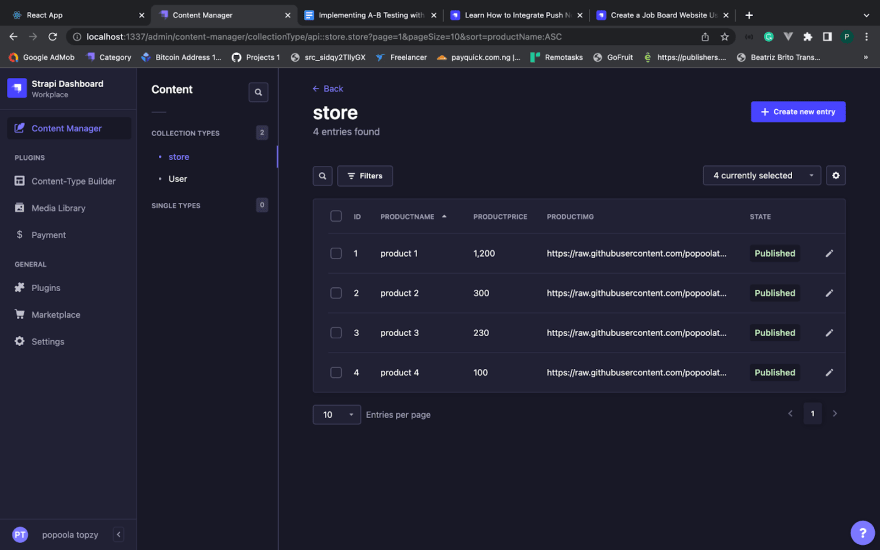
Now that we have created the store collection type, let's add some test products. From the side navigation bar, click on Content Manager > Store and add the product as shown in the image below.
We must also make the store collection type public access before accessing it at the front end.
From the side menu, navigate to Settings > Users & Permission Plugin > Roles > Public, and then click on Store and select all. Save the settings.

How to Create an Optimizely Account
Optimizely is a digital experience optimization platform that allows businesses to conduct A/B testing and personalization on their websites and mobile apps. Optimizely also offers integrations with various marketing and analytics platforms, such as Google Analytics and Salesforce.
To get started, we'll need to create an Optimizely account. To create an Optimizely account, follow the steps below:
- Go to the Optimizely website (https://www.optimizely.com/), fill out the registration form, and click the "Submit" button.

- After the registration, you will receive an email containing a link to create a new password for your account.

- Use the link to set your account password and log in to your optimizely dashboard.
Optimizely A/B testing configuration
Creating Flag
The Optimizely flag is a technique that allows turning certain functionality on or off without deploying new code, enabling better control over the full lifecycle of features.
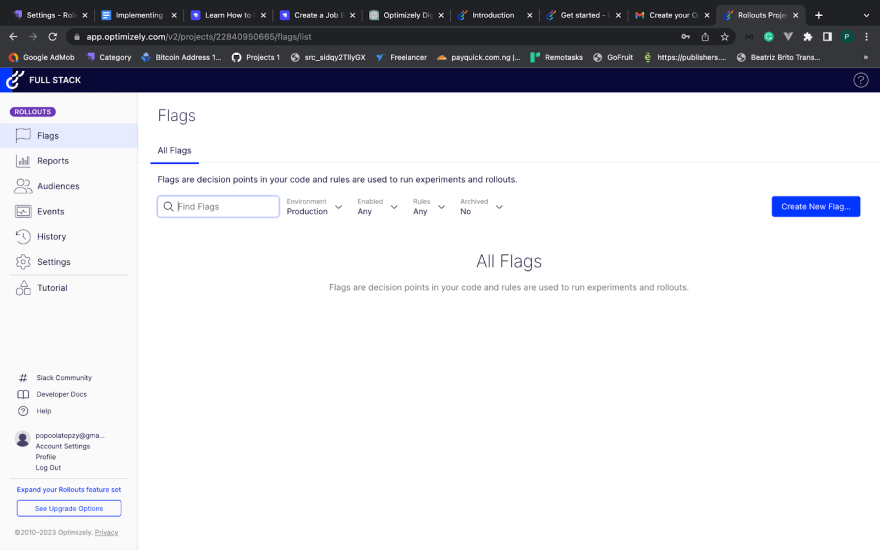
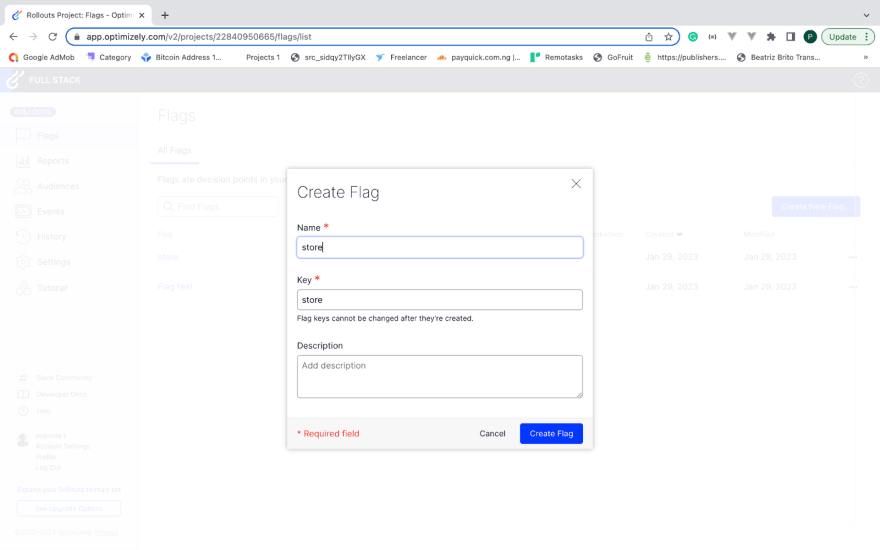
To create a new Optimizely flag, navigate to the Flags menu from the dashboard, click on Create New Flag, name the flag key store, and then click Create Flag, as shown below.
Next, we need to add two default variables to the store flag. To do this, click on the Default Variables option under Flag Setup. Add the variables add_to_cart and buy_now, as shown in the image below.

After adding the default variables, we need to add the A/B testing variations, the control and treatment groups. To add these variations, click on Variations and then click on the + icon. Create the two variations as follows.
variable1 - name Add to Cart with key add_to_cart, and a value of Add to Cart.

variable2 - name Buy Now with key buy_now, and a value of Add to Cart.

Creating Events
Next, we need to create an event to track when a user clicks a button (variation). From the side menu, click on Event, then add the add_to_cart and buy_now events, as shown in the image below.

Creating A/B Testing Rule
We need to add a rule that determines the behaviour of our A/B testing. Click on your environment (Production) from the store flag page and add a new A/B Test rule. Next, configure the experiment as shown in the image below:

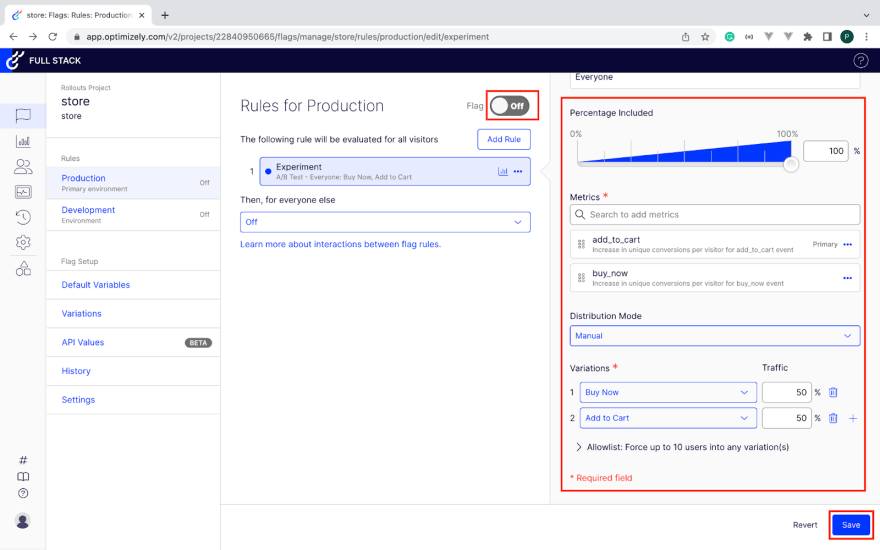
Save the configuration and switch the Production flag on, as shown in the image above.
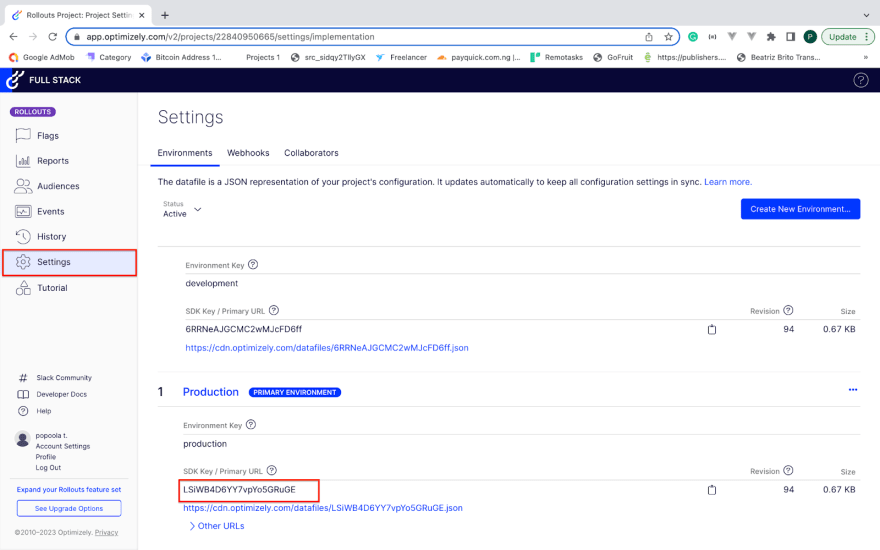
Finally, before using the Optimizely SDK in our application, we must copy the environment key. To obtain the environment key, navigate to Settings and copy the key (Production).
Implementing A/B Testing into react app
Now that we have set up the backend and configured the A/B testing on Optimizely let's run A/B testing on the "Buy Now" and "Add to Cart" buttons on the homepage.
Let's create a new React project. Open your terminal and install React using the command below.
    npx create-react-app my-app
    cd my-app
    npm start
After the installation of the React app, we need to install the Optimizely SDK using the command below:
npm install @optimizely/react-sdk
From the project root directory, open the src/app.js file and replace its content with the following code.
    import "./style.css";
    import { useState, useEffect } from "react";
    // import React from "react";
    import {
     createInstance,
     OptimizelyFeature,
     OptimizelyProvider,
     withOptimizely,
    } from "@optimizely/react-sdk";
    import React from "react";

    const optimizely = createInstance({
     sdkKey: "Optimizely_SDK_Key",
    });

    class Buy_Now_Button extends React.Component {
     onClick = () => {
       const { optimizely } = this.props;
       // after we’ve confirmed purchase completed
       optimizely.track("buy_now");
     };

     render() {
       return <button onClick={this.onClick}>Buy Now</button>;
     }
    }

    const WrappedBuyNowButton = withOptimizely(Buy_Now_Button);

    class Add_to_Cart_Button extends React.Component {
     onClick = () => {
       const { optimizely } = this.props;
       // after we’ve confirmed purchase completed
       optimizely.track("add_to_cart");
     };

     render() {
       return <button onClick={this.onClick}>Add to Cart</button>;
     }
    }

    const WrappedAddaToCartButton = withOptimizely(Add_to_Cart_Button);

    function App() {
     const [store, setStore] = useState([]);

     function update() {
       fetch("http://localhost:1337/api/stores")
         .then((res) => res.json())
         .then((store) => {
           setStore(store.data);
         });
     }
     useEffect(() => {
       update();
     }, []);

     return (
       <OptimizelyProvider
         optimizely={optimizely}
         user={{
           id: "user13122",
         }}
       >
         <div>
           <center>
             <h3> eCommerce store</h3>
             <div className="body">
               {store.map((list, i) => {
                 return (
                   <div className="card">
                     <img className="image" src={list.attributes.productIMG} />
                     <span>{list.attributes.productName}</span>
                     <br />
                     <br />
                     <span>
                       Price:<b>${list.attributes.productPrice}</b>
                     </span>
                     <br />
                     <br />
                     <WrappedBuyNowButton></WrappedBuyNowButton>
                     <WrappedAddaToCartButton></WrappedAddaToCartButton>
                   </div>
                 );
               })}
             </div>
           </center>
         </div>
       </OptimizelyProvider>
     );
    }

    export default App;
The code above fetches all the products from the Strapi back-end, and in the markup, we loop through all the store products and display a simple product card for each iteration.
We instantiate the Optimizely SDK and pass in our Optimizely environment key. We also create two components (Buy Now and Add to Cart) that keep track of the user's button clicks.
To proceed, create a new style.css file in the application root directory and add the following code.
    .card {
       width: 250px;
       height: 250px;
       border-radius: 9%;
       float: left;
       margin-left: 50px;
       margin-top: 20px;
       border: 2px solid rgba(69, 9, 209, 0.743);
    }

    .body {
       width: 70%;
       height: 400px;
    }

    .image {
       width: 250px;
       height: 120px;
       border-top-left-radius: 15%;
       border-top-right-radius: 15%;
    }
The code above adds some basic styling to the product card that we created earlier. Previewing our application, we should see an output like the one below.
As users click on either of the two buttons, we can view the statistics of users who clicked on the Buy Now and Add to Cart buttons from our Optimizely account and make decisions based on these statistics.
To view the A/B testing statistics, go to the Optimizely menu, click on Report, and select Experiment. You should then see the A/B testing report, as shown below.

Conclusion
This article taught us how to implement A/B testing in an e-commerce app using React, Strapi, and Optimizely. To learn more about Optimizely A/B testing, you can read more on their official documentation.
You can find the source code for the e-commerce application on GitHub.

Top comments (0)