
In this step-by-step beginners tutorial, you'll learn how to integrate Nuxt Previews using Strapi as the backend to preview content before publishing it.
Author: Mark Munyaka
In today's Jamstack world, pages are generated at build time, and you can deploy the static assets to any CDN network where it is served to users. However, one drawback of this approach is that there is no server-side rendering on the fly, and editors can not preview content before publishing it.
Strapi is an open-source content management system based on Node.js with exposed APIs for developers to design and deliver content faster. Strapi comes inbuilt with lots of great benefits and is also very popular among the Jamstack community.
To learn more about Strapi and what it does, you can learn it from the Strapi Features Page, as that is out of scope in this content.
In this beginners tutorial, you'll learn how to integrate Nuxt Previews using Strapi as the backend.
As much as this domain is still under development, many solutions have been created to solve the problem, generating a preview deployment by rebuilding the entire website on a Test URL.
The first approach also has its challenges of longer rebuild time, giving way to the second approach, which takes advantage of those statically generated frameworks such as Nuxt.js that can hydrate into a full-blown single-page application.
We can then use JavaScript on the client-side to dynamically fetch the content from the CMS.
This feature is made possible in Nuxt.js > 2.13, and in this article, we will discuss how to set it up with the Strapi backend and implement previews in a Nuxt.js single page application successfully.
Prerequisites
Before you can jump into this content, you need to have:
- Basic knowledge of JavaScript,
- Basic knowledge of Vue.js,
- Basic knowledge of Nuxt.js, and
- Basic understanding of Strapi - get started here.
Enabling Preview Mode in Nuxt (> v2.13)
Before starting enabling and implementing previews in Nuxt.js, we need to install and set up Nuxt.js 2.13 or later in our local machine. To install Nuxt.js, run through the following steps or skip if you already have it installed.
npx create-nuxt-app nuxt-preview-demo
Follow through the instructions and select your preferred choice. Make sure to choose SSR and Static hosting at rendering mode and deployment target, respectively.
Now that we have our Nuxt.js application installed successfully, we need to enable Nuxt preview. Please create a new file in the plugins folder called preview.client.js and paste the following code.
    // plugins/preview.client.js
    export default function ({ query, enablePreview }) {
      if (query.preview) {
        enablePreview()
      }
    }
Next, add the newly created file to your nuxt.config.js to enable the Nuxt Preview plugin. Open your nuxt.config.js file and add this script to the plugins array.
    export default {
      //...

      plugins: ['~/plugins/preview.client.js']

      //...
    }
After configuring the preview successfully, if you visit any page of your Nuxt app with ?preview=true query parameter, Nuxt will invoke the enablePreview() function and disable any data from the server calls nuxtServerInit, asyncData, and fetch methods on the client-side.
To test the preview mode, you need to run the following commands:
    npx nuxt generate
    npx nuxt start
The first command will generate a static SPA application, and the second command will start the development server. If you look at the Network tab of your browser, you will see that Nuxt makes a call to the API even if it's in preview mode, so we can plug in Strapi API to generate data from our Strapi backend.
Previewing New Pages
For pages that are not generated yet, if you call them with the ?preview=true parameter, Nuxt will call the API first before showing the 404 error as the pages exist on the API but are not generated yet.
If you don't want it to redirect to the 404 pages in Preview mode, you can call the validate hook to handle such redirection.
    validate({ params, query }) {
      if (query.preview) {
        return true
    }
Scaffolding a Strapi App
To install and set up a Strapi application is as easy as just running the following commands. Inside the nuxt-preview-demo folder you created above, run the following commands.
    yarn create strapi-app nuxt-preview-api --quickstart
    cd nuxt-preview-api
    # If the server is not started by default
    yarn develop
We will have the Nuxt.js app and Strapi backend in the same folder. You can separate them if you want. The Strapi server should already be started. Open the Admin registration page on your default browser at localhost:1337/admin.
Fill in your details and click on the "LET'S START" button. Strapi will create your account and will load the admin UI.
Build the Collection
Next, we will build our first collection and fill in some dummy post data to display with our Nuxt Preview. To create the collection, open the Admin panel and click on Content-Type Builder on the left side of the page.
When the page loads, click on Create new collection type still on the left side of the page and fill in the following data.

Click on Continue to create a new Post collection. If you noticed, I have created other collections. That's the flexibility of Strapi.
Next, we need to fill the Post collection with lots of Post data. You can achieve this in two ways: using the Admin UI and using Strapi generated API.
We will use the Admin UI for this tutorial, so follow the following steps to add Posts to the Post Collection you just created.
After clicking on Continue, it will present you with another modal to select a field for your collection type.

Select Text, choose Short text for type and fill in title in the name field. Click in Add another field and repeat the process but name it description and select Long Text for the description field. Next add a Rich text field named content.
After adding all the required fields, click on Save to save the collection and wait for your Strapi app to restart.
Click on the Content Manager on the left side. Select Post under the COLLECTION TYPES.
Next, click on Create new entry button to add a new post. Click on Save and Publish buttons, and repeat the process to add five different posts content.
Integrating Strapi with Nuxt Preview
Before we can integrate the Strapi backend with the Nuxt preview, we need to configure and set up the Nuxt app we have already created at the beginning of this article. We will start by creating pages and components to represent a fully developed website.
While trying to access the Post API, if you have any permission errors, you need to access the public user in the Strapi dashboard. To allow access, click on Settings, then click on Roles and select Public, then check on Select All to assign all permissions to the Public User under the Users-permissions and check on Select All for the Post permissions and click on Save.
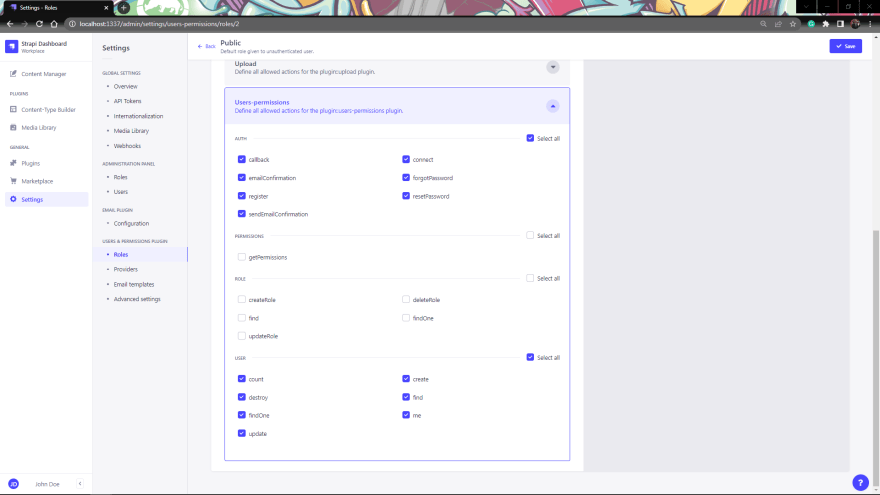
You should be able to access the Posts API after allowing permission successfully.
Creating Pages
- Open the
/pagesfolder and createtouch posts/index.vuefile. Paste in the following script inpages/posts/index.vuefile:
    <template>
      <div>
        <section>
          <div class="container">
            <h3 class="mt-5 text-center">Top Rated Posts</h3>
            <p>A list of our highly rated posts.</p>
            <Posts class="text-left" />
          </div>
        </section>
      </div>
    </template>
    <script>
    export default {}
    </script>
- Next, the
Postscomponent contains the logic of retrieving the posts from our Vuex State and presenting them to the browser.
    // /components/Posts.vue

    <template>
      <div class="row row-cols-1 row-cols-md-3 g-4">
        <Post v-for="post in posts" :key="post.id" :post="post" />
      </div>
    </template>
    <script>
    import { mapState } from 'vuex'
    export default {
      computed: {
        ...mapState({
          posts: (state) => {
            return state.posts
          },
        }),
      },
    }
    </script>
    <style></style>
- Next, we have the
Postcomponent, which represents a single Post and how to display it.
    <template>
      <div class="col">
        <div class="card h-100">
          <div class="card-body">
            <h5 class="card-title">{{ post.attributes.title }}</h5>
            <p class="card-text">
              {{ post.attributes.description }}
            </p>
            <nuxt-link :to="`/posts/${post.id}`" class="btn btn-primary text-white"
              >View Post</nuxt-link
            >
          </div>
        </div>
      </div>
    </template>
    <script>
    export default {
      props: {
        post: {
          type: Object,
          default: () => {},
        },
      },
    }
    </script>
    <style scoped>
    a {
      color: inherit;
    }
    </style>
- Next, we have our
index.jsstore file where the Post is fetched from, and in there, we connected to our Strapi backend to retrieve the posts data and store it in thepostsstate.
    // store/index.js
    export const state = () => ({
      posts: [],
    })
    export const mutations = {
      STORE_POSTS(state, posts) {
        state.posts = posts
      },
    }
    export const actions = {
      async nuxtServerInit({ commit }) {
        const posts = await this.$axios
          .$get('http://localhost:1337/api/posts')
          .catch((e) => console.error(e))
        commit('STORE_POSTS', posts.data)
      },
    }
In this index.js file, we use the nuxtServerInit function, which is only available on the server-side, to fetch post content on the client-side.
That's the power of the Nuxt Preview, and it's beneficial for generating static pages either for testing or hosting on a static hosting platform like Github Pages or Netlify.

The image above shows that when we added the ?preview=true parameter, we can retrieve the Posts from our Strapi Backend using the nuxtServerInit function.
Conclusion
So far, we have learned about Nuxt Preview and how we can integrate the Strapi backend with it to automatically generate content from the Server-side even when we are on the Client-side of Nuxt.js. We have learned how to set up and configure Strapi and Nuxt.js together to smooth the contents. Click here to view the Github repo for the tutorial.

Top comments (1)
Really nice and complete explanation on how to setup that one, thanks! 🙏🏻