React and Strapi are two popular technologies in the developer ecosystem, and they make a powerful combination for building applications. React is a widely-used JavaScript library for building user interfaces that allow developers to create reusable components for building complex and interactive web applications. Strapi is an open-source headless CMS that lets developers choose their favorite tools and frameworks while allowing editors to manage and distribute their content using their application's admin panel.
By using React for the front-end and Strapi for the back-end, developers can create a seamless user experience that is fast, reliable, and customizable. Strapi's flexible content modeling and REST API capabilities make managing and retrieving data easy. At the same time, React's component-based architecture provides a powerful toolkit for building interactive and dynamic UIs.
In this tutorial, you will learn how to build a meme generator application that enables users to create and alter humorous pictures or videos. You will use React to retrieve memes from Strapi and add text of your choice.
Prerequisites
Before we start, we need to equip ourselves with the following:
- Install Node on your local machine.
- Basic understanding of Strapi - get started with this quick guide.
- Basic knowledge of React.js.
Creating a New React App
If you have at least npm version 5.2, we can use the tool npx to create a new React project. Check out the React documentation to learn more, and then proceed with the steps below to create a new React app.
But first, ensure node.js is installed on your system.
Next, we need to create a new directory, Memegen
mkdir Memegen && cd Memegen
Then, run the command below to create the React app:
npx create-react-app name-of-project
OR
npm create-react-app name-of-project
Running this command will initially ask permission to install React temporarily and its associated packages. Once finished, you can start the app by running the command below.
npm start
This should open up the URL (http://localhost:3000) on your default browser.
Designing the Meme Generator
Meme Generator is very easy to use. The app design is straightforward. When creating memes, the user can only change the image and the text, so you don't have to worry about formatting or design.
We will design a meme generator app for our project. First, open your React app Memegen in a code editor, navigate through the src folder, and create a file meme.jsx, and paste the code below:
    import react from "react";
    import "./style.css";
    function Meme() {
      return (
        <div className="meme-container">
          <nav className="navbar">
            <img className={props.memeLogo} src="" alt="memeLogo" />
            <p className="title">Strapi Meme Generator</p>
          </nav>
          <div className="input-field">
            <input
              type="text"
              placeholder="Enter the first line..."
              name="firstline"
            />
            <input
              type="text"
              placeholder="Enter the second line..."
              name="secondline"
            />
          </div>
          <button className="generateBTN">Load random image</button>
        </div>
      );
    }
    export default Meme;
Following that, add a logo to our nav bar. Navigate to your src folder and replace the code within the App.jsx with the following:
    import react from "react";
    import Meme from "./meme.jsx";
    import "./style.css";
    import memeLogo from "./images.jpg";
    function App() {
      return (
        <div className="app-container">
          <Meme memeLogo={memeLogo} />
        </div>
      );
    }
    export default App;
To get the logo image, you can download any meme image, paste it into your src folder, and save it as images.jpg.
From the code above, pass memeLogo as a prop to the meme component. Next, create another file style.css, in our src folder for a little styling.
    *{
        margin: 0px;
        padding:0px;
        box-sizing:border-box;
        font-family:sans-serif;
        user-select:none;
        color: white;
    }
    .memeLogo{
    height:90px;
    }
    .app-container{
       max-width: 400px;
       height: auto;
       background-color: black;
       margin: 30px auto;
       border-radius: 35px;
       overflow: hidden;
       border-radius: 15px;
    }
    .navbar{
        display:flex;
        align-items: center;
        justify-content: space-between;
        background-color: #1c1c1c;
        padding: 6px 33px;
        width: 100% ;
    }
    .title{
        font-size: 16px;
        font-weight: bold;
        color: #94BD9C ;
    }
    .input-field{
        display: flex;
        justify-content: center;
        flex-wrap: wrap;
        align-items: center;
        margin: 18px 0px;
    }
    input{
        padding: 9px;
        font-size: 15px;
        margin: 5px 2px;
        color: black;
        width: 180px;
        border: none;
        outline: none;
        background-color: white;
        color: black;
        border-radius: 9px;
    }
    ::placeholder{
        color: black;
    }
    input:focus{
        outline:2px solid #ffbd08;
        color:black;
    }
    .generateBTN{
        margin:1px auto;
        padding:9px;
        background-color:#6aca7d ;
        color: black;
        font-weight: bold;
        margin-left: 30%;
        border-radius: 9px;
    }
    .generateBTN:active {
        background-color: #4ed08a;
    }
    .meme-image{
        margin: 21px auto;
    }
    .imageMeme {
    max-width: 350px;
    height: auto;
    margin: 12px 10px 20px 25px;
    border-radius: 9px;
    border: 2px solid white;
    }
    .first{
        position: absolute;
        top:18rem;
        /* right: 5px; */
        padding-left: 50px;
        color: white;
    }
    .second{
        position: absolute;
        top:28rem;
        /* right: 5px; */
        padding-left: 220px;
        color: white;
    }
Ensure your src/index.js is the same as this:
    import React from "react";
    import ReactDOM from "react-dom/client";
    import App from "./App.jsx";
    const root = ReactDOM.createRoot(document.getElementById("root"));
    root.render(
      <React.StrictMode>
        <App />
      </React.StrictMode>
    );
If you follow this tutorial, your browser should display something similar to the image below.

Setting up Strapi Project
To set up Strapi for our project, first, create a new directory in Command Prompt (CMD) mkdir strapi-back-end, and then run the command below to create a new Strapi project:
npx create-strapi-app@latest my-project --quickstart
or
yarn create strapi-app my-project --quickstart
When you run the command above, you will be prompted to choose your preferred installation method; select Quick Start to proceed. As shown in the screenshot, you will also be asked if you want to use a template; if you do not, Strapi will complete the installation quickly.
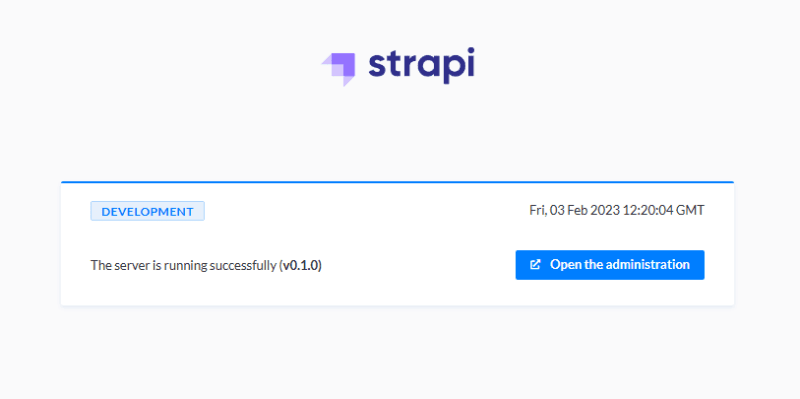
After the installation, the Strapi app should launch in your browser and display the following page. Or copy and paste the http://localhost:1337 link from your cmd into your browser.

Enter the open the administration, then signup or log in if you have already registered. You should have a page on your browser like this:

Integrating Meme with Strapi
Now upload meme images into your Strapi back-end using the media library.
Media Library allows you to upload images, videos, audio, or documents. Using the media library, you can quickly find the right asset, edit it, and reuse it.
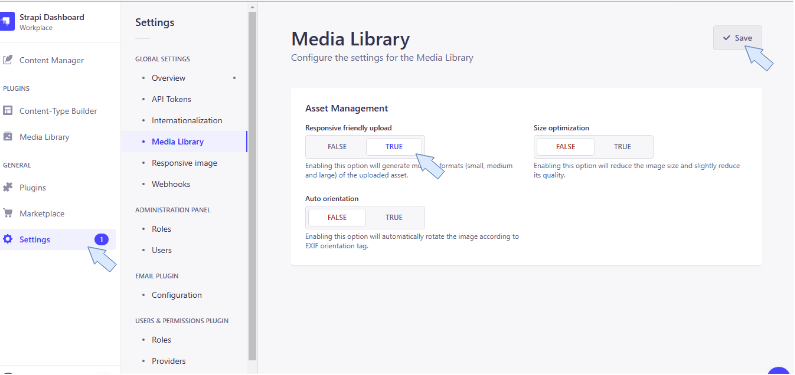
Now, on your Strapi admin pane, go to settings, and click on media. If not enabled, enable responsive friendly upload, and save.

Uploading Meme Images into Media Library
We have completed the configuration of our media library. It will appear on your dashboard automatically. Next, click on the media library, then click on the add new assets button, add any meme image, and hit upload 1 asset to the media library just like the image below.

Creating Collection Types
To make a collection type, go to the content-type builder on your admin homepage and create a new collection type called Meme which carries two fields:
- name: text
- meme: single media
The name has a text field, whereas the meme has a media field where we will publish all of our meme images.
Note: don’t forget to enable the permissions for
findandfindOne. You can do that by going to settings > roles > public and choosing the meme content type.
Next, we must publish the meme images uploaded to our media library. To do so, go to the Content Manager, select Meme collection type, and click the Create New Entry button.

Next, fill in the input field name and a meme image from the media library. Save and Publish. You can publish as many meme images as you want for your project.
After that, navigate to Settings, choose Roles, and select Public. To allow all application activities, we scroll down to Permissions, click on Meme, and then select all. This procedure allows us to access our API completely.
Generating Meme from Strapi Back-end
Now you will fetch the meme images from the Strapi back-end to our meme generator application. Strapi API does not retrieve relations, media fields, components, or dynamic zones by default. We'll use the populate parameter to retrieve all fields from our API. For more information, visit Strapi populating fields. Next, navigate to src/meme.jsx and add the following code:
    import react from "react";
    import "./style.css";
    import React, { useState, useEffect } from "react";
    function Meme(props) {
      const [appData, setAppData] = useState({
        firstline: "",
        secondline: "",
      });
      // const [newMemeData, setNewMemeData] = useState([]);
      const [memeList, setmemeList] = useState([]);
      const [randomMeme, setrandomMeme] = useState(null);
      function meme() {
        fetch("http://localhost:1337/api/memes?populate=meme")
          .then((res) => res.json())
          .then((meme) => {
            setmemeList(meme.data);
          });
      }
      useEffect(() => {
        meme();
      }, []);
      function getRandomMeme() {
        const randomNumber = Math.floor(Math.random() * memeList.length);
        let randomMemeURL =
          memeList[randomNumber].attributes.meme.data.attributes.url;
        setrandomMeme(randomMemeURL);
      }
      function enterLine(event) {
        setAppData((prevAppData) => {
          return {
            ...prevAppData,
            [event.target.name]: event.target.value,
          };
        });
      }
      console.log(appData);
      return (
        <div className="meme-container">
          <nav className="navbar">
            <img className="memeLogo" src={props.memeLogo} alt="memeLogo" />
            <p className="title">Strapi Meme Generator</p>
          </nav>
          <div className="input-field">
            <input
              type="text"
              placeholder="Enter the first line..."
              name="firstline"
              onChange={enterLine}
              value={appData.firstline}
            />
            <input
              type="text"
              placeholder="Enter the second line..."
              name="secondline"
              onChange={enterLine}
              value={appData.secondline}
            />
          </div>
          <button className="generateBTN" onClick={getRandomMeme}>
            Load random image
          </button>
          {randomMeme !== null && (
            <div className="meme-image">
              <img
                className="imageMeme"
                src={`http://localhost:1337${randomMeme}`}
                alt="Meme Not Responding "
              />
              <h2 className="first">{appData.firstline}</h2>
              <h2 className="second">{appData.secondline}</h2>
            </div>
          )}
        </div>
      );
    }
    export default Meme;
Let's examine how the functions mentioned in the code above work in our project.
- meme(): it uses the populate parameters to retrieve all of our data from the Strapi back-end.
- getRandomMeme(): This function is used to retrieve random meme images.
- enterLine(event): We use this function to compute the text on our meme image.
Testing our project
Since the data in our application depends on Strapi, we must first start the Strapi server because the application won't run otherwise. First, open a new terminal window, change to the directory where our Strapi app was created, and launch the app by typing the following commands:
npm run develop
To run your React app:
npm start
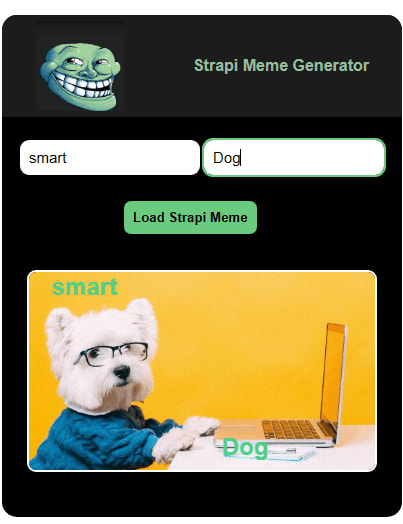
Whenever you click the Load Strapi Meme button, a random image will appear on your meme generator app, just like the image below.

Adding text to a generated meme image:

Conclusion
We used React js to create a meme generator app, add meme images to our media library, and share them on our meme field. We also obtained the media API by using the populate parameter.
Furthermore, by clicking the Load Strapi Meme button, we could send a random image from our Strapi API to our meme generator application. You can expand the functionality of your application.
Here's a link to codes on my GitHub repository.
If you would like to learn more about how to customize a Strapi and React-powered application, check these resources:
- Strapi Authentication with React
- Implementing A/B Testing With Strapi, React, and Optimizely
- Strapi Internals: Customizing the Backend
Continue discussing this topic further or connect with more people using Strapi on our Discord community. It is a great place to share your thoughts, ask questions, and participate in live discussions.


Top comments (0)