
In web security, authentication stands as a cornerstone for safeguarding sensitive data. Two prevalent methods, API tokens and JSON Web Tokens (JWTs), play pivotal roles in this landscape.
This guide provides the exploration of these mechanisms, offering insights into their generation, management, and implementation in Strapi and in building fortified web applications.
Prerequisites
The following are required to follow along with this tutorial:
- NodeJs installation on our local machine.
- Postman installation on our local machine.
- A Good understanding of Strapi - get started with this quick guide.
- Basic knowledge of authentication concepts. ## What is Authentication?
Authentication checks if an entity is who they say they are before letting them access resources.
Authentication Types
There are several authentication methods. These include:
- Username and password authentication: This is the most common form, where users provide a username and password to access server resources.
- Two-factor/Multi-factor authentication (2FA/MFA): Users must provide more than one verification method before being granted access.
- Biometric authentication: This utilizes users' physical uniqueness, such as fingerprints, facial recognition, or voice recognition.
- Single Sign-On (SSO): Users authenticate once with a central service and access multiple applications without separate logins (e.g., Google authentication).
- Token-based authentication: This uses unique tokens (e.g., API keys, JWTs) for verification instead of usernames and passwords. ## What is a REST API?
A REST API is an application programming interface that conforms to the design principles of the representational state transfer (REST) architectural style.
REST APIs communicate through HTTP requests to perform standard database functions like creating, reading, updating and deleting records (also known as CRUD) within a resource.
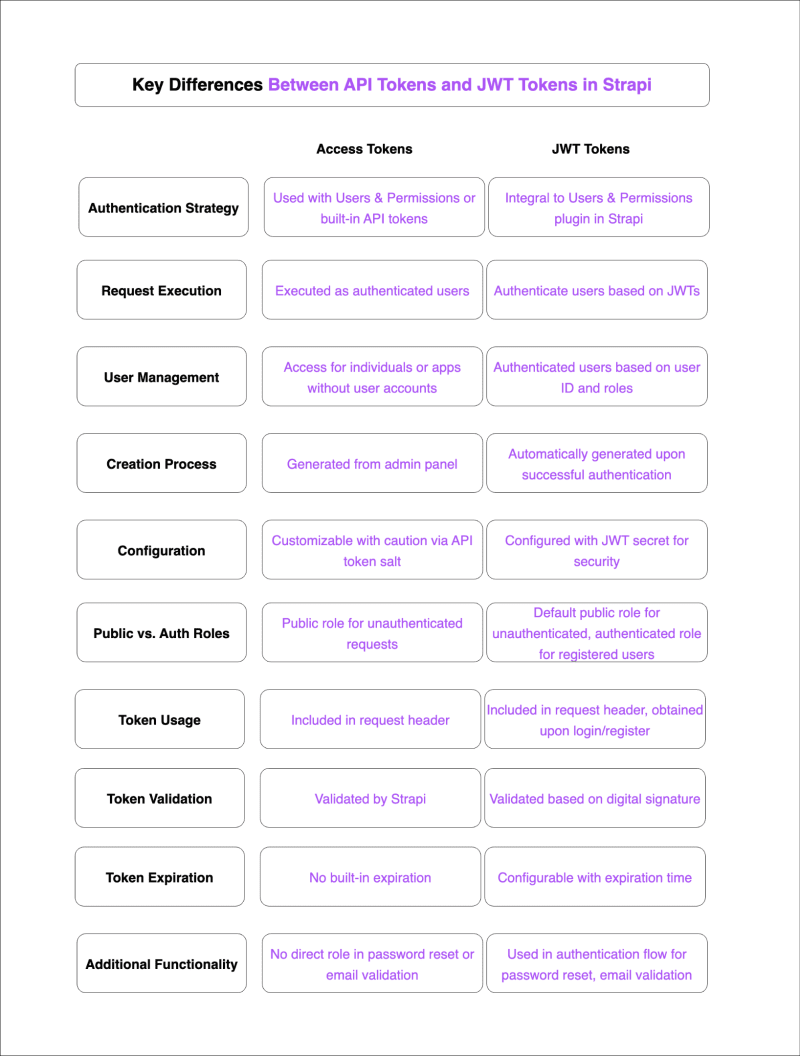
Authentication Strategies in Strapi
In this article, we will only explore the authentication strategies in Strapi. They are API Tokens and JWT Tokens.
API tokens are built into Strapi and found in the admin panel. Whereas the Users and Permission Plugin provides authentication using JWT tokens.
Without managing user accounts or making changes in the Users & Permissions plugin, users or applications can access resources using API tokens. With this, any unmanaged user or application can access resources if they make authenticated requests using an API token.
Unlike API tokens, the Users & Permissions plugin creates an access layer. With the access layer, users are matched and determine whether they can access a resource. This plugin uses JWT to authenticate users.
There must be an Authorization header with the JWT token to make authenticated requests. It should be in the bearer-token scheme, Bearer your-api-token.
Understanding API Tokens
What are API tokens and their role in authenticating and authorizing API requests?

API tokens are unique identifiers or codes that grant users or applications access to an API. These tokens are uniquely created for each client and validated by the API before access to a resource gets granted.
They allow users or clients to make requests as authenticated users.
The Basics of JSON Web Tokens (JWTs)

JWT or JSON Web Tokens is a standard for providing a secure and efficient way to transmit information representing claims between two parties.
They are used for authentication and authorization mechanisms and information exchange.
Structure
The JWT comprises three structures: the header, payload, and signature.
- Header: This comprises of 2 parts. "Type", which is JWT and the "signature". The signature can be HS256, RSA, etc. The signature defines the signing or hashing algorithm used. See example below:
{
  "alg": "HS384",
  "typ": "JWT"
}
- Payload: The payload contains the claims of the user. See example below:
{
  "id": "1",
  "name": "Strapi User",
  "admin": false
}
- Signature: By signing the encoded header, the encoded payload, a secret and the algorithm specified in the header, we get the signature. It ensures that the information sent remains unchanged along the way.
## Differences and Similarities
Pros and Cons
- API tokens do not necessarily require authentication to generate one. There must be authentication to generate a JWT token,
- Unlike API tokens, JWT tokens are stateless and eliminate the need for server-side management.
- API tokens have a payload size smaller compared to JWT tokens. JWT tokens payload size can become bloated with excessive payload data.
- JWT tokens can be issued and validated by different parties. API tokens are dependent on the issuer’s availability and reliability.
- JWT tokens are flexible in adding additional user information to the payload. API tokens are limited in the authentication context. ## Create a Collection Type
To carry out the implementation of API tokens and JWT tokens, we need to create a collection type.
Using the Content-Type Builder, create a collection type called Product and create a single field for it called name. The name field should be of type text (short text), required, and unique.

The collection type represents products that we can buy, and the name is the product name.
Using the Content Manager, proceed to create entries in the collection type:

Our collection type is ready to be accessed. Let us proceed to make some requests using Postman.
NOTE: Remember to click “publish” when creating an entry in our collection.
Implementing API tokens in Strapi
API Tokens in Strapi
In Strapi, API tokens can be managed in the admin panel. Administrators can manage API tokens from Settings > Global settings > API Tokens.

Creating an API Token
Creating an API token requires that we give it a name, as shown below. The description is optional. The token duration is required and set to 7 days, 30 days, 90 days or unlimited. The token type can be full access, custom or read-only.

API Token Types
Full Access API Token
With the full-access tokens, users get granted permission. They can make requests to any route of the Product collection. As can be seen, all actions on the product route are allowed by default and can’t be modified.

Custom API Token
By using custom API tokens, one can customize access to the product route and modify actions. As depicted in the image below, we can restrict access to the create action on the Product collection route.

Read-only API Token
The read-only API token type only grants access to the read-only actions, the find and findOne. Requests to update, create or delete a resource in the Product collection will be forbidden. See the image below.

We will use the full access token type and set the token expiration to 7 days. See the image below.

NOTE: Ensure to copy the token before leaving the page.
Make Requests Using Postman
Products are available on our Strapi server. We need to be able to send HTTP requests that will allow clients or users to perform CRUD operations on these product resources. Postman will be our tool for making requests to the Strapi REST API.
Fetch all Products (Unauthenticated Request)
We will start by fetching all the products in our Strapi backend. As shown in the image below, this route gets protected by default, and the request is forbidden. So, to fetch all products, we must make an authenticated request.

Fetch all Products (Authenticated Request)
In the request header, using the bearer-token scheme, add the “Authorization” header with the generated API token.

Also, we can add the API token by clicking the Authorization tab in Postman. Select Bearer Token from the dropdown and enter the API token.

Now, when we make a request to get all products, it will be granted.

Update a Product
With the API token, we can make an update to a product. Let us change the name of the first product item.
Start by adding the token to the Authorization header, as shown in the image below:

Proceed by adding the request body and making the request. As can be seen in the image below, the PUT request was successful.
{
  "data": {
    "name": "MacBook Pro 2024"
  }
}

Continue by making CREATE and DELETE requests.
Sending JWTs with Postman
JWT Tokens in Strapi
In Strapi, the Users and Permissions Plugin provides us with authentication through JSON Web tokens.
When we click the Settings link, under the USERS & PERMISSIONS PLUGIN section, we will find sections for managing Roles, Providers, Email Templates, and Advanced Settings.
The Role permissions come in 2 kinds: Authenticated and Public:
- Authenticated is for permissions given to authenticated users.
- Public is for permissions granted to unauthenticated users.
Set Public Endpoints
Now, click the Public > Product, and select only find and findOne endpoints. Users will access these endpoints without authentication or authorization. With this in place, unauthenticated users can see all products and any product by their ID.

Set Authenticated Endpoints
Click on Authenticated > Product, and click on Select All.
With this in place, authenticated users can access all endpoints related to the Product collection.

Generating JWT Tokens
To generate a JWT token, a user must first make an authentication request. An authentication request body must include the password and identifier of the user. The identifier could be their username or email.
There are 2 ways to create a user. We can create the user in the admin panel or make a POST request to the /api/auth/local/register endpoint. Let us do the latter:

In the image above, the request body includes the username, email and password of the new user. Upon successful request, the JWT token, along with other data, gets returned as shown below:

From the image above, the JWT in the response body represents the JWT token the new user can use to make authenticated requests.
Once the JWT token expires, we can make a **POST** request to the /api/auth/local endpoint to get a new one. In the body request, we will only supply the user’s username or email as an identifier and their password.
{
  "identifier": "user@strapi.io",
  "password": "strapiPassword"
}

Upon success, the following gets returned.

Create a Product
With the JWT token, we can perform all the actions related to the Product collection endpoint. For this reason, let us create a product. Using the bearer-token schema, add the JWT token to the Authorization header.

Add the following as the request body in Postman.
{
  "data": {
    "name": "PlayStation 5 (PS5)"
  }
}

Upon successful request, the following gets returned.

Delete a Product
Next, let us delete a product. To delete a product, we will make a DELETE request to the /api/products/[id] endpoint. The [id] here represents the ID of the product we want to delete.
Start by adding the JWT token to the Authorization header.

In the image above, we want to delete the product with an id of 1. When we make the request, we get the following:

Best Practices for API Token and JWT Management
Because API tokens and JWT tokens are required to make authenticated requests, they should be managed and prevented from unwanted and malicious use.
- Ensure that HTTPS and SSL are used for all API communications to protect API tokens and JWT tokens.
- Ensure that there is secure Storage to store API tokens and JWT both on the client and server side.
- Implement Rate Limiting on endpoints to prevent brute-force attacks and limit the number of requests per unit of time.
- Monitor and audit API usage.
- Stay up to date with best security practices.
- Implement token expiry to reduce the risks of unauthorized access. ## Conclusion
In this article, we looked into the application of authentication and the REST API. We have discovered that in Strapi, there are two strategies for making authenticated requests: API token, JWT, and others.
When choosing an authentication strategy, we have to think in such a way that it will be efficient, applicable and not just problematic after. Such as, in comparison to the API tokens, JWT tokens are stateless, and they eliminate the need for server-side management, like storing tokens in the database. Also, in terms of their payload size, API tokens are more compact than JWT tokens, which are prone to get bloated due to more payload information.
It is important to apply security practices such as HTTPS and SSL, secure storage of the tokens, rate limiting, API monitoring, etc. so that authentification requests do not come from malicious access.
Additional Resources
- https://docs.strapi.io/dev-docs/configurations/api-tokens
- https://docs.strapi.io/user-docs/settings/API-tokens
- https://docs.strapi.io/dev-docs/backend-customization/examples/authentication
- https://strapi.io/blog/how-to-create-a-refresh-token-feature-in-your-strapi-application
- https://strapi.io/blog/a-beginners-guide-to-authentication-and-authorization-in-strapi
- https://www.ibm.com/topics/rest-apis
- https://jwt.io/introduction


Top comments (0)