
Creating a Recipe Book with Strapi
Strapi is a Javascript-based headless CMS that helps you build and manage the backend of your project with ease while allowing you to use whatever technology you want on the frontend. It works really well with Next.js, a modern React framework that provides hybrid static and server rendering, Typescript support, and file-system routing, among other features.
In this article, you will learn how to use these versatile technologies together by creating a virtual recipe book. By the end, you will know how to use Next.js and Strapi to form a full-stack app. If you would like to see the code from this tutorial in its entirety, check out the GitHub repo. Fork and clone it if you would like to follow along, or expand upon it and make it your own.
Note: If you fork this project, please make sure you create recipes and categories as described later in this article, then set permissions accordingly. Running the app as is will produce an error if you do not complete those steps.
Setting Up Strapi
To set up Strapi, you first need to have Node.js and npm installed.
Then do the following:
- Create a folder for your project by running
mkdir strapi-recipesin the terminal; thencdinto that folder. - Create your Strapi project using
npx create-strapi-app@latest backend --quickstart.
Note: The quick start installation sets up Strapi with a SQLite database. Other databases and installation options are available (see CLI installation guide).
- Find that a local server will automatically start up. Navigate to
localhost:1337/adminand create an account on the admin panel using an email address.
Setting Up Next.js
Now that you have the backend set up, it’s time to set up the frontend using Next.js. To do this, open up another terminal window and navigate to the strapi-recipes folder. Then run npx create-next-app frontend. This will make a Next.js project called “frontend.” cd into that folder, then use npm run dev to start your Next.js app. You should now have your Strapi backend running on localhost:1337 and your Next.js frontend running on localhost:3000.
Implementing the Recipe Book
Now that you have both the frontend and backend running, it’s time for the fun part. For the recipe book, you will first create content-types in Strapi to represent the recipes themselves, along with recipe categories. Then you will design the appearance of the recipe book using Next.js and connect the frontend and backend using Strapi’s built-in REST API.
Creating the Collection Types
To create a collection type, go to PLUGINS > Content-Types Builder in the admin panel. Next, under COLLECTION TYPES, click Create new collection type.
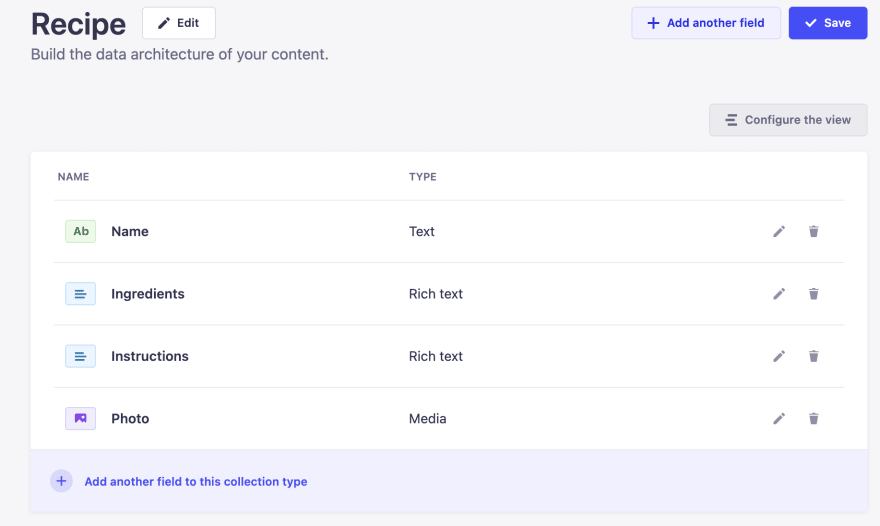
In the modal, type recipe under Display name, then click continue. This will bring up different options for the fields. For each recipe, you will want to have a name, a list of ingredients, instructions, a photo, and a recipe category (e.g., breakfast, soups, and bread), so you will need to add a field for each of these.
Add your first field by choosing Text. Type “name” in the Name field. This will be the name of your recipe. Then click the Add another field button. This time, choose Rich text. Enter “ingredients” in the Name field. Follow the same instructions to create a Rich text field named “instructions” and a Media field named “photo”.
Note that for the Media field, you should choose single media, as you will only be adding one photo per recipe for this project. Don’t worry about the category field yet. Once you have added all the fields, make sure you save your content type.
Now it’s time to create the category collection type. Use the same process as you did when you created the recipes. Click Create new collection type under COLLECTION TYPES. This one will be named “category”, and it will consist of two fields: a Text field called “category” and a relation between it and the recipe type.
Create the Text field the same way as before, then create a relation. This will link the two types together, like a foreign key in an SQL database. You will see a modal pop up like the one below.
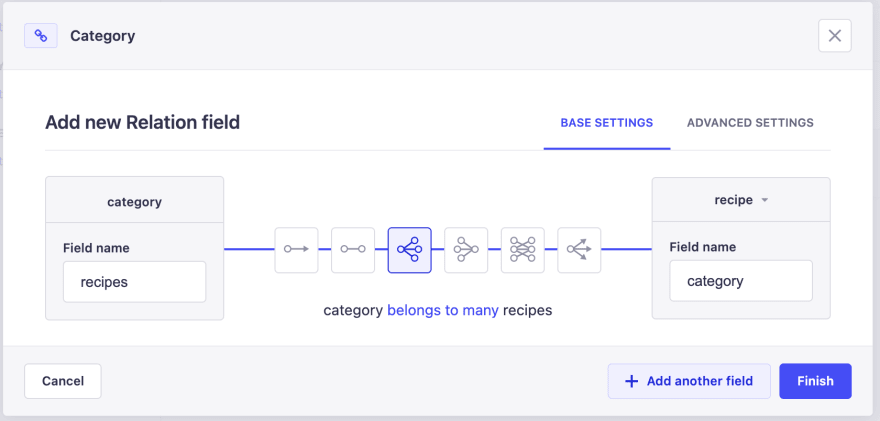
Make sure Category appears in the box on the left and Recipe appears on the right. Then choose the appropriate relationship between the two. Each category can apply to multiple recipes, so you will choose the Category belongs to many Recipes relation. Then hit Finish and Save. Your collection types are now complete.
At this point, you should create a few recipes and a few categories so you have something to display on the frontend. To do this, go to Content Manager > COLLECTION TYPES > category, then click the button to Add new entry. Type a category name in the category field, hit Save, and then hit Publish. Do this for as many categories as you want.
Then do the same thing for the recipes. Go to Content Manager > COLLECTION TYPES > recipe and click the button to Add new entry. Then fill in the fields for the recipe name, ingredients, and instructions. Add a photo if you want and choose a category from the dropdown menu on the right. Note that if you leave any text or rich text field empty, it will throw an error on the frontend later, so make sure you add some sort of data to those fields.
Once you have your collection types created and some data entered, you need to set permissions. This will ensure that your data is reachable from the frontend. Go to GENERAL > Settings > USERS & PERMISSIONS PLUGIN > Roles > Public. Check the boxes for find and findone for each of your content types. You can check to make sure this works correctly by accessing the collections using Postman. Send a GET request to localhost:1337/api/recipes and another to localhost:1337/api/categories. You should get JSON objects as responses for both.
Designing the Recipe Book
Now that your backend is up and running, it’s time to create your recipe book in Next.js. If you don’t already have your Next.js app running, navigate into the frontend folder (while keeping Strapi running in a separate terminal) and run the command npm run dev. Your Next.js app will open on localhost:3000.
Your basic recipe book will consist of recipe cards with names and photos that link to the full recipes. To accomplish this, you will create a reusable Recipe card component that will be used on index.js to display each recipe. Then you will create a page that displays each of the recipes using dynamic routing.
To start, beneath the Home component in pages/index.js, write an async getServerSideProps function to fetch the recipes from the backend. Your function should look like this:
export async function getServerSideProps() {
  const recipeRes = await fetch('http://localhost:1337/api/recipes?populate=*');
  const categoryRes = await fetch('http://localhost:1337/api/categories');

  const recipes = await recipeRes.json();
  const categories = await categoryRes.json();

  return {
    props: {
      recipes,
      categories,
    },
  };
}
Notice the populate parameter used with the recipes endpoint. By default, relations are not populated when fetching entries, so you need to specify that you want those returned as well. To do this, you can either specify the desired relations in the URL, or use a wildcard (*) to populate all relations, as shown above. This way, the categories associated with each recipe will be accessible to the frontend.
Next, create a components folder and a file inside that for your recipe card component. This component will take the recipe object as an argument and display the recipe name, image, and category.
const Recipe = ({recipe}) => {
  return (
    <div className='recipe-card'>
      <div className="recipe-name"><h3>{recipe.attributes.name}</h3></div>
      <img src={`http://localhost:1337${recipe.attributes.photo.data.attributes.formats.thumbnail.url}`} alt={recipe.name} className="recipe-image" />

      <span className='category'>{recipe.attributes.category.data.attributes.category}</span>
    </div>
  )
  }

  export default Recipe;
Now that you have your recipe card component, go back to pages/index.js and delete the contents of the Home component. Replace them with the following, which maps through the recipe object retrieved from the backend and, for each recipe, renders a Recipe component:
export default function Home({ recipes }) {
  return (
    <div>
      <Head>
        <title>Strapi Recipe Book</title>
      </Head>
      <div id="recipe-container">
        {recipes.data.map((recipe) => <Recipe recipe={recipe} / key={recipe.data.id}>)}
      </div>
    </div>
  );
}
You can do some basic styling here to make your cards look nicer. The focus of this tutorial isn’t the CSS, but you can get the result below using basic CSS with CSS Grid.

Creating Recipe Pages Using Dynamic Routes
Right now, you can see the names and photos of the recipes, but you can’t see the full recipe. In Next.js, you can use dynamic routes to create a page that will show a single recipe based on its ID.
To do this, create a folder in pages called recipe, then create a file in that folder called [id].js. The code in this file will look something like this:
import { marked } from 'marked';
import Link from 'next/link';

const fullRecipe = ({ recipe }) => {
  const getMarkdownText = (text) => {
    const formattedText = marked(text);
    return { __html: formattedText };
  };
  return (
    <div className="full-recipe">
      <h1>{recipe.attributes.name}</h1>
      <img
        src={`http://localhost:1337${recipe.attributes.photo.data.attributes.formats.medium.url}`}
        alt={recipe.attributes.name}
        width={400}
      />
      <h3>Ingredients</h3>
      <div
        dangerouslySetInnerHTML={getMarkdownText(recipe.attributes.ingredients)}
      ></div>
      <h3>Instructions</h3>
      <div
        dangerouslySetInnerHTML={getMarkdownText(
          recipe.attributes.instructions
        )}
      ></div>
      <Link href="/">
        <button className="home">Home</button>
      </Link>
    </div>
  );
};

export default fullRecipe;

export async function getStaticPaths() {
  const response = await fetch('http://localhost:1337/api/recipes?populate=*');
  const recipes = await response.json();
  return {
    paths: recipes.data.map((recipe) => ({
      params: {
        id: recipe.id.toString(),
      },
    })),
    fallback: false,
  };
}
export async function getStaticProps({ params }) {
  const response = await fetch(
    `http://localhost:1337/api/recipes/${params.id}?populate=*`
  );

  const recipe = await response.json();

  return {
    props: { recipe: recipe.data },
    revalidate: 1,
  };
}
There’s a lot in there, so focus first on the getStaticPaths function. This function gets called at build time and pre-renders paths for you. In this case, you are pre-rendering paths based on recipe ID. (Note that you need to convert the ID to a string for this to work correctly.)
Next, look at the getStaticProps function. This is basically the same as the function you created in index.js, but here, it is fetching a single recipe based on the ID in the URL. For example, localhost:3000/recipe/1 will fetch the recipe with the ID number of 1.
Finally, look at the fullRecipe component. This takes in the recipe object from the props and displays all the fields. You will notice that there is a library called Marked being imported here then used in a small function called getMarkdownText. This is necessary because some of the fields you want to display (Ingredients and Instructions) are rich text types. Rich text in Strapi uses Markdown, but the formatting you used when creating your recipes will not automatically appear correctly on the frontend. You will need to use a library (like Marked) to convert the Markdown formatting to HTML. To download and install Marked, simply run npm install marked.
Note that to display converted Markdown in React, you must use dangerouslySetInnerHTML, the React alternative to innerHTML.

Once you have your full recipe pages set up, go back to your recipe component and add a link to them. In the code below, you can see that the recipe component now has a link in it to the full recipe.
 const Recipe = ({recipe}) => {

  return (
    <div className='recipe-card'>
      <div className="recipe-name"><a href={`http://localhost:3000/recipe/${recipe.id}`}><h3>{recipe.attributes.name}</h3></a></div>
      <img src={`http://localhost:1337${recipe.attributes.photo.data.attributes.formats.thumbnail.url}`} alt={recipe.attributes.name} className="recipe-image" />

      <span className='category'>{recipe.attributes.category.data.attributes.category}</span>
    </div>
  )
  }

  export default Recipe;
Conclusion
Strapi and Next.js are a great combination and are an excellent alternative to a traditional CMS if you want to have more control over how your content is managed and presented. In this article, you learned how to make a simple recipe book using these technologies, but there are tons of other types of projects you can create using your new skills. To learn more about Strapi, check out their docs.

Top comments (1)
I like your information!! how to cast a revenge spell at home